
I have mentioned in the past how much writing I do for work. When I write I prefer having two monitors. Unfortunately, I only have second monitors at home and work. I prefer writing grants, white-papers, and manuscripts in local coffee shops or, my favorite spot, the public library. Previously, when writing in these alternate locations I had to make due with the 13" screen of my Macbook Air. I had tried two-screen solutions that used my iPad Air as a second monitor--but they had too much lag to be functional. Recently, I discovered a product called Duet Display. Instead of using a wireless connection, Duet uses a Thunderbolt cable to connect my computer and iPad. Duet was easy to set up and there is absolutely no lag. I can now, thanks to Duet, take my dual screen set-up to any location. My only complaint, the app's cost ($15.99). Still, for the problem Duet solves, I've found it well worth the money.
Automated Dictation and Task Delegation using Evernote and Workflow App
As usual, David Sparks (Macsparky) inspired me. After finishing the MacSparky Workflow Video Field Guide, I decided to try my chops at buidling something new. As I was exploring the Gallery (the pre-baked workflows that come with the app), one of the examples caught my eye; "Recording to Evernote."I have a twenty minute commute between my home and work. When not listening to audio books, I attempt to be productive. While driving, I'm frustrated by my inability to delegate tasks to my administrative assistant. Before Workflow, in order to send a request (or dictation), I'd have to ask Siri to transcribe an email and then hope for the best. As I'm sure you're aware, Siri makes many mistakes. It's both difficult and unsafe to proof while driving. Siri was not a viable option.That's where Workflow comes in. I built a Workflow that records my voice then, at the same time, sends a link to both my admin and to Omnifocus. Here's how I did it.
Add the "Recording to Evernote" from the Gallery
First, download Workflow. Once you've installed the app, click on the "Recording to Evernote" workflow in the Gallery. Select "Get Workflow." Your workflow will be added to your "My Workflows" Area. Now it’s time to edit.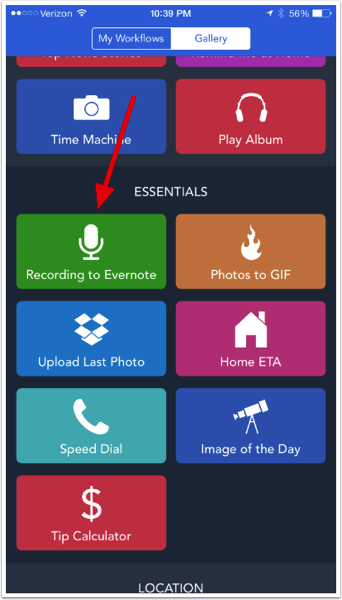
Programming the workflow
I didn't change any of the programming at the beginning of the script, but you can.
Programming the workflow - screen 2
Here is where I altering and appended the built in script:
- (1) I customized the name of the note and included the current date variable
- (2) After the audio note is recorded, the file is saved to Evernote. "Get Note Link" retrieves the unique URL for this brand new note.
- (3) "Copy to Clipboard" passes the URL of the audio to the clipboard.
- (4) "Send email" command takes the clipboard and pastes it into my email
- (5) I put my admin's email address is in the "To:" field
- (6) I included my OmniFocus MailDrop email address in the "Bcc" field (so I can track what I've delegated in Omnifocus).
- (7) I customized the Subject Field (and appended the current date)

Add to my Home Screen
Finally, when I was finished programming (and after I customized the color and icon of the button), I added the button to my HomeScreen. Now, when I touch the button a screen comes up that reminds me to "tap to record." I tap, record my message, and then tap again. Workflow automatically saves the recording to Evernote then sends two emails: one to my admin (with a link to the audio recording) and one to my Omnifocus Inbox (where I can keep track of the delegated task).As you can see, Workflow makes automation ridiculously easy. I hope you find this simple application useful.
Macsparky Field Guide on iOS Workflow App
Kudos to my friend and Mac Ninja David Sparks and his latest Macsparky Field Guide. His latest effort focuses on the iOS automation app, Workflow. In usual Macsparky fashion, David makes what might be an intimidating program into something that’s both understandable and fun. The one hour video is chock full of examples and useful workflows that touch on Maps, Photos, number calculation and much, much more. The screencast has useful stuff for everyone from beginners to seasoned Mac veterans. Please support David to keep these excellent field guides coming.
Updated Keyboard Maestro Script for Obtaining Scholarly Information through Duke
In a previous entry, I published my Keyboard Maestro script that I often use to obtain scholarly literature. A few months ago, Duke’s Medical Center Library updated their website, which broke my script.
I finally had a chance to re-write the script today.
Here is how it works:
- Highlight any text (web page, PDF, Word Document, etc.) and hit Command-Shift R
- the script will copy the highlighted text
- then it will launch Duke’s Medical Center Library Web Page
- it will paste the copied text into the search field of the web page
- and then submit the search to Pubmed
All this with a single key stroke–saves me tons of time.
If you’re not a Duke, you will have to modify the URL and search boxes to conform to your library of choice.
Don’t have Keyboard Maestro? Get a demo!
Enjoy.
Addendum, May 17, 2014: Several folks reported the script didn’t work for them. I’ve modified the script again. You can download the updated script here, and import it into Keyboard Maestro. When you download the macro and before you import, you’ll have to remove the .txt at the end of the file (so it will be recognized as a Keyboard Maestro file).
Capturing Ideas and Thoughts on the Move
As I mentioned in previous entries. I'm an avid audiobook listener. I have a twenty minute commute between my home and work. Using my forty minutes of commute time in addition to listening when I exercise, I easily go through two audiobooks a month.
I listen to wide range of titles: to give you an idea I am currently listening to The Creative Destruction of Medicine by Eric Topol and Top Dog: The Science of Winning and Losing by Po Bronson.
Often, when listening to audiobooks in my car, I have a flash of insight. It might be an idea for a research project, and idea for an entry in my blog, or a quotation I'd like to capture. Although I could pull off the road and type my thoughts into my device, I've found a more efficient method that works when I'm on the move. Before you read more, please go through my post on Capturing Ideas.
Okay, back? Now let's talk about what I do to capture ideas on the move.
I'm an avid user of Siri. If you don't have a Siri enabled iOS device, you won't be able to take advantage of this workflow. First I ask Siri to launch TextExpander. Then I ask Siri to launch Drafts. Within Drafts I hit the Microphone Icon on the bottom of the virtual keyboard and dictate a TextExpander Snippet Trigger and then hit done. TextExpander expands the snippet for me. For instance, if I dictate: "dot i d x" Textexpander launches my personal ideas snippet. Next, I hit the Mic Button again and dictate my idea and then hit done. Siri converts my voice to text.
I've configured my Drafts menu so I know the "send to Notesy" choice is first. I wait until I've parked my car before sending my new note(s) from Drafts to Notesy (letting Notesy sync while walking to my office).
Using this method, I've captured many ideas that would have been lost had I waited until I reached my destination. I hope it helps you too.
Workflow: Capturing Ideas
Ideas are my lifeblood. Whether ideas for writing projects, grants, or to-dos, I need a simple method to get the ideas out of my head and into my system. An idea might come to me during a meeting, in the car, or on a walk. My system has to be fast, ubiquitous, and flexible. The less thought I have to put into capturing my ideas, the better.
Over time, my workflow for capturing ideas has evolved. You won't be surprised my system revolves around plaintext.
Here is the software you'll need for this workflow (you may also want to read my previous entries on why I use plaintext, Launchbar, and Drafts):
- nvALT 2.1 - Notational Velocity Fork
- TextExpander
- TextExpander Touch
- LaunchBar
- Dropbox
- Simplenote Notesy
- Drafts for iPhone
- Drafts for iPad
TextExpander allows me to type short key combinations (called Snippets) that expand into words, phrases, or even pictures. I use TextExpander constantly to type things like my email address (.hm expands to my home email, .wm expands to my professional email). I use similar combinations for my home address, my city, state, and my email signature. TextExpander is available for iOS devices (called TextExpander Touch) and is integrated into an increasing number of iOS programs. Under preferences, I choose to keep TextExpander Snippets synchronized using DropBox. I highly recommend this--identical snippets are then available on your Mac, iPhone, and iPad only needing to be entered once.
One must also have nvALT - Notational Velocity Fork installed on your Mac. Notational Velocity Fork is a special version of Notational Velocity that was developed by the genius, Bret Terpstra. It allows me to create text notes seamlessly and has a lightning fast search function. nvALT launches and I just start typing. Whatever I type becomes the title of my new note (after I hit return) while simultaneously searching the nvALT database for matching text strings. Hitting return finalizes the title and move the cursor down to a full note area. It's very fast. You need to check three settings in nvALT. First, be sure to set the "Read from Notes" drop-down menu to your desired folder. I synchronize to my nvALT folder in DropBox. Second, under the "Synchronization" Tab, make sure SimpleNote synchronization is OFF. Finally, under the "Storage" Tab, make sure you're saving as plaintext (not as RTF or HTML). If you choose this set-up, you won't be able to encrypt the nvALT database, but the trade-off in accessibility for me is well worth the price.
Next, make sure you have Simplenote Notesy installed on your iPhone and iPad. Notesy is a note taking program that synchronizes between your Mac and iOS devices using DropBox. Make sure Notesy is configured to synchronize with your nvALT folder in Dropbox hierarchy. I use Notesy as a conduit and for searches, but I rarely use it for writing.
The final programs you'll need are Drafts for iPhone and Drafts for iPad. As I discussed in my previous entry, Drafts is my go-to note taking app and has a place on the coveted home-screen of both my iPhone and iPad. I can get information entered quickly. Only after the information is captured, do I need to decide where to route it. Drafts gives me dozens of possibilities that I can personalize to show or hide.
IDEAS WORKFLOW: when sitting at my Mac and and idea hits me I invoke Launchbar (hitting Command-Space), type nv then return--launching nvAlt. Depending on what the idea is, I use TextExpander snippets. For instance ".wix" automatically types the following: WiPPPx - Untitled - 2012-12-10. I have a similar snippet for project ideas ".idx" expands to IdeaX - Untitled - 2012-12-10, and many others as well. All I have to do is change the "Untitled" to something descriptive, hit return and start typing. My idea or writing snippet is captured to nvALT (and is thus searchable via Spotlight, nvALT, or any other search utility I prefer). Because I've set up synchronization these idea files are available on my iPhone or iPad regardless of location.
If i'm on my iPad or iPhone and want to capture an idea, I use Drafts. Once I've completed the thought (using typing or voice entry), I must enter a title. Since Drafts is TextExpander Touch enabled, I can use my same Snippets to name the idea to convention (make sure TextExpander is open on your iPad or iPhone for the text expansion to work). I then route the completed Drafts note to Notesy (via the Drafts interface). It is saved, synchronized, and available on all my devices, all the time.
I can then search and find single or multiple ideas using the nvALT search interface. If I type "IdeaX" in the nvALT search box, ALL my ideas are returned in neat order. If, instead, I'm searching for a specific idea, I can be more explicit with my search terms, finding related items or even a single item.
Although this workflow takes a bit of set-up, the payoff is immense. Over time, I have accumulated hundreds of potential projects, text snippets, and more using this method. Many of them would have been lost, had I not had a quick and convenient way to capture them.
I hope you find the workflow useful.
Appended March 2, 2013: Read this entry on why I switched from SimpleNote to Notesy.