Tempo: The Smart Calendar for your Smart Phone

I have slowly been putting together a narrative of my iPhone home screen for MacSparky (David Sparks). One of the questions he asked me was what app was still missing from iOS. Before last week, I would have answered a decent calendar. That was before I discovered Tempo.

Tempo, is a new app by the makers of Siri (Stanford Research Institute). I’ve been testing it for about a week and have been incredibly impressed.

First, I had to link my personal email account, Facebook and LinkedIn. I was able to set this up in 2 minutes (I avoided linking my work address, due to concerns over corporate privacy). Once this was done, Tempo went to work.

What does Tempo do? All the following and more:

  • Scans email for documents and attachments relevant to my upcoming meetings.
  • Imports key information about attendees into my Tempo calendar entry (things like contact information, phone number, email addresses)
  • Allows me to quickly reach any or all attendees via phone, email or text from within Tempo.
  • Dials conference call numbers, including passcodes! Hallelujah!
  • Sends a pre-configured "running-late" email or text.
  • Reminds me to wish my contacts “Happy Birthday!”
  • Let’s me browse meeting attendees LinkedIn Profiles.
  • Integrates with Siri
  • Prompts me to send a pre-configured text if my phone rings during a meeting.

Tempo’s motto is “Your smartphone deserves a smart calendar – you’ll love the difference.” And I do! Download your free copy in the App Store.

Capturing Ideas and Thoughts on the Move

As I mentioned in previous entries. I'm an avid audiobook listener. I have a twenty minute commute between my home and work. Using my forty minutes of commute time in addition to listening when I exercise, I easily go through two audiobooks a month.

I listen to wide range of titles: to give you an idea I am currently listening to The Creative Destruction of Medicine by Eric Topol and Top Dog: The Science of Winning and Losing by Po Bronson.

Often, when listening to audiobooks in my car, I have a flash of insight. It might be an idea for a research project, and idea for an entry in my blog, or a quotation I'd like to capture. Although I could pull off the road and type my thoughts into my device, I've found a more efficient method that works when I'm on the move. Before you read more, please go through my post on Capturing Ideas.

Okay, back? Now let's talk about what I do to capture ideas on the move.

I'm an avid user of Siri. If you don't have a Siri enabled iOS device, you won't be able to take advantage of this workflow. First I ask Siri to launch TextExpander. Then I ask Siri to launch Drafts. Within Drafts I hit the Microphone Icon on the bottom of the virtual keyboard and dictate a TextExpander Snippet Trigger and then hit done. TextExpander expands the snippet for me. For instance, if I dictate: "dot i d x" Textexpander launches my personal ideas snippet. Next, I hit the Mic Button again and dictate my idea and then hit done. Siri converts my voice to text.

I've configured my Drafts menu so I know the "send to Notesy" choice is first. I wait until I've parked my car before sending my new note(s) from Drafts to Notesy (letting Notesy sync while walking to my office).

Using this method, I've captured many ideas that would have been lost had I waited until I reached my destination. I hope it helps you too.

OmniFocus Continued: Capturing Information in OmniFocus

In my last entry, I spoke about the power of Omnifocus. To get the most from the program, you must have easy ways to capture data. As I mentioned in my last entry, there are versions of Omnifocus available for the Mac OS as well as the IOS–I own them all. In this blog entry (and accompanying screencast) I’ll discuss the main ways I get information into Omnifocus.

Direct Entry

The least complicated way of entering a task is by manually entering it into the program itself. There are two ways to do this: (1) launch Omnifocus: Select Inbox: and type in the new Action (remember to frame the new item with a verb) or (2) Launch Omnifocus: select File: select “Quick Entry”: and enter the action.

Using the Quick Entry Box, you can capture a task and process it later, or if you expand the columns of the Quick Entry box (using the gear icon) you can type in the context, start date, etc at the time of entry. I try to estimate the amount of time it will take to complete the item at the time of entry.

If this is the first item in a new project, type in the name of the project in the Project column and then hit Command-Return. This will create a new project in the Omnifocus database. If you designate a Project while entering your item, it will be filed directly into that project. If you don’t, it will end up in your Inbox for later processing. Of all the ways to get information into Omnifocus, I find direct entry the most cumbersome.

Clippings

Clippings are incredibly handy and convenient. You highlight what you want, hit a key combination and, boom, Omnifocus launches and creates your Action item (with a link back to original item you highlighted). I use this method of capture Actions dozens of times each day. In order to get this to work you must set up your preferences in a specific way.

To set up Clippings go to the menu bar, and choose Omnifocus, then choose Preferences. In the Preferences menu click on the Clippings Tab. Define a Clippings Shortcut that works for you (I use the Command-Space-Period). Next you have to choose whether the clipped item shows up in Quick Entry (which allows you to do some additional quick editing) or whether you want the item dumped directly into your Inbox (I use Quick Entry).

Underneath the Copy Clipping to radio buttons are the different programs that work with Clipping. You can learn more about how Omnifocus will handle the clipping by highlighting each individual item next to the check box. I have all the programs checked. The most important selection is the final item: Any Application- make sure this is checked. You can then make and Action item out of information anywhere on your computer.

There is a special add-on for Apple’s Mail.app called the Clip-o-Tron 3000. Make sure this is installed (the installer is in the bottom right hand corner of the Clippings preference panel). The Clip-o-Tron let’s you highlight an email message and then use the key combination you designated above to automagically make a new Omnifocus Action. This new action contains the text of the email as a note AND a link back to the original email in your email database. This is my most common method of capturing Action items into Omnifocus.

If you’ve set up Omnifocus to synchronize (more on that in another entry)–the new Action will show up on all of your devices. Both Direct Entry and Clipping describe how I capture information from my MacBook Pro. Direct Entry also works on the iPad and iPhone. But I find myself usually using a third method to capture information from my iOS devices.

Capturing Information by Sending email

I’ve found I use my iPad more than my laptop these days. Unfortunately, capturing information is less convenient on my iPad. How do I get around this shortcoming yet maintain my productivity? By using email!

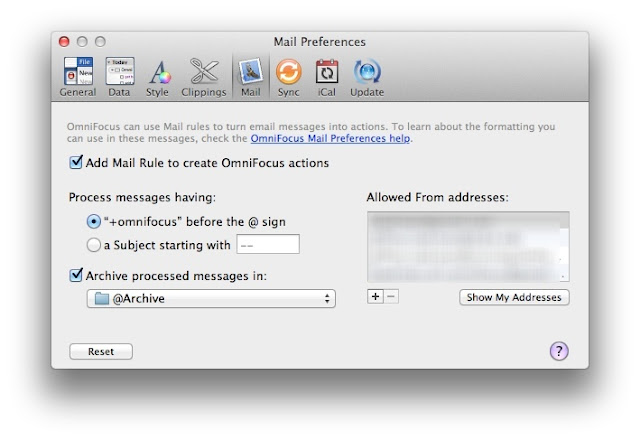
Open Preferences under Omnifocus menu bar and click on the Mail Tab. Make sure that the Mail Rule to create Omnifocus actions is checked. Next, look at the options under “Process messages having: radio buttons. I use the ”+omnifocus" before the @ sign option ( found it’s easier to have mail autocomplete a mail address than navigating to the subject line and typing). Next, you can choose the processed messages to be filed in a dedicated folder (I have a specific folder called at @Archive). If you leave this unchecked, the item will just remain in your email Inbox. Finally, (and critically) you must specify which e-mail addresses Omnifocus will accept mail from (I use all of my current e-mail addresses).

Now open Mail.app and select Preferences. Select the Rules Tab. Omnifocus should have placed a rule for you to edit. Here is how I’ve configured my “Send to OmniFocus” Rule.


Once configured, all I have to do is send an email to myself inserting +omnifocus just before the @ sign in the email address. When Mail.app is launched on my MacBook Pro, the item is automatically processed by Omnifocus and filed into the appropriate folder.

This is a handy method to use when you are reading email or a web page on your iPhone or iPad. I forward the email (or send a link to the web page) using my +omnifocus email address. This method  of capture is powerful, but what if I'm unable to safely send an email to myself yet want to capture something to OmniFocus (say, perhaps, while  commuting in my car or walking from one location to another)? It turns out that’s possible too, using Siri!

Using Siri to Capture to OmniFocus

This final method works only if you have an iPhone 4S with SIRI. As with the other methods, it takes a bit of configuration.

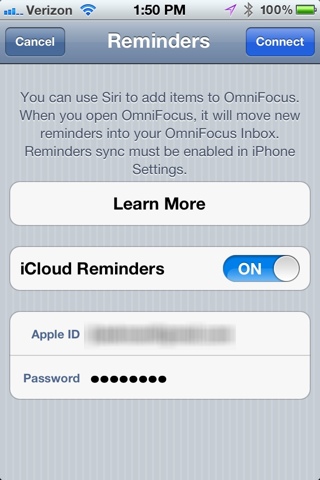
You must have Omnifocus installed on your iPhone. Launch Omnifocus on your phone and on the main Omnifocus Home Screen choose the Settings button (looks like a gear). Under Capture select the iCloud Reminders menu.

Make sure iCloud Reminders is turned ON. You also must enter your Apple ID and Password. Once this is configured, then hit the “Connect” button.

Siri understands two commands for OmniFocus. If I ask Siri to "Remember to..." the entry will be placed in my Inbox without an associated time. If I ask Siri to “Remind me to…..” do anything, for instance: “Remind me at 10am to call Dr. Smith about Patient Y’s operative plan,” a timed entry is placed in the OmniFocus Inbox and an alarm will go off at the requested time. What really happens is the entry is entered into Apple’s native Reminders App but when OmniFocus is launched, the reminder is transferred to your Inbox and the Apple Reminder is erased. The Omnifocus Inbox synchronizes with all your other devices.

The SIRI "Remind me to..." entry is context sensitive–if it’s before the time I specified, an alarm will go off to remind me to call today. If it’s after the time I specified, the alarm will be set for tomorrow.

I find this method of entry especially useful to capture items during my commute to and from work or when I’m walking between one location and another. In my opinion, this is one of the best applications of the SIRI technology–and has improved my productivity immensely.

Conclusion

I’m a heavy user of OmniFocus. In fact, Omnifocus is the hub of almost all of my workflows. During a typical day I’m inputting information constantly from many different sources. In this entry, I’ve covered the four most common ways I capture information into OmniFocus.

In my next Omnifocus entry, I’ll discuss how I organize and use Omnifocus in my daily work (and in the process discuss some of its strengths and limitations).

Until next time! Jeff Taekman


Omnifocus 1: OmniFocus-The Center of The WIPPP

I thought I’d kick off my blog with a discussion of one of my most critical pieces of software, Omnifocus by the Omni Group. Although I have modified and tweaked David Allen’s system to work for me (more on this in another entry), the software is based on David Allen’s Getting Things Done (GTD). There are versions for my Mac, my iPad, and my iPhone.

In a nutshell, Omnifocus serves as the central hub of organization for my personal and professional life. David Allen’s method depends on getting stuff out of your head and into a holding place called your Inbox. Each time you are confronted with something to do you have three choices: Do it, Delegate it, or Defer it. If you can to do it immediately (in 2 minutes or less), you should do it right away, otherwise, if not delegated,  the task should be sent to your Inbox for processing.

Core concepts to understand about OmniFocus:

  • Inbox is where you dump (capture) everything for further processing. The Inbox is a temporary holding area to be processed daily. 
  • Actions are single events. Actions should always start with a verb. An example of a good actionable event would be: “Download my CME certificate from the American Society of Anesthesiologist Meeting.” 
  • Projects are collections of two or more Actions. Projects can be defined as sequential (each task must be completed in order) or parallel (each task can be completed at any time). 
  • Contexts are where (or what) you need to complete the Action. My contexts include email, call, errands, Mac:Anywhere, Mac:Online, work, home, etc.

Omnifocus Basics-Items, Projects, Contexts, and the Inbox

Once a day (I typically do it in the evening), I sort through my inbox and assign each item a project (see below) and a context (where the item will be completed). In addition, I typically add a start date and projected time to each item. I only use a due date if the item is important AND has a hard stop.

Sample Project-Renewing my Medical License

I know each year on my birthday I have to renew my medical license and submit it to the Credentialing Office.There are numerous tasks I have to complete to make this happen. I have to submit documentation on my professional education, log the hours into the Medical Board’s web site, pay my annual license fee, download my updated license, and send the license to Credentialing.

Let’s assume I wasn’t vigilant in collecting all my CME certificates, and thus have to contact the organizing body of each meeting to obtain my credit hours.

The items in this hypothetical sequential Project called Annual License Renewal (with context in parenthesis) would be: (1) download CME certificates (Mac: Online) , (2) enter hours and dates into personal spreadsheet (Mac:Anywhere), (3) log on to Medical Board Web site, enter information and pay fee (Mac:Online), (4) Download renewed license (Mac:Online), (5) email license to hospital credentialing (email). The project has a hard stop (my birthday) past which I would not be able to practice.

You’ll notice I used only a few contexts in this example. All in all, I have about fifteen. My personal contexts include: Home, Work, email, phone call, Mac Anywhere, Mac Online, iPad, iPhone, or Tech–for any device.

Why Take the Time?

Once you have your tasks in OmniFocus, the fun begins. Omnifocus lets you sort your lists in really useful ways–called Perspectives. Instead of looking at my projects, I can sort my to-do’s by contexts–having it show me the emails I must send across all my projects, or, in another example, what I need to do on my Mac while online. If I have only a few minutes, I can ask OmniFocus to display items tagged as t 5 minutes or less.

Perspectives are very customizable–the customizbility is where the power of Omnifocus outshines other GTD managers such as Things. I personally have about a dozen different perspectives I use to slice and dice my Omnifocus data. During the day, I refer to my lists dozens of times, usually in a Context mode. At the end of the day, as I’m processing new to-dos, I work primarily in a Project view.

My data backs up to my Dropbox, and syncs to the cloud (there are several different sync methods available). My database is accessible with an iPad and/or iPhone client-always current and always with me. As I add new information in iOS, the item turns up in my Mac-based Omnifocus client. Synchronized, powerful, and simple-very Mac like.

In a single day I’ll usually add information to my Inbox in one of four ways: clipping, direct entry, email, or through Siri. Getting information into OmniFocus will be the topic of my next entry.

In conclusion–OmniFocus is an indispensable tool for personal and productivity. If you aren’t familiar with it you should run, (not walk) to your computer and download it immediately.