

One of the most popular entries on WIPPP has been my 2015 Writing Workflow. My workflow has changed substantially over the last several years. I thought I'd share what I'm currently doing.
Read moreReading, extracting and storing scholarly information to supercharge the writing process


Bookends has completely replaced Papers.app as my citation manager. Despite this change, my method of information gathering has changed little since I covered the topic, except for one major addition. I am now finding the majority of information through qxMD Read.My workflow for extraction of annotations differs a bit from when I was using Papers. I now use the combination of Bookends and Highlights.app to extract each of my annotations and notes as separate files. In addition, after highlighting, I’ve been extracting the entire manuscripts in 1-4 paragraph pieces.The whole purpose of extracting annotations and full text from each manuscript is to gain granular access to the information I’ve read. Through its "see also" feature, Devonthink can identify information I’m looking for. But more importantly Devonthink finds related content based on the context of my original query.After importing a manuscript into Bookends, the document becomes available on all my devices. Bookends outshines Papers in its built-in annotation tools as well as its seamless syncing between iOS and Mac.
My current preference is reading PDFs on a 12.9" iPad Pro along with an Apple Pencil. In a pinch, I’ll annotate on my iPhone. On my first pass through an article, using Bookend's built-in tools, I highlight annotations and jot notes in green. I use blue to highlight quotes I wish to use verbatim. When I’m finished annotating, I add the keyword RFP (ready for processing) to the manuscript in the Bookend database.
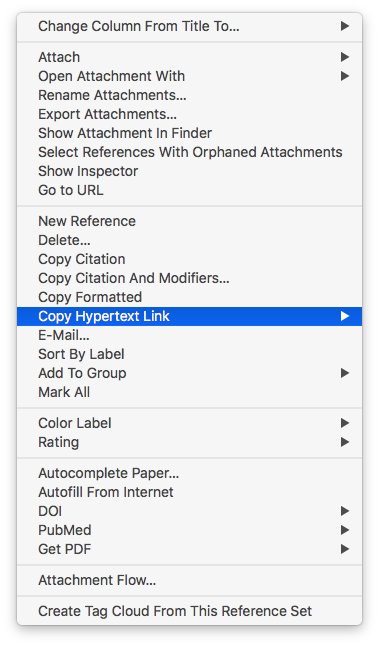
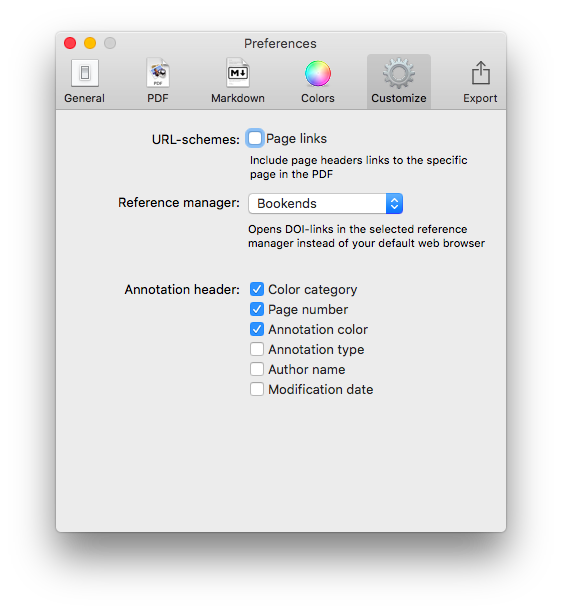
I have a Smart Folder set up in Bookends that finds the Keyword RFP. Uzsing this method, I can batch process multiple PDFs when I get to my Mac.When I'm ready to extract the information from the PDF into my Devonthink writing database, I export the PDF to my desktop and append the exported file’s name with FT (for fulltext).On my desktop, I open the file with Highlights. I use Copy Hypertext Link:Copy as Text from Bookends, and then open the “Edit” Tab in Highlights. Using use the text URL copied from Bookends to make a markdown link back to the Bookends Reference.When I export my annotations to Devonthink, the URL link will be appended to each file. Clicking the link within any extracted file takes me directly back to the reference in Bookends.I then turn my attention to Highlights.app. I make sure the annotations color preference is checked in Highlights.app. When checked, this preference will append the color of the highlight in each note.
Within Highlights, I use yellow to mark up the entire document over the top of my previous annotations. I highlight in 1-4 paragraph chunks. I also highlight the text of each table and figure.Once I'm done highlighting the entire paper, from within Highlights.app, I export my annotations to Devonthink from the Highlights.app menu. The annotations are saved as individual files to my Devonthink Inbox. I move the folder from the Devonthink Inbox to my desktop and then use Launchbar to move file from my desktop to my annotations folder. I put the desktop PDF in the trash, replace the RFP keyword in Bookends with DTx to remind me I've extracted the paper.
Since I’ve set up my Devonthink database to index this folder,the next time I launch Devonthink, the new information is catalogued and available for writing. The new information is also transferred to Devonthink ToGo to use while writing on my iPad.Using the Artificial Intelligence of Devonthink. I can quickly find related information. When I find an item in my database I want to include in my paper, clicking the link in the annotation takes me directly to the paper in Bookends.app.Using this method, I'm able to take full advantage of the Devonthink AI. Queries within Devonthink simultaneously find annotations, chunks of text and full manuscripts related to my search. I find this workflow invaluable when writing scholarly information.
***This workflow has been modified from here to the end-Please see Modification to Reading, Extracting And Storing Scholarly Information To Supercharge The Writing Process to see what I do instead.***
Highlights.app Redux
I was too quick to judge the program Highlights. I gave Highlights a second chance, and although not perfect, the app is slowly winning me over. Highlights has greatly sped up the extraction of information from my reading.First a little background. I use Papers for my PDF and bibliographic management. I’ve written about how I extract highlights and annotations into individual files along with their relevant references. The reason to go to this trouble is to enable Devonthink’s artificial intelligence. The Devonthink AI uses word count to find related information in other files. I use this method extensively in my writing of grants and manuscripts. With my previous method, I found by adding references to each annotation (thus similar words) I was interfering with Devonthink’s ability to find relevant information. In order to improve Devonthink’s accuracy, I stopped adding references to each individual annotation. Instead, I merely include a Papers Link back to the original file.Highlights shows the annotations you make in the app's right-hand column. A pop-up interface within Highlights allows you to make comments, underline , change colors, etc. The killer feature of Highlights is single-command extraction of each annotation / comment to its own file. This feature allows me to extract highlights (and metadata) without having to invoke my Keyboard Maestro macros. When the data is extracted into Devonthink, the individual files are in Markdown. This makes the extracted information easy to view and edit.Although I’m more enthusiastic about Highlights, there are several quirks you should understand:
When Highlights explodes your annotations into individual files, it prepends the original file’s name. If you use Highlights from within Papers (e.g. selecting Highlights as your PDF reader of choice from within Papers) you will end up with a ridiculous, machine based title in your metadata. This is not Highlights fault. The use of non-intuitive file names is one of my pet peeves about Papers. The workaround is to export a copy of the PDF to your Desktop and then launch the exported file using Highlights. Using this method, the author’s name and the title of the manuscript along with the year of publication are all prepended to each markdown file.
After reading and highlighting, I edit the markdown headers in Highlights (choosing the edit tab in the annotations window). I erase all but the primary author’s name and then add the Paper’s Citation and a Papers Link back to original file (copied from Paper’s Edit Menu). There is another quirk here. In Highlights Edit Mode, if you don’t leave a space between the markdown coding and the information you add, your file will be reset back to its original state, erasing your modifications.
Highlights has the ability to automatically look up DOI numbers. When it works, it’s great. It takes a single click to import a reference from the bibliography into your Paper’s Database. Unfortunately, this feature is flaky, especially with longer manuscripts. I often have to revert to my Launchbar scripts to capture the bibliographic information I need.
Once I’ve added the metadata I want to the master annotation file (and collected the references of interest), from within Highlights, I choose Export >> Devonthink. Highlights creates individual markdown files for each of the annotations. Each individual file contains the master file’s metadata. The data is copied to my Devonthink Global Inbox. I move the folder from the Devonthink Inbox to my Desktop and from there to my Annotations Folder using Launchbar.Highlights has significantly sped up the time it takes to process a manuscript. Using this method, I’m also having greater success with the “See Also” feature of Devonthink. I hope it works for you too.
Retrieval, Annotation, and Capture of Highlights (2016)
I have a unique way of processing scholarly information, I am convinced it gives me an advantage when writing grants and manuscripts--allowing me to find specific notes and related information very quickly and efficiently without having to rely purely on memory. I’ve written a bit about this before, but the process has evolved, so I am dedicating an entry to my updated workflow. The software and utlities integral to this workflow are:
- Papers 3
- Keyboard Maestro
- Launchbar
- Ulysses (or any text editor)
- DropBox
- Devonthink
Highlighting in Papers 3Despite lacking the outstanding features of Skim, I am back to reading/highlighting in Papers. I switched back to Papers primarily for synchronization. I do a fair amount of reading on my iPad. Any highlights I make on my Mac become immediately available on iOS. Anyhing I highlight on my iPad shows up on my Mac. Although I prefer Skim, the simplification afforded by doing everything in Papers was irresistable. Here is the manuscript we’ll be working with, highlighted in Papers. Export NotesOnce I’m finished highlighting, it's time to process. Within Papers I go to File->Export->Notes and am provided with the following menu box. (1) I usually choose to save the file to my Desktop, as it needs to be easily accessible for processing. (2) I choose "Selected Papers Only" or you I export notes from my whole collection. (3) I choose Plain Text.
 First Stage of Processing the Untitled Notes File on DesktopHere is the untitled notes file saved to my desktop.
 Contents of the unprocessed notes File
 Keyboard Maestro Script to Add Citation + Link and Save FileI have written two Keyboard Maestro scripts to help process my exported notes. The first script adds metadata to the text of the notes file we just exported, then renames the file using the unique Papers Citation. In order to use my script, in Papers, I make sure the correct paper is highlighted. Next, in the Finder, I select the exported note file. I invoke the script and it prepends the unique Papers Citation followed by a Papers Link to the top of the file.
 Keyboard Maestro Script to Add Citation + Link and Save File ContinuedThe script continues on to a save dialogue box where it replaces "Untitled" with the unique Papers Citation. I have to manually remove the curly brackets (as they are disallowed in file naming). I save the file to the Desktop.Download the script here…. You'll have to remove the .txt from the end of the file to use.
 Uniquely named Notes File Saved to Desktop.This note I just saved contains ALL of the exported highlights from the manuscript in a single file. As I've talked about in previous entries, I find it more efficient to access a single concept rather than having to dig through an entire papers worth of notes. I developed (along with a few others) a second KM script that copies the Metadata at the top of the note file, parses the single note file into a collection of notes files--one highlight per file, and appends the metadata to each file.Processing highlights in this way has revolutionized my grant and manuscript writing efficiency.Keyboard Maestro Script to Parse Highlights and Append metadata to each note
 Download the script here…. You'll have to remove the .txt from the end of the file to use.Moving the FolderI highlight the folder on my Desktop, then double click my Shift Key--this invokes a Launchbar action.
 Launchbar Moves FolderUsing Launchbar I move the text notes to the folder where I keep all the extracted highlights from all the manuscripts I'v read.
 Ulysses to finish the processAs I've mentioned previously, i use Ulysses extensively in my personal and professional life. I use Ulysses to finish the processing of my highlights, but any text editor will do. (1) Ulysses is pointed to read all the files in my Notes folder--here you see all the individual files extracted from this manuscript. (2) is the text of a single highlight, (3) is the metada added to each file by the KM script. With some notes I will add my own comments, other times, not. (4) are the references that support the statement....these are added manually by reading through the statement and copying each of the corresponding references from the original PDF. I don't go back and forth between the text file and the PDF...instead, I take advantage of Launchbar's Clipboard History.
 Launchbar Clipboard HistoryI merely highlight each reference mentioned, then in bulk I paste each of the references into the note.
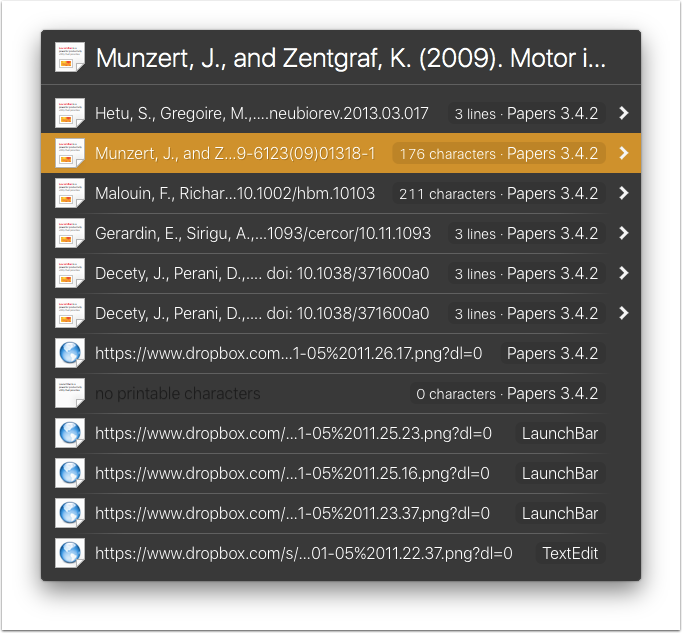 Appearance of NoteI showed you what this file looked like in Ulysses. Here is its appearance as a free standing text file. Depending on my mood (and time) I may or may not append refernces to each note file.
 Copy PDF to Indexed FolderAfter I've processed everything, the last step is to export a copy of my PDF to a location Devonthink can access.
 Using Devonthink to Find Concepts and Related InformationYou may aak yourself why I go to such lengths processing the information I read. The answer is Devonthink. I use the "Artificial Intelligence" of Devonthink quite extensively in my writing. As I mentioned, all the processed highlights, copies of PDFs go into a set of folders on Dropbox. I then Index (not import) the information in these folders (1) so they are "seen" by Devonthink. Why is that important? When I conduct a search (2), I can find the idea I'm looking for (3). By clicking on the "See also" function (4) in Devonthink I can see every piece of related information in my scholarly library (5), including things I have previously written. This ability has revolutionized the way I write.
 ConclusionIn this entry, I have shown you how I read and process scholarly my annotations from manuscripts. Although the process requires an extra ten minutes or so per manuscript, the payoff is immense.Please comment below.
Papers Links
In previous entries I've written about my love of Papers and how I use it for all my grants and scholarly writing.One of the features I use constantly is called Papers Links. This is a brief code (looks like a URL) that links back to a particular manuscript in your personal library. Here is an example:papers3://publication/doi/10.1097/AIA.0b013e3181eace73Papers Links are available in Papers by highlighting the manuscript, then using "Copy As" under the Edit Menu, right clicking on the paper of interest, or using the keys: Shift- Command-L.
Combining Papers Links with Launchbar is nothing short of awesome. I annotate everything I extract from a manuscript with a Papers Link and a Papers Citation. When writing, I can highlight any Papers Link, hit my Shift Key twice to invoke Launchbar Actions (as I discussed in this entry). The double shift copies the highlighted text to Launchbar--the orange tab shows that Launchbar is awaiting an Action Command.I hit Tab Key to bring up the context sensitive menu. I select Papers and hit return. Papers launches directly to the paper of interest.
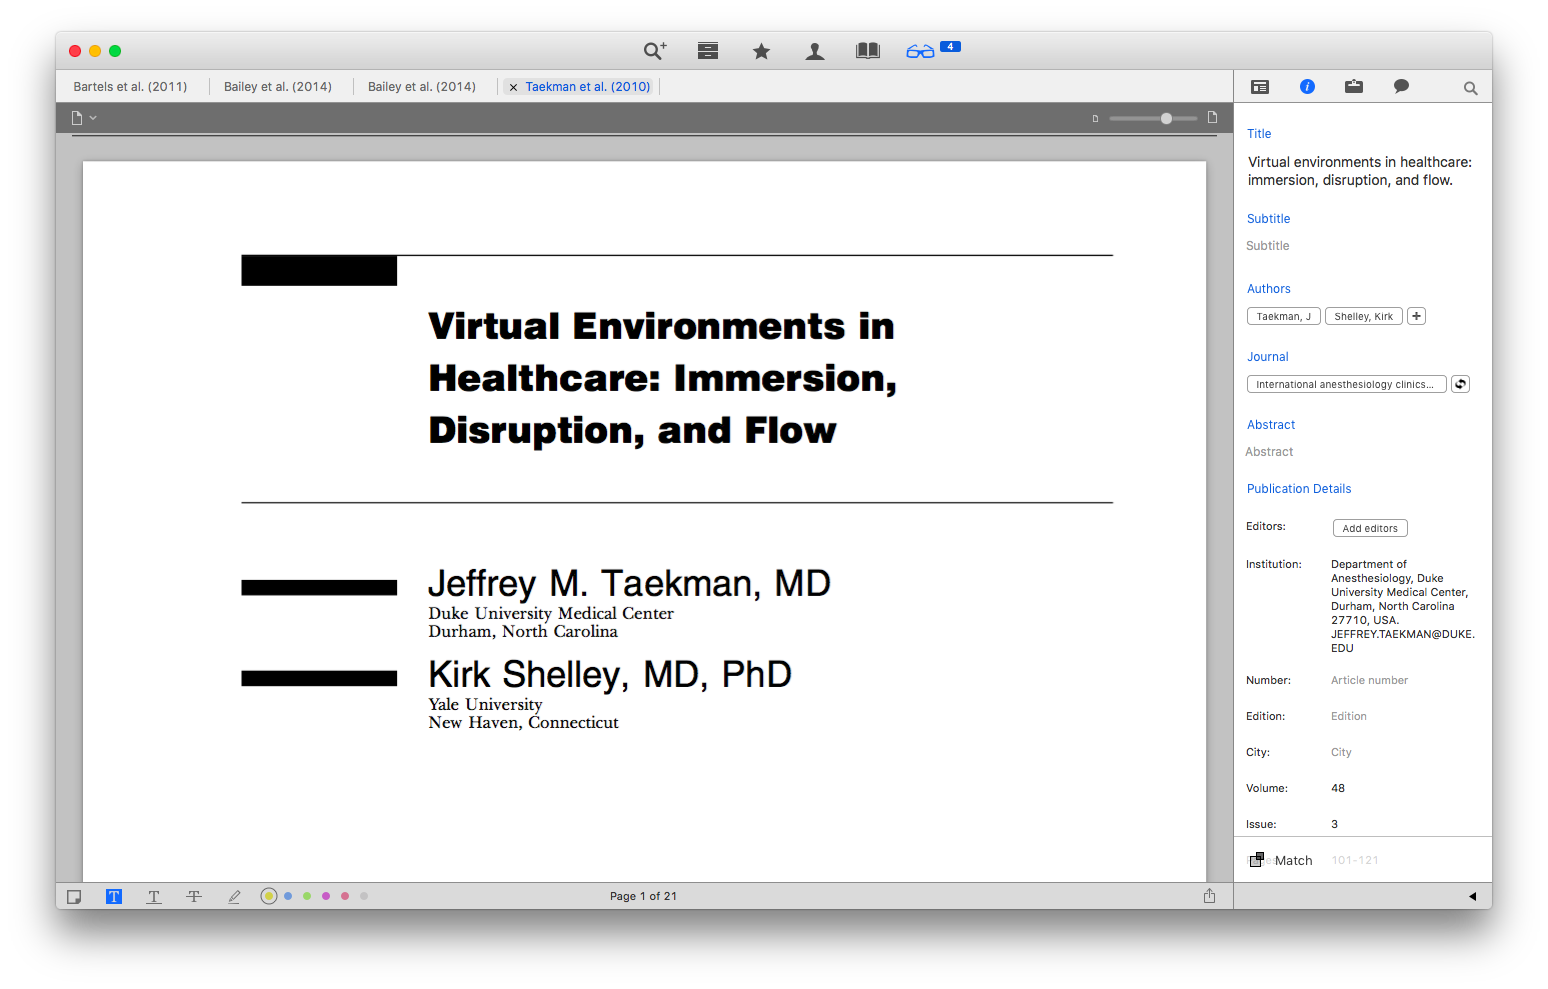 I use Paper Links in all my extracted annotations—it makes it lightning-fast to use a reference when writing, and to be able to dig deeper into the original reference as needed.
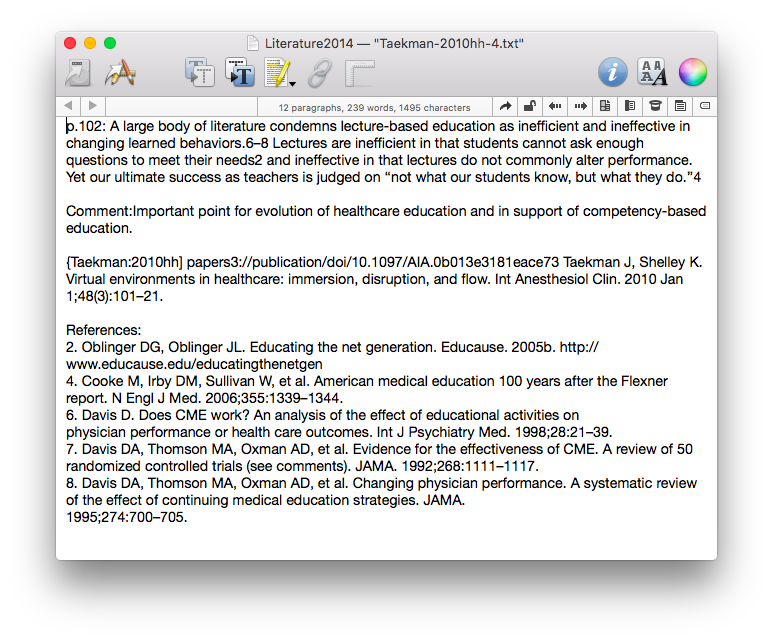 I also use Papers Links when I copy figures or tables from a manuscript using Skitch / Evernote. The Papers Link allows me to quickly find the manuscript with the embedded media element when writing or preparing presentations.I use Papers Links constantly when writing. I hope you find them helpful too.
Searching PubMed, Google Scholar, and Research Gate with Launchbar
I have blogged about the custom Keyboard Maestro (KM)scripts I wrote to grab journal articles while reading scholarly information. Using these scripts, I merely highlight text in a PDF (usually a reference), invoke my KM script, and the PubMed or Google ScholarI now do the same thing using Launchbar Action Scripts. I set up three custom search templates in Launchbar’s Search Template Index:PubMedhttp://www.ncbi.nlm.nih.gov/pubmed/?term=*Google Scholarhttps://scholar.google.com/scholar?hl=en&q=*&btnG=&as_sdt=1%2C34&as_sdtp=Research Gatehttps://www.researchgate.net/search.Search.html?type=publication&query=*Now, when I want to retrieve a reference, I merely highlight the reference in the PDF I’m reading and hit the Shift Key twice–this tells Launchbar that I want to do something with the highlighted text–by hitting tab and then typing the first few letters of Pubmed, Google Scholar, or Research Gate, then hitting Return, I tell Launchbar to pass the search string on to the publication web site. In order to find PDFs, I often have to repeat a search on more than one site. Launchbar makes retrieving PDFs fast and efficient. Check it out.
Embracing Evernote
Workflows evolve. A few years ago I was hesitant to use Evernote because of its proprietary nature. I was using plaintext to capture everything, but had to work out a complex syncing system to be efficient. Over the last year, I’ve overcome my fear and have increasingly built Evernote into my life. I started using it in so many ways, I finally subscribed to thePremium service. I’ve found Evernote to be a flexible and reliable tool readily available on all my devices — both for capture and to find information when I need it.
Here are a few ways I’m using Evernote:
Clipping Service
The first thing I installed when I started using Evernote was the Mac Clipping Tool. Using the clipping tool I easily capture, attach keywords, and annotate pages from the web. Using the “Share” menu in the web clipper, I copy a link to the note directly as a reference in OmniFocus or Calendar entries. When I’m on my iPhone or iPad I use the Action Button (the square with the arrow emerging from the top) to get items into Evernote.
Emailing notes directly into an Evernote NoteBook (premium feature)
I have transitioned my personal email client to Postbox. Postbox, unlike Mail.app, has an Evernote clipping tool embedded into the interface. Sometimes, I’m unable to use either of these methods and will choose to email a note into Evernote. To learn more about this premium feature, read the excellent overview of Evernote email features (including naming the file, placing the file directly into a specific notebook, or tagging the file with a keyword or reminder time).
I most commonly use this method when I’m answering an email, placing my unique Evernote email address and Omnifocus MailDrop Address in the bcc field of my email. Using this method, I can kill 3 birds with one stone (responding to the email, keeping the reference material, making an Omnifocus entry to keep up with the item).
Linking to reference material for Omnifocus or Calendar
Once information is captured Evernote, each note has its own unique URL. I use this feature extensively to link reference material to OmniFocus and my Calendar. I have different ways of linking depending on the situation.
By control-clicking on a note in Evernote and then selecting “More Sharing” I copy the web-based URL to my clipboard. I then paste the URL into the note field of Omnifocus or into the appropriate field of my Calendar. Then, even when I change devices, I have access to my reference material.
Another method of grabbing URLs is with Launchbar. As I mentioned, I now use Launchbar extensively. I can select a note in Evernote and then invoke Launchbar, then I select “Evernote – Copy Link of Selected Note.” This copies the URL of the slected note to my clipboard to be pasted into any other app.
Capturing Ideas in Evernote using Drafts
Evernote extends its great power by linking to many other applications. I’ve found capturing snippets of text into Evernote is even easier than the method I described a few years ago using plaintext.
I use Drafts on my iphone and iPad to capture / brain dump just about everything. Drafts is an essential program on my iPhone. Drafts allows me to capture without thinking about what app I need to open. Once the text is captured, Drafts routes the information wherever I choose. I wrote about one way I use Drafts to capture and process meeting notes.
When I want to capture an idea, I merely open Drafts and type or dictate my idea into the app. When I’m done, I route the information to Evernote using the following custom action:

The action automatically derives a title from the first line of the text and appends the date and time. Furthermore, it files the note in my “Ideas” Notebook in Evernote and tags the note with the keyword “Ideas."
The note ends up in Evernote looking like this:

When I get to Evernote, I append further information in the note as needed. I use IdeaX in the header so when I search for a list of my ideas, they are not mixed together with information I’ve gathered from other sources. If I search for a keyword(s), I not only see my ideas, but all the information I’ve gathered in Evernote—very useful.
Capturing Blog Ideas, Lyric Ideas, Quotes, and other Snippets in Evernote using Drafts
I use a similar scripts in Drafts to capture a whole host of other information on the go. Each class of information is filed into it’s own Notebook in Evernote. For example, here is the action I use to capture information for my blog:

By incorporating Evernote, I’ve greatly simplified many of my capture processes. I highly recommend giving Evernote Premium a whirl and trying out a few of these workflows on your own. You won’t be disapointed.
The Long Road back to Launchbar
After listening to the Mac Power Users episode 286: Launcher Smackdown, I decided to switch from Alfred to Launchbar 6. I used Launchbar for years then switched to Alfred for its more pleasing user-interface. To be honest I never learned the intricacies of Launchbar. Back then I used it primarily as an application launcher. Boy, was I missing out.
After listening to my heroes (Katie Floyd and David Sparks) talk about how good Launchbar 6 was, I decided to give it a another try. I’m really glad I did.
I downloaded Launchbar and was up and running in a few minutes. I had to remap Command-Space (in Launchbar’s Preference Menu) to invoke Launchbar (I moved Alfred to Control-Space). I also decided, if I was going to switch back, I was going to learn the power users tricks—so I downloaded Take Control of Launchbar by Kirk McElhearnI. The book was excellent. I was able to finish reading it in about an hour (experimenting with the features as I read along). Within a few minutes I put together a new customized search template for PubMed. I am using Launchbar extensively while reading, and writing scholarly information (more on this in a later posts). Launchbar 6 is loaded with features. In fact Launchbar's mantra is “1000+ features, 1 interface.” I use Launchbar to act on files, invoke Services or Keyboard Maestro scripts, collect and annotate text, and a whole lot more. I am especially enamored with one of the newer features called “actions.” Actions allow me to act on text or files copied on the mac or dropped onto the app. Using actions I can append information to a note, search Pubmed, or a whole host of other activities directly from the Launcher. Actions are improving my everyday tasks as well as my reading and writing workflows.
A tip of the hat to Katie and David for continually upping my game. Now that I’ve taken a deep dive into Launchbar 6 I know it is once again destined to become an indispensable application in my wheelhouse.
Workflow: Capturing Ideas
Ideas are my lifeblood. Whether ideas for writing projects, grants, or to-dos, I need a simple method to get the ideas out of my head and into my system. An idea might come to me during a meeting, in the car, or on a walk. My system has to be fast, ubiquitous, and flexible. The less thought I have to put into capturing my ideas, the better.
Over time, my workflow for capturing ideas has evolved. You won't be surprised my system revolves around plaintext.
Here is the software you'll need for this workflow (you may also want to read my previous entries on why I use plaintext, Launchbar, and Drafts):
- nvALT 2.1 - Notational Velocity Fork
- TextExpander
- TextExpander Touch
- LaunchBar
- Dropbox
- Simplenote Notesy
- Drafts for iPhone
- Drafts for iPad
TextExpander allows me to type short key combinations (called Snippets) that expand into words, phrases, or even pictures. I use TextExpander constantly to type things like my email address (.hm expands to my home email, .wm expands to my professional email). I use similar combinations for my home address, my city, state, and my email signature. TextExpander is available for iOS devices (called TextExpander Touch) and is integrated into an increasing number of iOS programs. Under preferences, I choose to keep TextExpander Snippets synchronized using DropBox. I highly recommend this--identical snippets are then available on your Mac, iPhone, and iPad only needing to be entered once.
One must also have nvALT - Notational Velocity Fork installed on your Mac. Notational Velocity Fork is a special version of Notational Velocity that was developed by the genius, Bret Terpstra. It allows me to create text notes seamlessly and has a lightning fast search function. nvALT launches and I just start typing. Whatever I type becomes the title of my new note (after I hit return) while simultaneously searching the nvALT database for matching text strings. Hitting return finalizes the title and move the cursor down to a full note area. It's very fast. You need to check three settings in nvALT. First, be sure to set the "Read from Notes" drop-down menu to your desired folder. I synchronize to my nvALT folder in DropBox. Second, under the "Synchronization" Tab, make sure SimpleNote synchronization is OFF. Finally, under the "Storage" Tab, make sure you're saving as plaintext (not as RTF or HTML). If you choose this set-up, you won't be able to encrypt the nvALT database, but the trade-off in accessibility for me is well worth the price.
Next, make sure you have Simplenote Notesy installed on your iPhone and iPad. Notesy is a note taking program that synchronizes between your Mac and iOS devices using DropBox. Make sure Notesy is configured to synchronize with your nvALT folder in Dropbox hierarchy. I use Notesy as a conduit and for searches, but I rarely use it for writing.
The final programs you'll need are Drafts for iPhone and Drafts for iPad. As I discussed in my previous entry, Drafts is my go-to note taking app and has a place on the coveted home-screen of both my iPhone and iPad. I can get information entered quickly. Only after the information is captured, do I need to decide where to route it. Drafts gives me dozens of possibilities that I can personalize to show or hide.
IDEAS WORKFLOW: when sitting at my Mac and and idea hits me I invoke Launchbar (hitting Command-Space), type nv then return--launching nvAlt. Depending on what the idea is, I use TextExpander snippets. For instance ".wix" automatically types the following: WiPPPx - Untitled - 2012-12-10. I have a similar snippet for project ideas ".idx" expands to IdeaX - Untitled - 2012-12-10, and many others as well. All I have to do is change the "Untitled" to something descriptive, hit return and start typing. My idea or writing snippet is captured to nvALT (and is thus searchable via Spotlight, nvALT, or any other search utility I prefer). Because I've set up synchronization these idea files are available on my iPhone or iPad regardless of location.
If i'm on my iPad or iPhone and want to capture an idea, I use Drafts. Once I've completed the thought (using typing or voice entry), I must enter a title. Since Drafts is TextExpander Touch enabled, I can use my same Snippets to name the idea to convention (make sure TextExpander is open on your iPad or iPhone for the text expansion to work). I then route the completed Drafts note to Notesy (via the Drafts interface). It is saved, synchronized, and available on all my devices, all the time.
I can then search and find single or multiple ideas using the nvALT search interface. If I type "IdeaX" in the nvALT search box, ALL my ideas are returned in neat order. If, instead, I'm searching for a specific idea, I can be more explicit with my search terms, finding related items or even a single item.
Although this workflow takes a bit of set-up, the payoff is immense. Over time, I have accumulated hundreds of potential projects, text snippets, and more using this method. Many of them would have been lost, had I not had a quick and convenient way to capture them.
I hope you find the workflow useful.
Appended March 2, 2013: Read this entry on why I switched from SimpleNote to Notesy.
Core Software for the Mac: LaunchBar
Over the years, I’ve adopted several pieces of software that have completely altered the way I use my Mac. One of these is LaunchBar. LaunchBar is a "launch application" for Mac OS X, providing access to my applications, folders, and files by merely typing the first few letters of their name. For me, LaunchBar serves multiple purposes: a clipboard manager, an iTunes controller, a search tool, and a calculator all rolled into one. This allows me to access anything on my computer without lifting my fingers from the keyboard. I merely invoke LaunchBar using a key combination (I use Command-Space) and then type in the first few letters of what I want to do. LaunchBar returns the top hits in a small menu at the top of my screen. Out of the box, a Mac will launch Spotlight if you hit Command-Space. You have to turn this feature OFF in the Spotlight Preferences (in System Preferences).  You also have to designate the key combination you wish to invoke Launchbar in the Launchbar Preferences.
 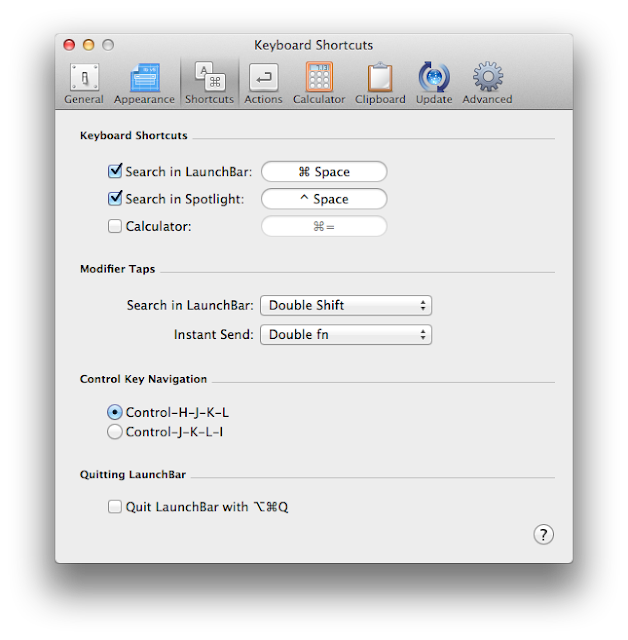 In order to appreciate the broad range of possibilities with Launchbar, take a look at the Features. Even better, Download the free 30-day demo and work through the short Tutorial. I use Launchbar hundreds of times every day. I am literally lost on my computer without it. I will cover the other core pieces of software in future entries.