Unlock the Power of RSS feeds with Devonthink

I’ve written often about my love of Devonthink. Over the years, it has become an indispensable part of my digital life. Only recently, I discovered the power of Devonthink’s RSS capabilities. Devonthink RSS is the topic of today’s entry.

RSS (Rich Site Summary) is a format for delivering changing web content. Many news-related sites, blogs, and publishers syndicate their content as RSS feeds. Many of my colleagues use freestanding RSS readers like Feedly to collect their content. I’ve tried many of the stand-alone readers, but Devonthink is clearly superior because of its search and AI capabilities.

Here how I use Devonthink RSS.

Read more

Deckset: Rapid Presentation Generation using MarkDown

My workflows have changed since I wrote my entry: “Why I Use Plaintext” in June 2012. The entry was about avoiding the distraction of Microsoft Word and Apple Pages while writing. At the time I wrote the entry there was no Ulysses. Now I use Ulysses for almost all my short-form writing. In 2012, there was no iOS version of Scrivener. Now I use Scrivener for all my long-form writing. Although technology has changed, some things have not. I still dislike bloated software packages that get in the way of my final goal. I still love Plaintext / Markdown.There is another requirement of my job that relies just as heavily on bloated software-presentations. Speeding up the development of a presentation is the focus of this entry.Presentations are used throughout business and academia to transmit ideas. Some influential thinkers, such as Edward Tufte, argue bulleted presentations shouldn’t be used at all. The reality is that presentations are deeply ingrained in business and academia. Many presenters rely too heavily on the glitz offered by the software at the expense of content. It’s easy to get lost in software features—spending hours tweaking backgrounds, transitions, and text placement.Which brings me to Deckset. Deckset is an amazing application for iOS that converts Markdown files into presentations. As this review of Deckset 1 in Macworld says: “It’s designed for the average person who needs to make beautiful slides without the muss and fuss of Keynote or PowerPoint.” With the release of Deckset 2 and its outstanding features, the application has become my go-to application for rapid preparation of presentations. Because Deckset uses Markdown, I find myself concentrating less on making my slides look attractive and more on content. Deckset works seamlessly with Ulysses, allowing me to quickly edit my presentations on my phone, my tablet, or my Mac. (You can use any text editor with Deckset. If you plan to use Ulysses, check out these helpful tips).I recently used Deckset to develop a new 30 minute presentation. I estimate the presentation took about 1/4 the amount of time to develop versus Keynote. The cost for Deckset 2 is $29 (with educational discounts available).Here is a link to the Deckset manual.

My Migration from Papers to Bookends

I have dedicated a lot of time and energy squeaking every ounce of productivity from the Papers app. I’ve used Papers for more than a decade. Over the years, I built many scripts and work-arounds to address the shortcomings of the application.ReadCube purchased Papers in 2016. Because of the time I’ve spent in Papers, I started having angst when I read of certain changes to the software: a subscription model, the loss of Magic Citations, and the loss of integration with Scrivener.I started exploring alternatives to Papers. When I wrote about my interest in migrating away from Papers, several Wippp Readers suggested I check out Bookends. Several folks raved about the tight integration between Bookends and Devonthink as well as Bookends and Tinderbox—two other programs I use heavily in my academic life. Several people also mentioned the LEGENDARY support of SonnySoft, the company  behind Bookends.My initial evaluation of Bookends was far too cursory. Following publication of the blog entry, I received a very nice email from SonnySoft asking me to take a closer look at Bookends. After digging deep into the software, I decided to migrate from Papers to Bookends. I haven’t looked back. It’s been several months now and the more I use Bookends, the more I like it.Things I like about Bookends:

  • The interface, although not as modern as Papers, is cleaner and more organized.

  • The iOS and Desktop version are better integrated than Papers.

  • A PDF on my phone is drop-dead easy to import into Bookends. The PDF and the metadata I choose is automatically synced with the Mac app (although I have to rename the pdf when I get to my Mac).

  • All PDFs are saved to a single folder in iCloud, making them easy to access and for Devonthink to index.

  • Bookends integrates well with Scrivener (and many other writing clients)

  • Dragging and dropping citations into Tinderbox and Devonthink are both seamless. Tinderbox maintains metadata from Bookends. This obviates the need for the KM script I built to move citations from Papers to Tinderbox.

Things I don’t like:

  • It was difficult to import Papers library with PDF into Bookends (Bookends only imported about 1/3 of my PDFs).

  • I can't export or customize the format of the exported metadata.

  • My smart collections don’t transfer to iOS.

  • Although I can designate a “watch” folder to import new PDFs into Bookends, this only works with PDFs that are saved to the folder AFTER Bookends is open. This didn't work well with how I collect information so I decided to modify my Hazel script, changing it to launch Bookends instead of Papers.

  • I don't like the way duplicate references and / or PDFs are handled.

Over the next few months, I plan to write several entries about my migration and how Bookends has become a critical part of my augmented writing workflow.

Deliveries Automation - The easiest way to track your packages

Here is a quick tip I wish I figured out before the holidays….There is a nifty application for Mac and iOS called Deliveries (by JuneCloud). The app aggregates tracking information of all your packages. I used it over the holidays to track the progress of my gifts. Out of the box, the app uses iCloud to sync data between your iPhone, iPad, and Mac. Although Deliveries has handy features, it was a multi-step process to get my tracking numbers into the app.The app was so useful, I decided to figure out a way to automate the process of tracking number extraction. JuneCloud was way ahead of me. It turns out there are two ways to sync data in Deliveries: through iCloud or through JuneCloud’s own cloud service, JuneCloud Sync. If you sign up for a JuneCloud Sync account, you can send an email with a tracking number to track@junecloud.com and Deliveries takes care of the rest.I find auto-extraction from forwarded emails extremely easy to use and is a key feature of several of my favorite apps (e.g. Tripit for travel itineraries, of FlightView for flight tracking).I wrote a rule for my email client, Airmail, that automatically forwards tracking emails to the JuneCloud Sync Service:Although I’ve only been using JuneCloud Sync a few days, so far it’s worked flawlessly (with Amazon packages) and has saved me the hassle of cutting and pasting tracking numbers from emails. I’ll report back if I have any trouble with other vendors.

Highlights.app not ready for prime time

On recommendation of several people, I decided to try the annotation app, Highlights. Although I was intrigued with several of the features, after extensive use, I can’t recommend the app. The program still needs work before I could reliably use it in my writing workflow.I found two of Highlights features especially attractive:

  1. The ability to extract each highlight or comment as its own markdown file.
  2. The ability to underline references in the PDF and have those references automatically appended/linked to extracted notes.

I trialed Highlights for about a week. Ultimately, even with the intriguing features, The appnwas far too buggy for me to adopt.Here are some of the issues I faced:

  1. References would not reliably link to a note. I could find no rhyme or reason for this behavior. Sometimes the feature worked, sometimes it didn’t. No matter what I tried, I was unable to remedy this issue. My attempt at editing markdown files led to frustration—my edits were often erased.
  2. Even when the reference extraction worked, there is a bug that alters the markdown file, adding additional markdown to each reference. With many references, this bug makes each file unreadable.
  3. I found no way to configure the order, type, and appearance of the metadata.
  4. Extraction of figures from the manuscript were buggy and unreliable.
  5. Metadata was impossible to change. Initially, I set Up the app to automatically retrieve metadata. Unfortunately, several of the paPers the software Retrieved had erroneous metadata. Once imported, I found the metadata impossible to change. Since I add the title, author, And other metadata to every one of my extracted notes, this was The fatal flaw that caused me to end my trial.

Although I am intrigued by several of the features of the Highlights App, I will continue to use my tried and true method of note extraction using Skim. I plan keeping an eye peeled for these issues to be fixed within Highlights. With some improvements, I could see the app becoming my Mac PDF reader of choice.

Skim Split Screen Workaround

When reading PDFs on my Mac, I use Skim. Although I love the program, Skim has one annoying quirk. I cannot select (or highlight) text in a split screen. This makes it difficult to highlight or download references in real-time.I found a workaround that is fast and efficient. After opening a PDF in Skim, I’ll select “Print” from the File Menu and then, from the bottom left drop down menu, I’ll select “Open PDF in Preview.” This opens a second editable version of the manuscript side-by-side with the original.Let me know how this works for you.

Storyist and Scrivener? Nope.

As I wrote in my last entry, I was excited when I read Ricardo Sanchez’s article on the integration of Storyist and Scrivener. Full of anticipation, I plunked down my $15 and downloaded Storyist. I was disappointed.First i tried to enable DropBox sync in Storyist, but then realized Storyist requires the native Scrivener file to be saved on iCloud Drive. I followed the instructions in Storyist to set up iCloud Drive—the Storyist Folder showed up on my iPhone, but not on my Mac. I consulted the forums and saw that iCloud sync can take some time—up to several minutes. I waited-no sync. I cold-booted my phone-no sync. I reinstalled Storyist—still no sync. Finally, I connected my phone to my Mac and iTunes.Lo and behold, a Storyist Folder appeared on the iCloud Drive on my Mac. On my Mac, I set up an alias for a current Scrivener project and moved the native file to the Storyist Folder on ICloud Drive. The file appear on my phone. The folder hierarchy appeared identical on the phone as on Scrivener on my Mac. Many of the features of the Storyist software don’t work with native Scrivener files.I navigated down into the Drafts folder on my iPhone and typed some text. I waited for what seemed like several minutes for the file on my Mac to update. I opened the Scrivener project on my Mac and opened the section I had edited on my phone—the edited text did not show up on my Mac. Instead, I saw file conflict notifications between the Mac and iPhone version of the section. No matter how I tried, I was unable to resolve these conflicts.To make a long story short, I feel like I wasted $15. The lack of usable features and the unreliable sync of Storyist are deal killers for me. In fact, the only advantage I can see in using Storyist is the ability to read native Scrivener files. In every other aspect, I found Storyist inferior to the Dropbox text sync method I discussed in this entry. I’m going to continue to hold out for the real deal: Scrivener iOS.

MacID-unlock your Mac with TouchID

When asleep, my Mac is configured to require a password to unlock. I often have to type my password dozens of times each day.This am, while reading My Must-Have iOS Apps, 2015 Edition (by Federico Viticci), I found MacID, an app that uses the TouchID on your phone to unlock/lock your Mac.Setup was incredibly easy. I installed the app on my phone and my Mac. Connecting the two was a snap. I installed the unlock bookmark on the main screen of my iPhone. Now, I merely click the app on my iPhone, use the TouchID, and my Mac unlocks. If I have the lid of my Mac closed, when opened, MacID sends a notification to my phone asking if I’d like to unlock—awesome!Not only is the app incredibly functional, but it is very aesthetically pleasing. Check it out!

The Long Road back to Launchbar

After listening to the Mac Power Users episode 286: Launcher Smackdown, I decided to switch from Alfred to Launchbar 6. I used Launchbar for years then switched to Alfred for its more pleasing user-interface. To be honest I never learned the intricacies of Launchbar. Back then I used it primarily as an application launcher. Boy, was I missing out.

After listening to my heroes (Katie Floyd and David Sparks) talk about how good Launchbar 6 was, I decided to give it a another try. I’m really glad I did.

I downloaded Launchbar and was up and running in a few minutes. I had to remap Command-Space (in Launchbar’s Preference Menu) to invoke Launchbar (I moved Alfred to Control-Space). I also decided, if I was going to switch back, I was going to learn the power users tricks—so I downloaded Take Control of Launchbar by Kirk McElhearnI. The book was excellent. I was able to finish reading it in about an hour (experimenting with the features as I read along). Within a few minutes I put together a new customized search template for PubMed. I am using Launchbar extensively while reading, and writing scholarly information (more on this in a later posts). Launchbar 6 is loaded with features. In fact Launchbar's mantra is “1000+ features, 1 interface.” I use Launchbar to act on files, invoke Services or  Keyboard Maestro scripts, collect and annotate text, and a whole lot more. I am especially enamored with one of the newer features called “actions.” Actions allow me to act on text or files copied on the mac or dropped onto the app. Using actions I can append information to a note, search Pubmed, or a whole host of other activities directly from the Launcher. Actions are improving my  everyday tasks as well as my reading and writing workflows. 

A tip of the hat to Katie and David for continually upping my game. Now that I’ve taken a deep dive into Launchbar 6 I know it is once again destined to become an indispensable application in my wheelhouse.

Papers 3 Overview

Papers 3 has been re-written from the ground up. There are changes in virtually every facet of the program, from importing to matching manuscripts to storage and synchronization. Before I explain my workflow, I thought it would be important to familiarize you with some of these changes.

You can download a 30 day trial of Papers 3 and follow along with me. Papers 2 and 3 can exist side-by-side without altering your data.

Go ahead and install Papers 3. Once that’s done, let’s take a look at some of the preferences.

Preferences General:

I choose to open (and annotate) my manuscripts in Skim (as I did with Papers 2). For a short time, I experimented with the built in highlighting features of Papers, but they didn’t meet my needs.

Preferences general

Preference: Sync

I want my library to sync across my computers and iOS devices. Here, I’ve turned on Dropbox Sync and checked automatically sync new changes.


Preference sync

Preferences: Library

Here are my Library Preference Settings:

  • (1) denotes the location of my Papers Library in Dropbox
  • Hitting the Browse Button (2) places a virtual disk on your desktop that allows access to your entire Papers Library (via paper, author, year, etc)
  • I keep the Copy files to Paper Library folder after import (3) checked
  • I check Organize library folders by subdirectories (4). I use the convention Category Author Year
  • I check Rename Files in Library Folder (5): I use the convention Author Title Source Year

Preferences library

Main Screen

This is the main Papers 3 screen. The terminology I use here is primarily my own–may deviate from what the company calls a specific area.

  • The Library (1) organizes all the media in the program. My Collections includes both manually created folders and Smart Folders (folders created by metadata of the media. Shared Collections allows you to share selected folders with others.
  • The Search Bar (2) allows you limit your searches or change the presentation of your Library
  • The Filter Bar (3) lets you (from left to right) search for a document, view your library, view by Labels, view library by author, view by Type, and view previous database entries.
  • The Viewing Pane (4) is where you view your media. I typically use the “Column” view, but there are other choices as well.
  • Metadata (5) for the paper may be viewed (from left to right) by Overview, Information, Notes, or Activity
  • Metadata Inspector (6) is where you view Metadata and related information
  • PDF and Supplement Window (7) lets you visually see the first page of the actual paper as it exists in the library.
Main screen

Annotations and Highlights in Skim

When I double click on an entry in Papers, the manuscript opens in Skim.

Annotations in skim

TripIt: Travel Plans Made Easy

Although I don’t consider myself a road warrior, I do a fair amount of travel for my work. For years, my trusted travel partner has been TripIt.

TripIt is a web site (with apps for your iPhone, iPad, or Android) that aggregates all my travel information. Whenever I receive travel related information, I forward the email to the generic address: plans@tripit.com. TripIt processes the information from airlines, hotels, car rentals, etc., and combines them all into a single, easy-to-read itinerary (with confirmation numbers, phone numbers, times, etc.). The base site is free, but the Pro version is well worth the $49 per year. I’ve been a Pro subscriber for years.

Check out this video for more on TripIt.

MyPhoneDesktop: Seamlessly Transfer information Between Mac and iOS Devices

I’ve written about the interplay between my Mac and iOS devices in several entries. The interplay between my iPhone, iPad, and computer are critical to my productivity. Recently, I discovered a program called MyPhoneDesktop that I use so often, it has made its way to the home screen of my iDevices.

Although I love my iPhone, I have trouble with the soft keys—they slow me down when I have to type things like URLs or text strings. If I wanted to transfer files, I would typically use Dropbox (or email) to get files from my Mac to my iPhone or iPad. But no more. After installing and configuring MyPhoneDesktop on both my iPhone and Mac, I can rapidly share information between my devices.

As an example, I can search for a contact on my Mac, then have my computer dial the number on my iPhone. I can send URLs, text snippets, or complete files from my Mac to my iPhone or iPad merely by dragging and dropping onto the app. Similarly, I can transfer pictures to my phone by dragging and dropping onto a pop-up receptacle that emerges from the right side of my screen. Perhaps best of all is the app's bookmarklet that passes a web page from the Mac to my iOS device through the push of a single button. 

What’s the downside? I can’t transfer information from my iPad or your iPhone back to my Mac. 

I use MyPhoneDesktop numerous times every day and you will too. Pick up a copy for $4.99.

Meeting Workflows: Processing Meeting Notes and Discovering Linkages

It was a great deal of fun to join my friends, David Sparks - MacSparky, Katie Floyd, and Brett Terpstra (hosted by Dan Miller) on stage at MacWorld Live to discuss my Meeting Workflow. The session was webcast live from the MacWorld site. Following the session, I received many questions as to how I process my notes once they’ve been collected. Here is what I do…..

As I mentioned, I write and capture all my notes in Plaintext (using Drafts on my iPad and iPhone and nvALT on my Mac). I covered the way I capture ideas (IdeaX) using TextExpander. I use a similar method for capturing meeting notes (MeetX), chunks of writing (ScribbleX), quotations (QuoteX), and random thoughts (ThoughtX). Using Simplenote Notesy, I’m able to keep my notes on my iPad and iPhone in sync with my Mac. A single folder indexed by nvALT serves as the repository for everything, regardless of their content. In a pinch, I can search my notes on my iPad or iPhone using SimpleNote Notesy, but the true power of this workflow is realized when I return to my Mac.

I have alluded to my love of Devonthink Pro Office. I’m especially fond of DT's ability to find related notes using its artificial intelligence. For the purpose of this workflow, I have a single database that indexes three things: (1) my collection of manuscripts (from Papers2), (2) my web clippings, and (3) my nvALT notes. My web clippings are added directly to my DT database, but my Papers folder and nvALT folder are INDEXED, not imported into the same database. Indexing in DT is done by choosing File:Index… and navigating to the folder of interest on your computer (this is only during the initial set-up). You will have to manually update the index your folders each time you add new information. This is quick and simple– done by choosing the appropriate folder in DT and choosing File:Update Indexed Items.

When I’m writing (or searching for information), I can select a particular note and find all related information in my library-whether it’s a scholarly article, a newspaper clipping, a web site, or a note I’ve taken. Often times, DT finds linkages for me that weren’t readily apparent. This speeds my writing process immensely and makes me look like a magician to my peers. I hope it works for you too.

Appended March 2, 2013: Read this entry on why I switched from SimpleNote to Notesy.

Core Software for the Mac: Default Folder X

I use my computer and iPad many hours a day. There are a few core programs that have become so integral to my workflow, I’m lost without them. One of these programs is Default Folder X. Despite the mysterious name, it has become an essential part of my Mac-based workflows.Default Folder X combines folder navigation, OpenMeta tagging, and host of other features into a single, easy-to-use interface that interdigitates with the built-in Save Dialogue Box.The three features I use most commonly are the Recents Menu, OpenMeta tags, and the Favorites Folders.The Recents Menu keeps track of the places you’ve most recently saved information, allowing single-click access to your most recently saved-to folders.dialogue boxThe OpenMeta Tags box lets you tag files before saving them, sparing you the need to go back and label them at a later time (I’ll cover tagging in a later entry).openmetaI usually work on several concurrent projects. Using the Preference menu of the app, I can designate current project folders as “Favorites.” I can then open these folders through key combinations, greatly speeding up access to the information contained within.preferencesDefault Folder X is another program I use dozens of times each day. You can download a copy and try it yourself for 30 days at St. Clair Software’s website.

Core Software for the Mac: LaunchBar

Over the years, I’ve adopted several pieces of software that have completely altered the way I use my Mac. One of these is LaunchBar. LaunchBar is a "launch application" for Mac OS X, providing access to my applications, folders, and files by merely typing the first few letters of their name. For me, LaunchBar serves multiple purposes: a clipboard manager, an iTunes controller, a search tool, and a calculator all rolled into one. This allows me to access anything on my computer without lifting my fingers from the keyboard. I merely invoke LaunchBar using a key combination (I use Command-Space) and then type in the first few letters of what I want to do. LaunchBar returns the top hits in a small menu at the top of my screen. Out of the box, a Mac will launch Spotlight if you hit Command-Space. You have to turn this feature OFF in the Spotlight Preferences (in System Preferences). Spotlight Preferences You also have to designate the key combination you wish to invoke Launchbar in the Launchbar Preferences. LaunchBar Preferences 
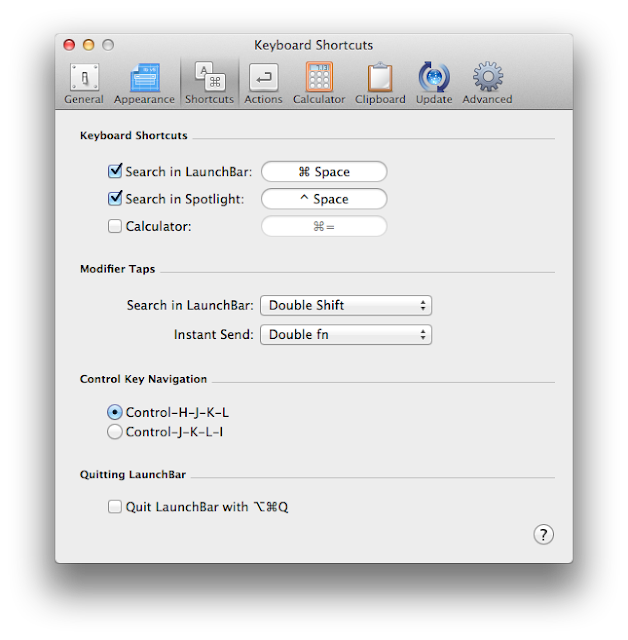
In order to appreciate the broad range of possibilities with Launchbar, take a look at the Features. Even better, Download the free 30-day demo and work through the short Tutorial. I use Launchbar hundreds of times every day. I am literally lost on my computer without it. I will cover the other core pieces of software in future entries.

CheatSheet Instantly Displays All the Keyboard Shortcuts for Mac Apps

I found a story on Lifehacker about an app called CheatSheet. The app sits in the background of your computer, but if invoked (by holding down the Command key) it brings up a list of key combinations that can be used with the program in the foreground.

Learning keyboard shortcuts can improve your productivity significantly.  I tested CheatSheet with several of the programs I use commonly--CheatSheet worked for them all. The utility is free--and worth far more than its price (it's free!).

(Via CheatSheet Instantly Displays All the Keyboard Shortcuts for Mac Apps )

Omnifocus 1: OmniFocus-The Center of The WIPPP

I thought I’d kick off my blog with a discussion of one of my most critical pieces of software, Omnifocus by the Omni Group. Although I have modified and tweaked David Allen’s system to work for me (more on this in another entry), the software is based on David Allen’s Getting Things Done (GTD). There are versions for my Mac, my iPad, and my iPhone.

In a nutshell, Omnifocus serves as the central hub of organization for my personal and professional life. David Allen’s method depends on getting stuff out of your head and into a holding place called your Inbox. Each time you are confronted with something to do you have three choices: Do it, Delegate it, or Defer it. If you can to do it immediately (in 2 minutes or less), you should do it right away, otherwise, if not delegated,  the task should be sent to your Inbox for processing.

Core concepts to understand about OmniFocus:

  • Inbox is where you dump (capture) everything for further processing. The Inbox is a temporary holding area to be processed daily. 
  • Actions are single events. Actions should always start with a verb. An example of a good actionable event would be: “Download my CME certificate from the American Society of Anesthesiologist Meeting.” 
  • Projects are collections of two or more Actions. Projects can be defined as sequential (each task must be completed in order) or parallel (each task can be completed at any time). 
  • Contexts are where (or what) you need to complete the Action. My contexts include email, call, errands, Mac:Anywhere, Mac:Online, work, home, etc.

Omnifocus Basics-Items, Projects, Contexts, and the Inbox

Once a day (I typically do it in the evening), I sort through my inbox and assign each item a project (see below) and a context (where the item will be completed). In addition, I typically add a start date and projected time to each item. I only use a due date if the item is important AND has a hard stop.

Sample Project-Renewing my Medical License

I know each year on my birthday I have to renew my medical license and submit it to the Credentialing Office.There are numerous tasks I have to complete to make this happen. I have to submit documentation on my professional education, log the hours into the Medical Board’s web site, pay my annual license fee, download my updated license, and send the license to Credentialing.

Let’s assume I wasn’t vigilant in collecting all my CME certificates, and thus have to contact the organizing body of each meeting to obtain my credit hours.

The items in this hypothetical sequential Project called Annual License Renewal (with context in parenthesis) would be: (1) download CME certificates (Mac: Online) , (2) enter hours and dates into personal spreadsheet (Mac:Anywhere), (3) log on to Medical Board Web site, enter information and pay fee (Mac:Online), (4) Download renewed license (Mac:Online), (5) email license to hospital credentialing (email). The project has a hard stop (my birthday) past which I would not be able to practice.

You’ll notice I used only a few contexts in this example. All in all, I have about fifteen. My personal contexts include: Home, Work, email, phone call, Mac Anywhere, Mac Online, iPad, iPhone, or Tech–for any device.

Why Take the Time?

Once you have your tasks in OmniFocus, the fun begins. Omnifocus lets you sort your lists in really useful ways–called Perspectives. Instead of looking at my projects, I can sort my to-do’s by contexts–having it show me the emails I must send across all my projects, or, in another example, what I need to do on my Mac while online. If I have only a few minutes, I can ask OmniFocus to display items tagged as t 5 minutes or less.

Perspectives are very customizable–the customizbility is where the power of Omnifocus outshines other GTD managers such as Things. I personally have about a dozen different perspectives I use to slice and dice my Omnifocus data. During the day, I refer to my lists dozens of times, usually in a Context mode. At the end of the day, as I’m processing new to-dos, I work primarily in a Project view.

My data backs up to my Dropbox, and syncs to the cloud (there are several different sync methods available). My database is accessible with an iPad and/or iPhone client-always current and always with me. As I add new information in iOS, the item turns up in my Mac-based Omnifocus client. Synchronized, powerful, and simple-very Mac like.

In a single day I’ll usually add information to my Inbox in one of four ways: clipping, direct entry, email, or through Siri. Getting information into OmniFocus will be the topic of my next entry.

In conclusion–OmniFocus is an indispensable tool for personal and productivity. If you aren’t familiar with it you should run, (not walk) to your computer and download it immediately.