In an earlier entry, I discussed how I initially set up my Zettelkasten, using The Archive, Drafts, and Obsidian. However, my workflow has evolved over the last few years. This entry will explain my current workflow using Drafts, Obsidian, and Devonthink, including the capture, curation, linking, and tagging of zettels.
Read moreTaekman Academic Writing Workflow 2020
One of the most popular entries on WIPPP has been my 2015 Writing Workflow. My workflow has changed substantially over the last several years. I thought I'd share what I'm currently doing.
Read moreIdea Capture and Generation using Drafts and The Archive - Zettelkasten Workflow
I have been consuming a massive amount of information from books, podcasts, manuscripts, and other sources. What can I say? I love learning. I especially love learning about the microbiome, functional foods, integrative medicine, technology, and science.
Read moreUnlock the Power of RSS feeds with Devonthink
I’ve written often about my love of Devonthink. Over the years, it has become an indispensable part of my digital life. Only recently, I discovered the power of Devonthink’s RSS capabilities. Devonthink RSS is the topic of today’s entry.
RSS (Rich Site Summary) is a format for delivering changing web content. Many news-related sites, blogs, and publishers syndicate their content as RSS feeds. Many of my colleagues use freestanding RSS readers like Feedly to collect their content. I’ve tried many of the stand-alone readers, but Devonthink is clearly superior because of its search and AI capabilities.
Here how I use Devonthink RSS.
Read moreAutomating the Organization and Accessibility of Academic Literature: Bookends and Devonthink Pro
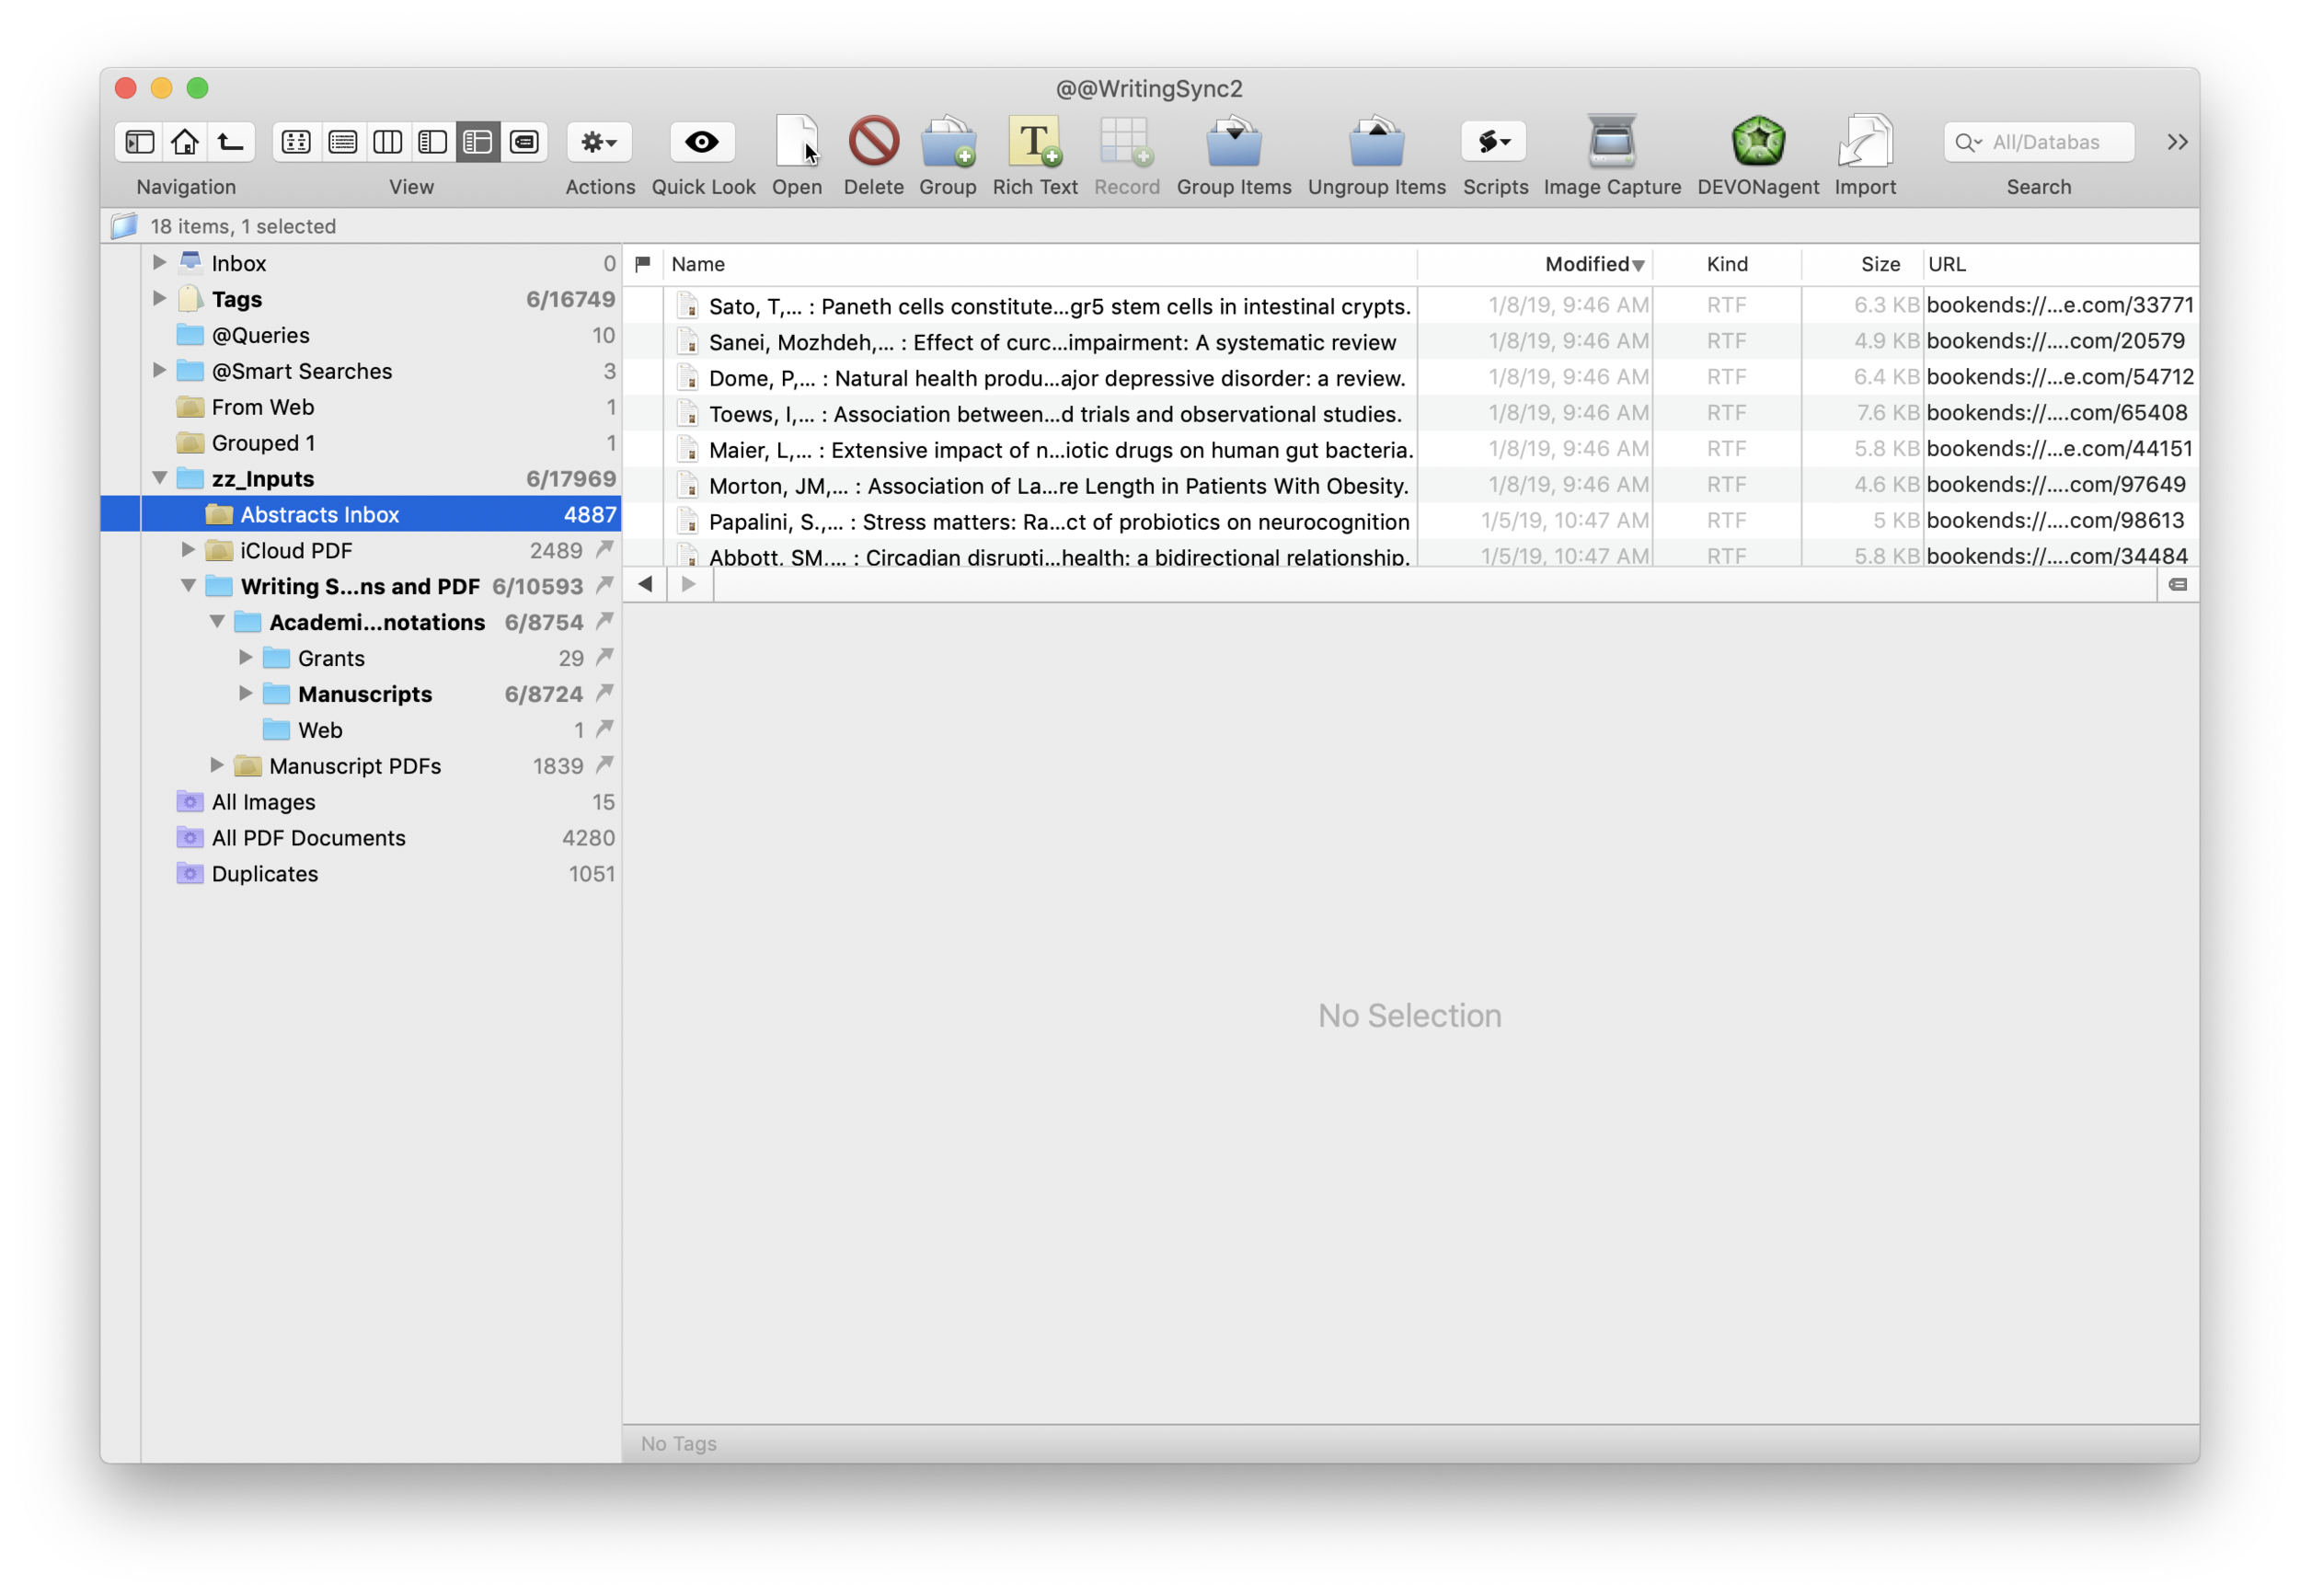
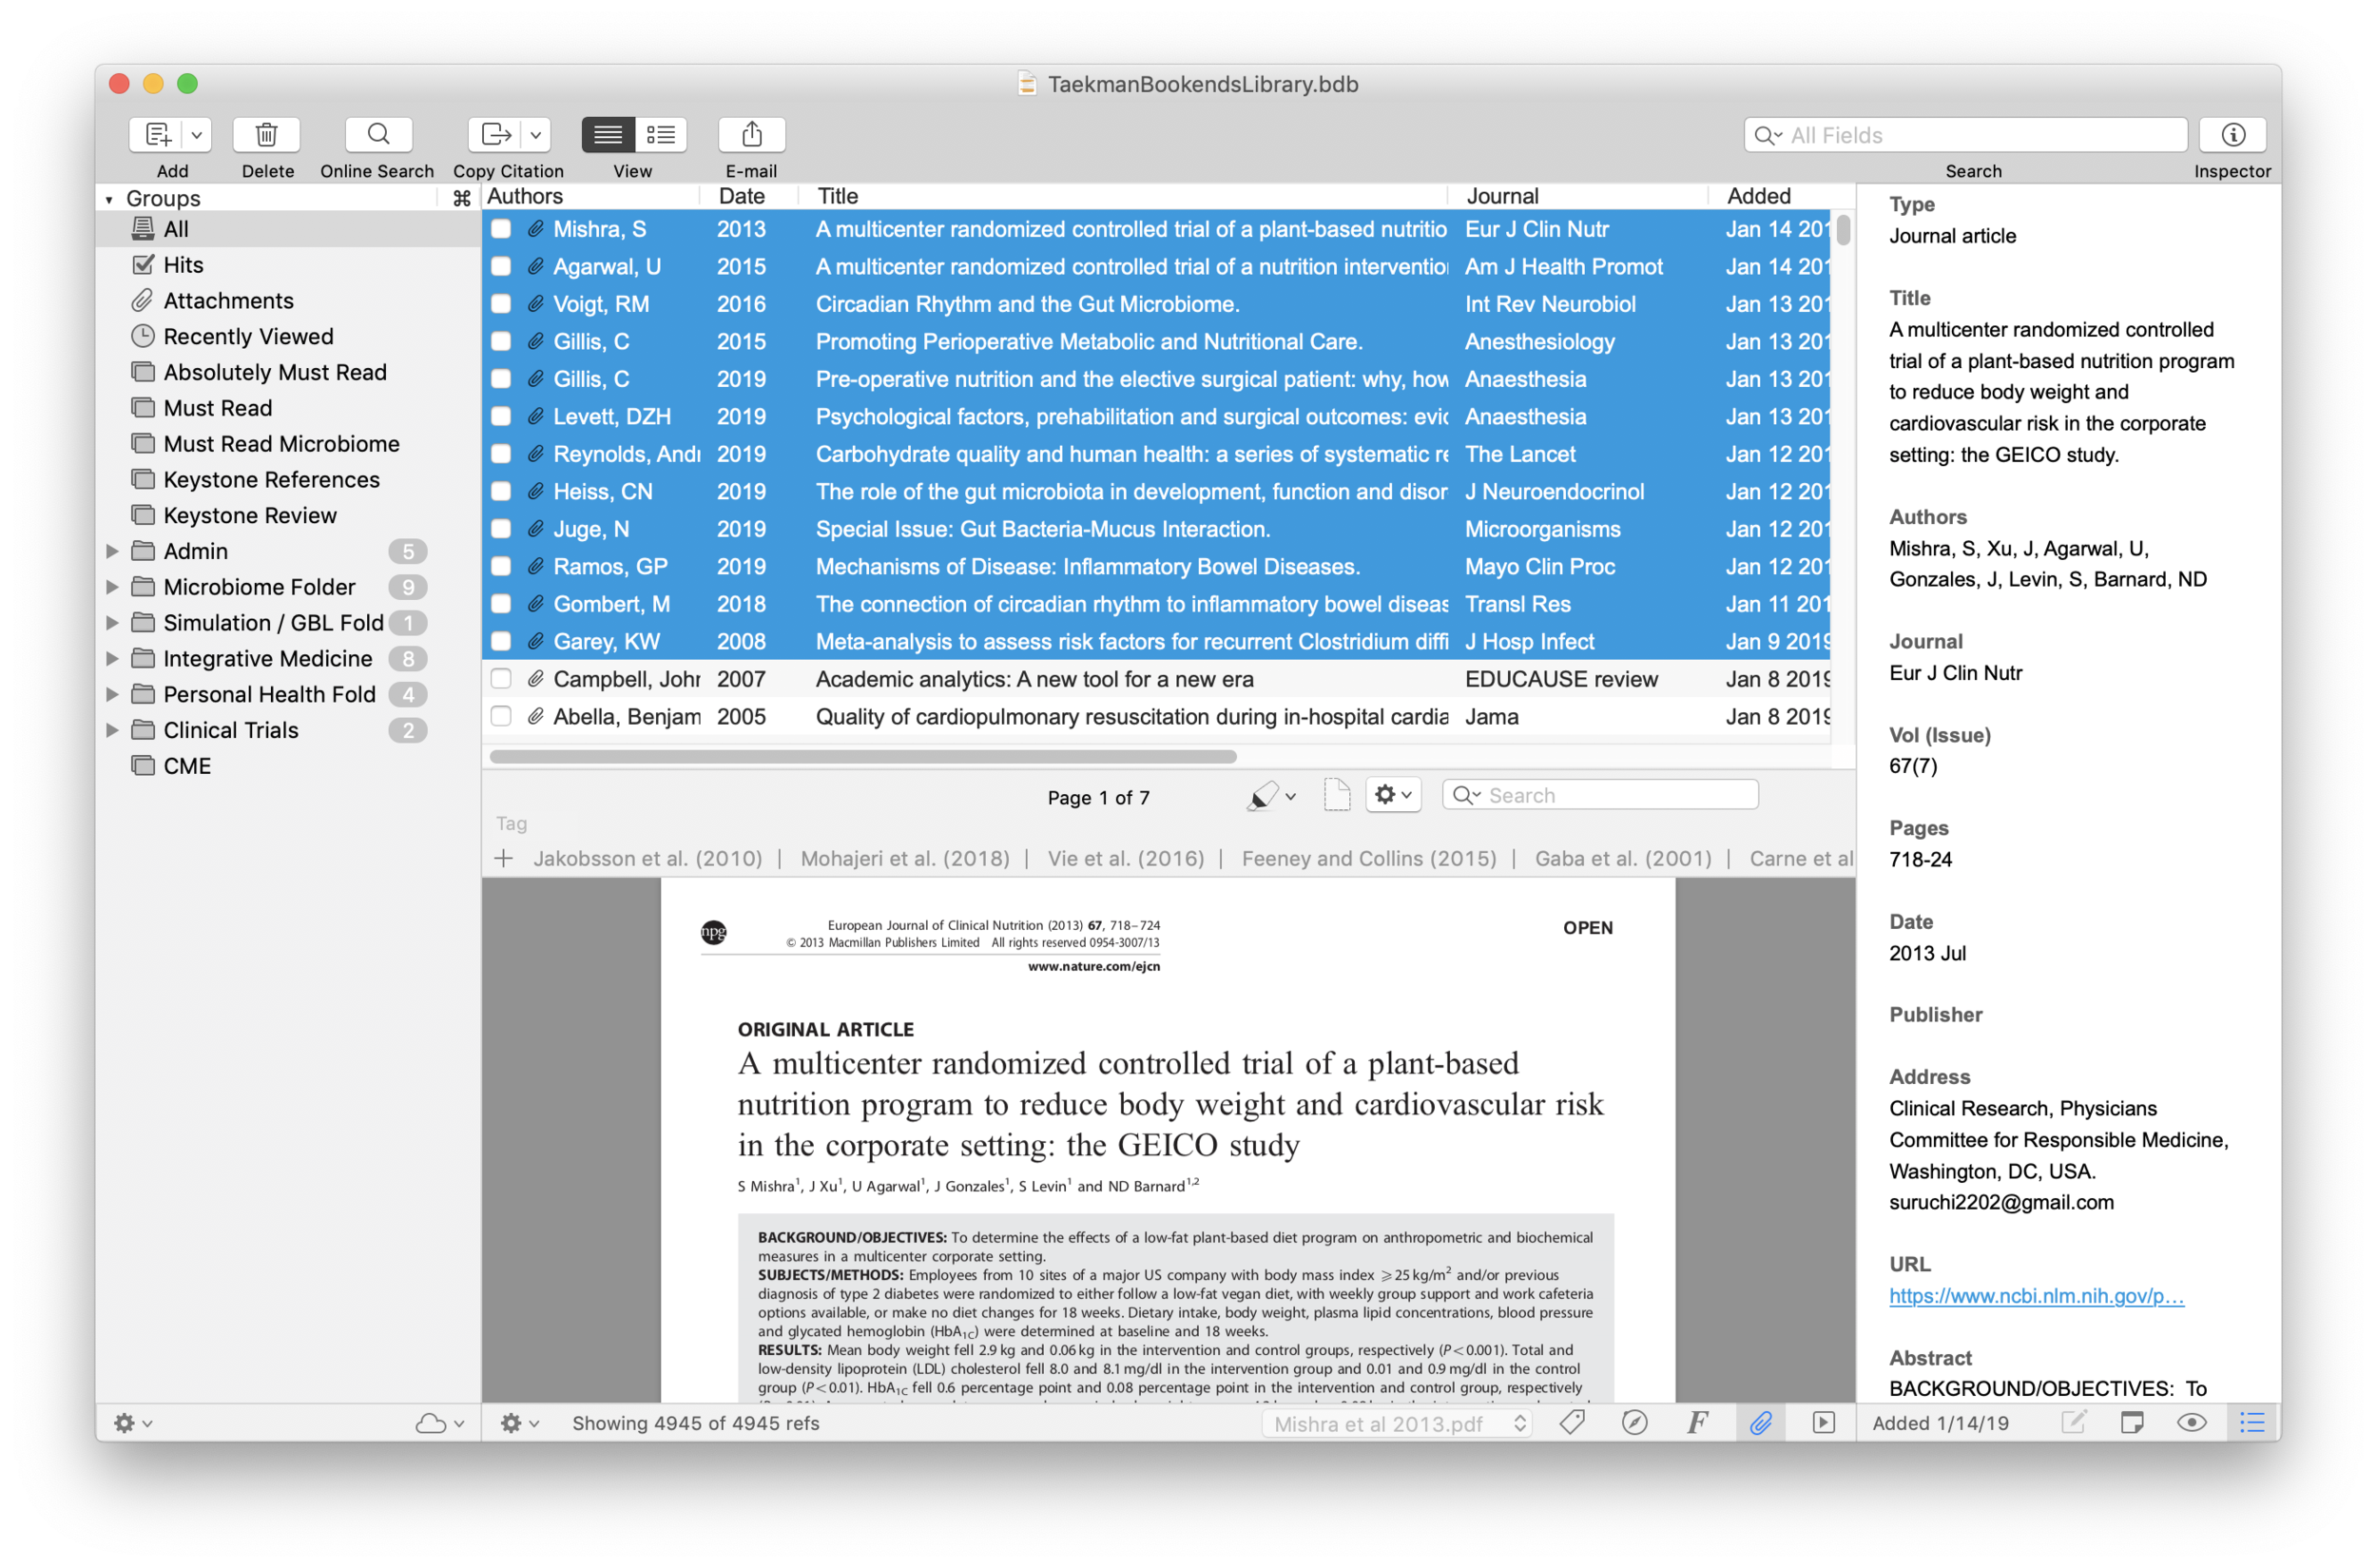
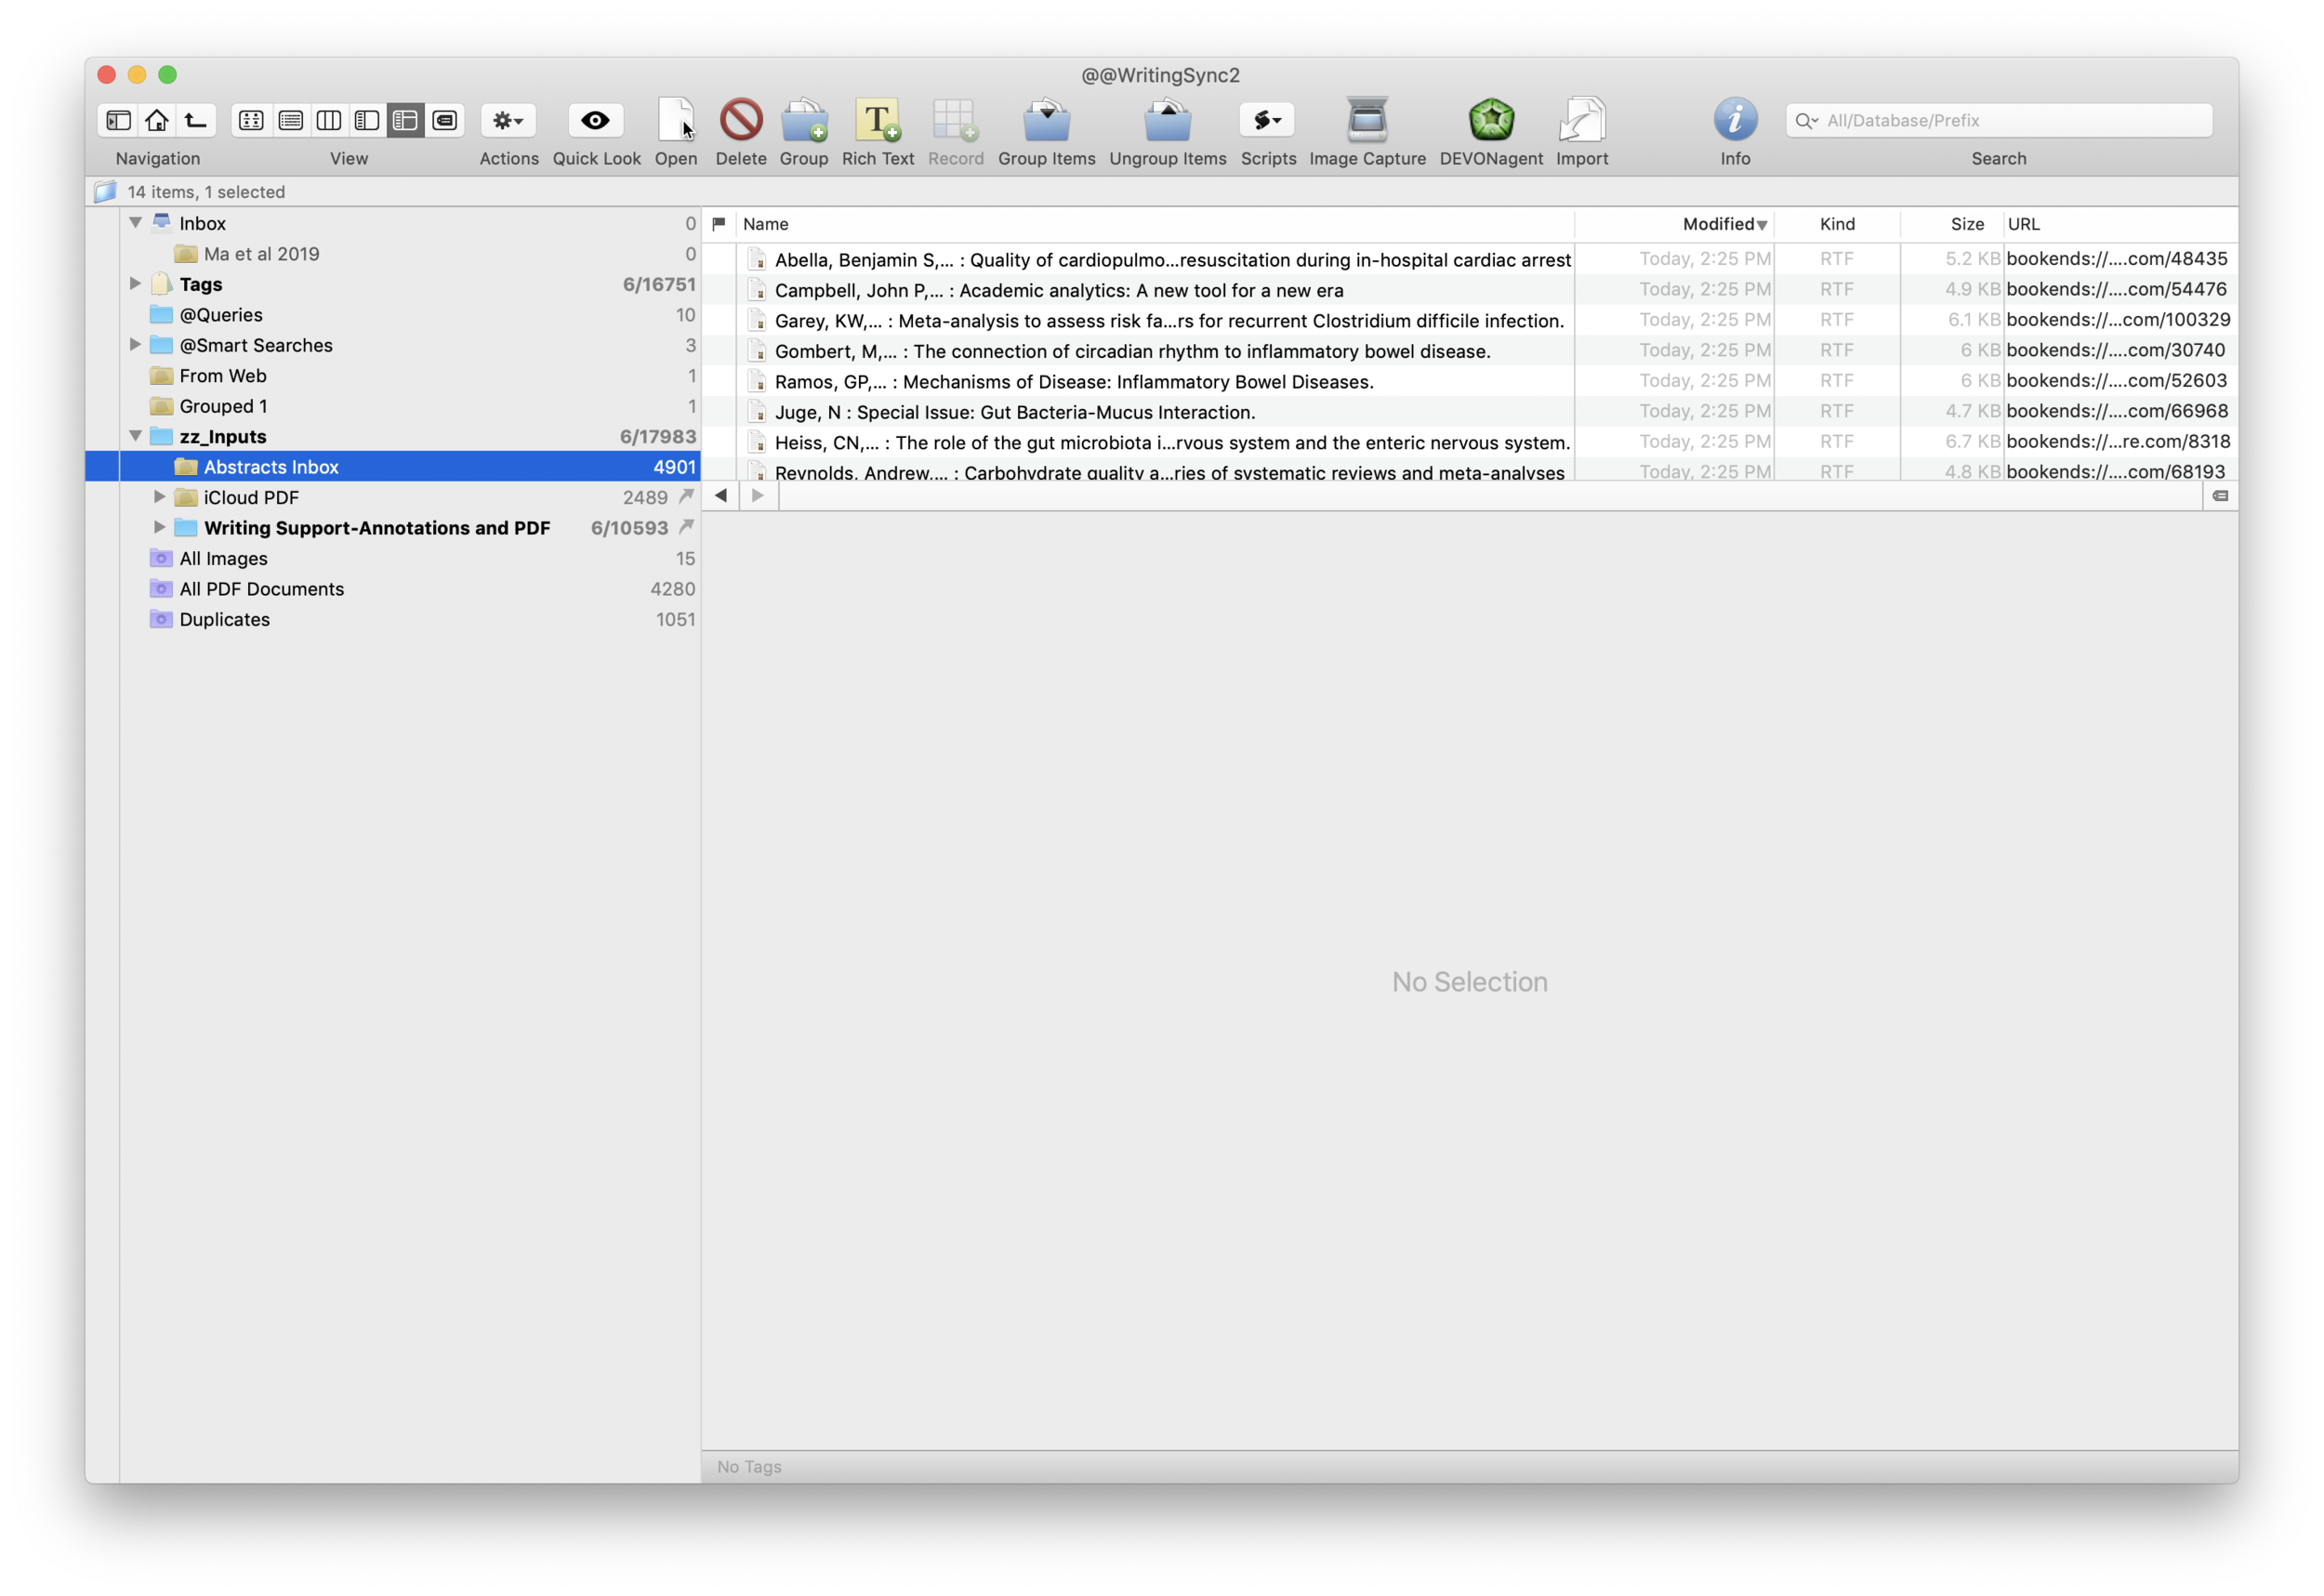
I wrote about Sense-making of the Academic Literature back when I was using Papers. My old workflow required Keyboard Maestro to extract abstract information to Tinderbox. Although Tinderbox is great for visually organizing your notes, it can’t compare to the search capabilities of DevonThink Pro.Since switching to Bookends, I’ve found myself spending less time in Tinderbox and even more time in Devonthink. I’ve made heavy use of a particular built-in Devonthink Template that automates the migration of abstracts from Bookends to DTP (with a link back to Bookends). Once imported into DTP, these abstracts can be parsed using smart folders (enduring searches) that make your literature library a dynamic resource for writing.I have a single DTP database that has indexed the various folders critical in my writing process (e.g. PDFs, extracted notes). In DTP, I’ve organized these folders into a “zz-Inputs Folder”. As you can see below, a sub-folders of zz-Inputs is an “Abstracts Inbox.” When I set up this folder in DTP, I made sure the folder WAS NOT excluded from tagging (this is done by option-clicking on the folder and making sure “exclude from tagging is UNCHECKED).When it’s time to transfer abstracts from Bookends, I first click to select the Abstracts Inbox folder in DTP.I then open up Bookends and sort the fields by the “Added” Column. I like reverse chronological order so I can see the last date I imported abstracts. I highlight all the new manuscripts in Bookends.I then move over to DTP and select the Data:New From Template: Education: Reference (from Bookends) menu item. DTP grabs all the highlighted abstracts from Bookends.The imported information includes Author, Title, Year, Abstract, and Keywords. The template also includes a link back to the publication in Bookends. Finally, there is a field for me to add my own comments to the new DTP file.Once the abstracts are imported into DTP, I make sure to index the folder so the new information is included in search. Now that the information is in DTP I am able to take full advantage of its search functionality and artificial intelligence.I make extensive use of Smart Searches in DTP. Using Smart Searches, The abstracts are automatically sorted into folders.For most topics I have two Smart Searches:
as shown below that includes the search criteria AND searching for the tag “Abstracts Inbox” we talked about earlier—this finds only abstracts relevant to the search,
only the search criteria—this returns ALL information in the database (including abstracts, PDFs, and extracted text as described in this entry).
In DTP, I bring up the Search Interface (Tools: Search….) and type in my search criteria. By default, in the Search Interface, DTP will search across all databases. Notice on the left hand side I have limited the search to my Writing Database. This returns ALL matching information ONLY in my Writing Database. I’ve color coded information extracted from articles using Highlights (for instance, a blue highlight is a direct quote). I can further limit the search by clicking on the “Advanced…” Button and adding additional criteria (e.g. tags, file types, words such as “blue,” etc.).Once I’ve found an abstract that interests me, I locate semantically similar information by highlighting the abstract in DTP and then clicking on the “See Also” button (the Magic Hat).Using this method, all the information I’ve collected (both read and unread) is easily accessible. I use this method extensively when writing. Please let me know if you find it useful too.
Keeping Current with Bookends and QxMD Read
In a previous entry, I covered the ways I add new literature to my scholarly manuscript collection. Technology has evolved since that entry. I’ve migrated to Bookends to keep my literature organized, and I have additional ways I find new literature I’d like to read. That’s what I’d like to cover today.In my MacWorld entry (circa 2012), I mentioned the three ways I collected new reading material:
as a recipient of an Endnote library (when writing collaboratively)
through personal searches on the web (and liberal use of Google’s automated search terms)
as attachments to colleague’s emails
Since then, there are two methods I use even more commonly:
Until recently, I was not familiar with QxMD Read. A colleague at Duke, Dr. Jordan Komisarow, brought the app to my attention. According to QxMD, Read “provides a single place to keep up with new medical & scientific research, read outstanding topic reviews and search PubMed. This iPhone & iPad app provides a simple interface that drives discovery and seamless access to the medical literature by reformatting it into a personalized digital journal.” One comment describes the app as “The Flipboard of Medical Literature.”The app was easy to set up. First I made a QxMD username and password. Then I chose my professions of interest. Finally, I chose specific journals, keywords, and collated collections.Once set up, Read began scouring the medical literature for new articles.In a single screen, I scroll through all the new publications (titles, conclusion, journal, etc.).If I find something of interest, I click on the title to find more information, including the entire abstract. While I’m scanning the abstract, Read attempts to download the full-text PDF.About half the time, Read finds a PDF and downloads it into the app. If the PDF cannot be found, I email the entry to my personalized Omnifocus Mail Drop so the paper is added to my Omnifocus Inbox.If the PDF is downloaded into Read, it is then a simple task to move the document into Bookends. The ease of importing full entries is one of the many places Bookends outshines Papers. I click Open In… and then select the Bookends icon.Bookends works its magic, finding one (or sometimes more) suggestions as matches.I choose the matching metadata and Bookends imports the PDF and metadata into its database. The paper and its metadata are immediately available on all of my devices.The process works pretty seamlessly. The only annoyance is that if you save the PDF to your library, it receives a numerical name. You must later open Bookends on your Mac and rename the PDF to your naming convention. This is a small price to pay for such power.I'm finding even more relevant information these days using QxMD Read. My challenge now is finding the time to read and process it all!
Folder Structure to Maximize Writing with Devonthink Pro
On several occasions I have written about how I use Devonthink Pro (DTP) for scholarly writing. Although at one point I had all my information on manuscripts in a single DTP database, over the last year I have maintained separate databases; one for PDFs, another for my annotations.I accomplish this by having separate folders in Dropbox. After extracting my annotations from Highlights.app, I place the exported files in their own folder. Once a month, I export all the PDFs in my Paper’s Library to their own Dropbox folder. I use a Hazel script to throw away any duplicate PDFs in the Dropbox folder. I index (not import) the annotations folder into one DTP database, and index my PDFs into another.This setup allows a fair amount of flexibility. Not only is this setup advantageous for writing with DTP (as I will cover in my next entry), it allows easy access to my PDFs for reading with Liquidtext or listening with Voice Dream.
Mourning the loss of Integration Between Papers and Scrivener
Early indications, including personal communication with ReadCube personnel, are that Magic Citations (now called SmartCite) will no longer integrate with Scrivener. The new Papers app will only work with Microsoft Word. Bibliography formatting is not an issue for me. The biggest loss is the ability to add citations on the fly in Scrivener without interupting my writing flow.The news of this impending feature loss (along with the announcement of an annual fee) had me scrambling to invesitgate my options for citation managers. During my search, I came across this Wikipedia article, Comparison of Reference Management Software with a great table that collates the majority of software out there.My needs are the following:
- Ability to organize and search through metadata and pdfs
- Integrated citation insertion with Scrivener and Ulysses
- Ability to insert citations while writing on an iOS device
- Ability to annotate PDFs and export each comment individually appended with the article's metadata
- Ability to export metadata (to enable my workflows for sense-making and export of annotations)
I looked at the following:
No product currently fills the void left by Papers, although the consensus of users (both those seeking alternatives to Papers and those who are being forced to leave Sente) seems to be to move to Bookends. I tried the demo version of Bookends and was not impressed. I am waiting impatiently for the release of ReadCube Papers. If the majority of features are retained, I will likely bite the bullet and pay the annual fee. I plan to figure out a work-around to add citations to Scrivener / Ulysses.I'd be interested in hearing your plans / thoughts on academic citation managers.
OmniFocus Mail Drop Trick
Here's a quick tip for getting tasks from your email to your OmniFocus Inbox.Many times, requests for my time arrive via email. Committing and tracking this type of request used to be a multi-step process. First, I'd add the email to my OmniFocus Inbox. Then I would reply to the email acknowledging my commitment (or requesting a follow-up).I realized there was an easier way....Now, when replying to an email with a task, I merely put my OmniFocus Mail Drop email address in the bcc field. Using this method, I can respond and track the task in a single button click.
Travel Receipt Workflow
Here is a handy workflow to keep track of your reimbursable / billable expenses on the road.Set-up:
I have an Evernote Notebook that is used solely for professional receipts. This notebook is named “Receipts_Work”. I’ve set up an If This Then That (IFTTT) Applet to send an email when the notebook receives a new note.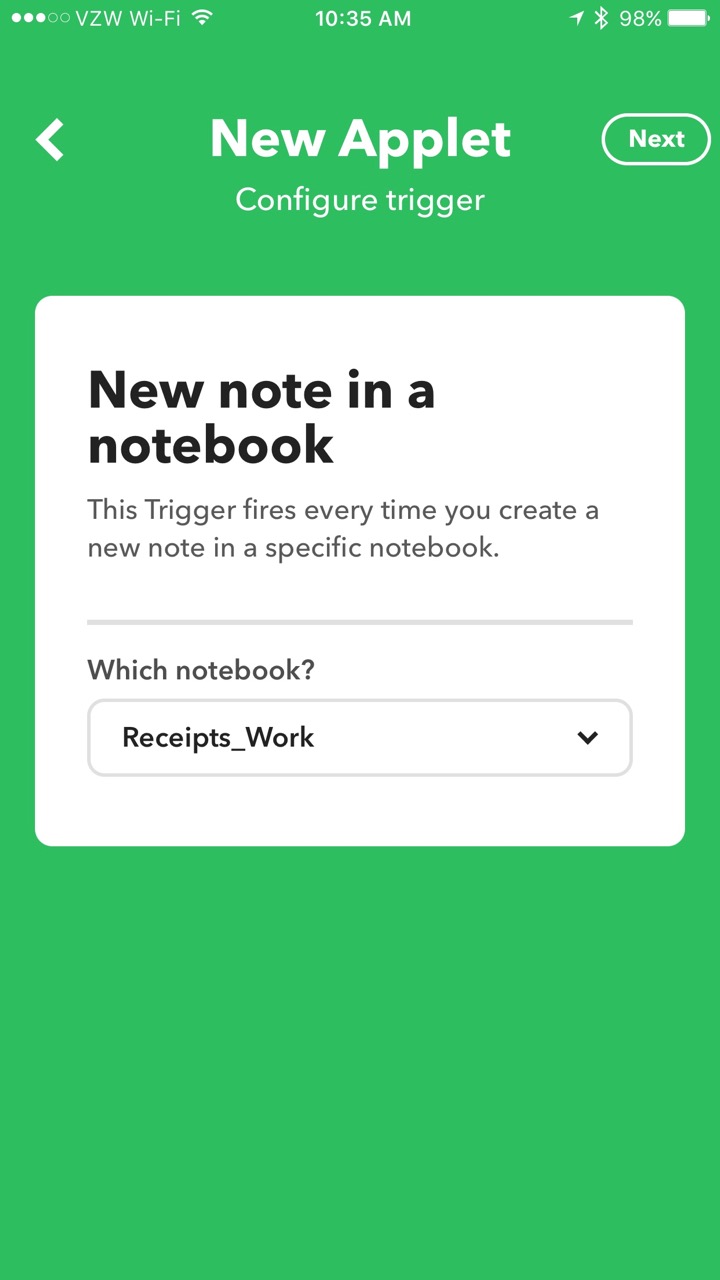
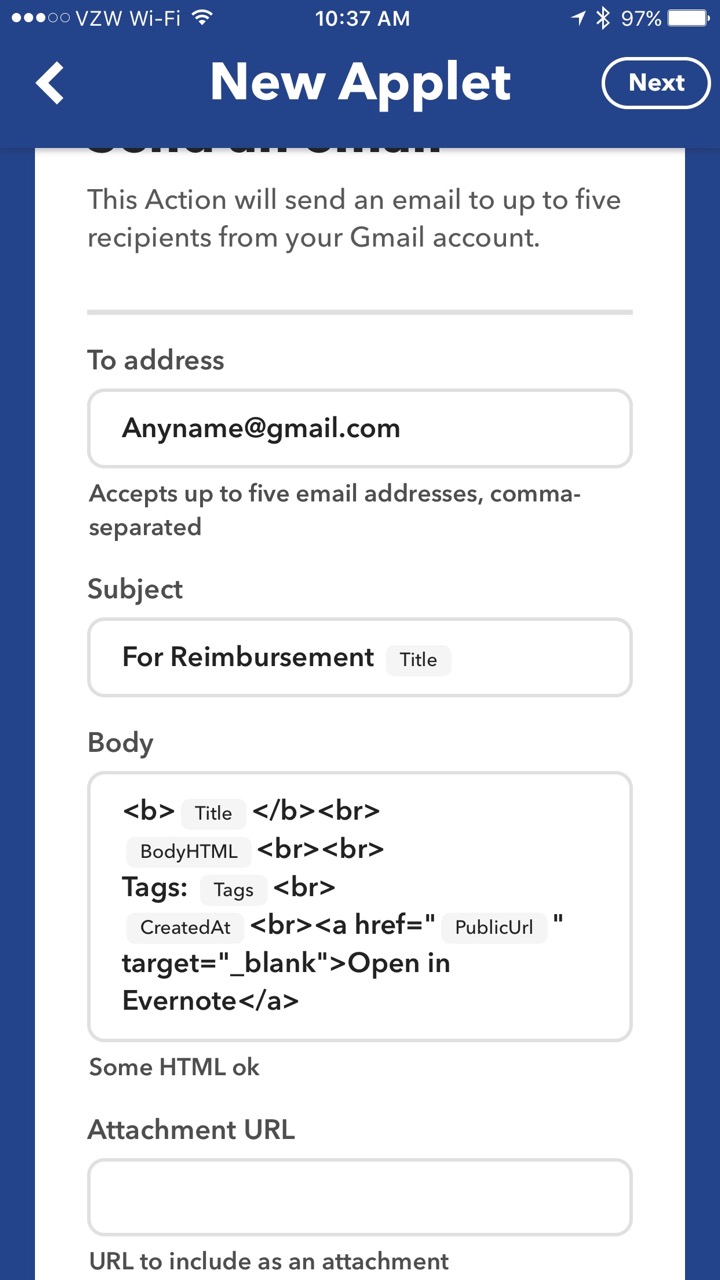 When I receive a receipt on the road, I immediately scan it with Scannable then save it to my Receipts_Work Notebook. IFTTT monitors the Receipts_Work Notebook. When the new note is detected, it automatically sends an email to both my assistant and my Omnifocus Maildrop address (so the item is added to my Omnifocus Inbox).After my trip, I can go back to my Evernote, select all the receipts/notes from my trip and make a “Table of Contents” using a single button push in Evernote.
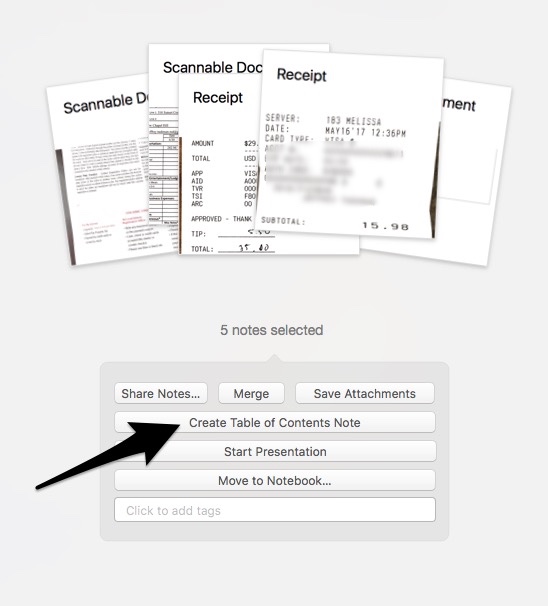 This workflow simplifies management of reimbursement receipts. Hope it works as well for you as it does for me.
Highlights.app Redux
I was too quick to judge the program Highlights. I gave Highlights a second chance, and although not perfect, the app is slowly winning me over. Highlights has greatly sped up the extraction of information from my reading.First a little background. I use Papers for my PDF and bibliographic management. I’ve written about how I extract highlights and annotations into individual files along with their relevant references. The reason to go to this trouble is to enable Devonthink’s artificial intelligence. The Devonthink AI uses word count to find related information in other files. I use this method extensively in my writing of grants and manuscripts. With my previous method, I found by adding references to each annotation (thus similar words) I was interfering with Devonthink’s ability to find relevant information. In order to improve Devonthink’s accuracy, I stopped adding references to each individual annotation. Instead, I merely include a Papers Link back to the original file.Highlights shows the annotations you make in the app's right-hand column. A pop-up interface within Highlights allows you to make comments, underline , change colors, etc. The killer feature of Highlights is single-command extraction of each annotation / comment to its own file. This feature allows me to extract highlights (and metadata) without having to invoke my Keyboard Maestro macros. When the data is extracted into Devonthink, the individual files are in Markdown. This makes the extracted information easy to view and edit.Although I’m more enthusiastic about Highlights, there are several quirks you should understand:
When Highlights explodes your annotations into individual files, it prepends the original file’s name. If you use Highlights from within Papers (e.g. selecting Highlights as your PDF reader of choice from within Papers) you will end up with a ridiculous, machine based title in your metadata. This is not Highlights fault. The use of non-intuitive file names is one of my pet peeves about Papers. The workaround is to export a copy of the PDF to your Desktop and then launch the exported file using Highlights. Using this method, the author’s name and the title of the manuscript along with the year of publication are all prepended to each markdown file.
After reading and highlighting, I edit the markdown headers in Highlights (choosing the edit tab in the annotations window). I erase all but the primary author’s name and then add the Paper’s Citation and a Papers Link back to original file (copied from Paper’s Edit Menu). There is another quirk here. In Highlights Edit Mode, if you don’t leave a space between the markdown coding and the information you add, your file will be reset back to its original state, erasing your modifications.
Highlights has the ability to automatically look up DOI numbers. When it works, it’s great. It takes a single click to import a reference from the bibliography into your Paper’s Database. Unfortunately, this feature is flaky, especially with longer manuscripts. I often have to revert to my Launchbar scripts to capture the bibliographic information I need.
Once I’ve added the metadata I want to the master annotation file (and collected the references of interest), from within Highlights, I choose Export >> Devonthink. Highlights creates individual markdown files for each of the annotations. Each individual file contains the master file’s metadata. The data is copied to my Devonthink Global Inbox. I move the folder from the Devonthink Inbox to my Desktop and from there to my Annotations Folder using Launchbar.Highlights has significantly sped up the time it takes to process a manuscript. Using this method, I’m also having greater success with the “See Also” feature of Devonthink. I hope it works for you too.
My Omnifocus Set-up - free webinar
I was honored to be a guest on Tim Stringer’s Learn Omnifocus to discuss my Omnifocus setup. I covered much of the material in My Omnifocus Set-up (Part 1) and (Part 2). Tim made the webinar available free on the Learn Omnifocus Website. Check it out!
OmniFocus + Focus - Pomodoro Productivity
Combining Omnifocus and the Pomodoro Technique is an incredible way to get things done. Years ago, I used a program called Eggsellent. Eggsellent integrated seamlessly with Omnifocus ( flagged tasks in OF were added to the Eggsellent queue). The upgrade from OF to OF2 broke the integration, and the Eggsellent developer did not update his app.In searching for a replacement, I tried Vitamin R2 and Tomatoes. I settled on Tomatoes for its simplicity and visually pleasing interface. Tomatoes did not meet my needs. The only way to get OF tasks into Tomatoes was to drag and drop (or type). This was a far cry from the workflow I enjoyed with Eggsellent.From Tim Stringer’s Learn Omnifocus website, I found a Pomodoro app called Focus. Focus is one step closer to what I’ve been looking for since the demise of Eggsellent. The Focus Interface is clean, intuitive, and attractive. Although Focus does not autopopulate flagged items from OF2, it is easy to add a task using the “Share” menu. Timers and tasks are synchronized on Mac, iOS, and Apple Watch via iCloud.Focus is still missing some of the functionality I desire in a Pomodoro app. Besides missing automatic OF2 integration, there is no ability to add tags to each item. The only way to add metadata is via a text box. Add that to the relatively steep price ($19.99 for the Mac version, $7.99 for iOS).Despite these shortcomings, Focus is my favorite modern Pomodoro app and has replaced Tomatoes as my timer of choice. Give it a try.
LiquidText PDF Reader
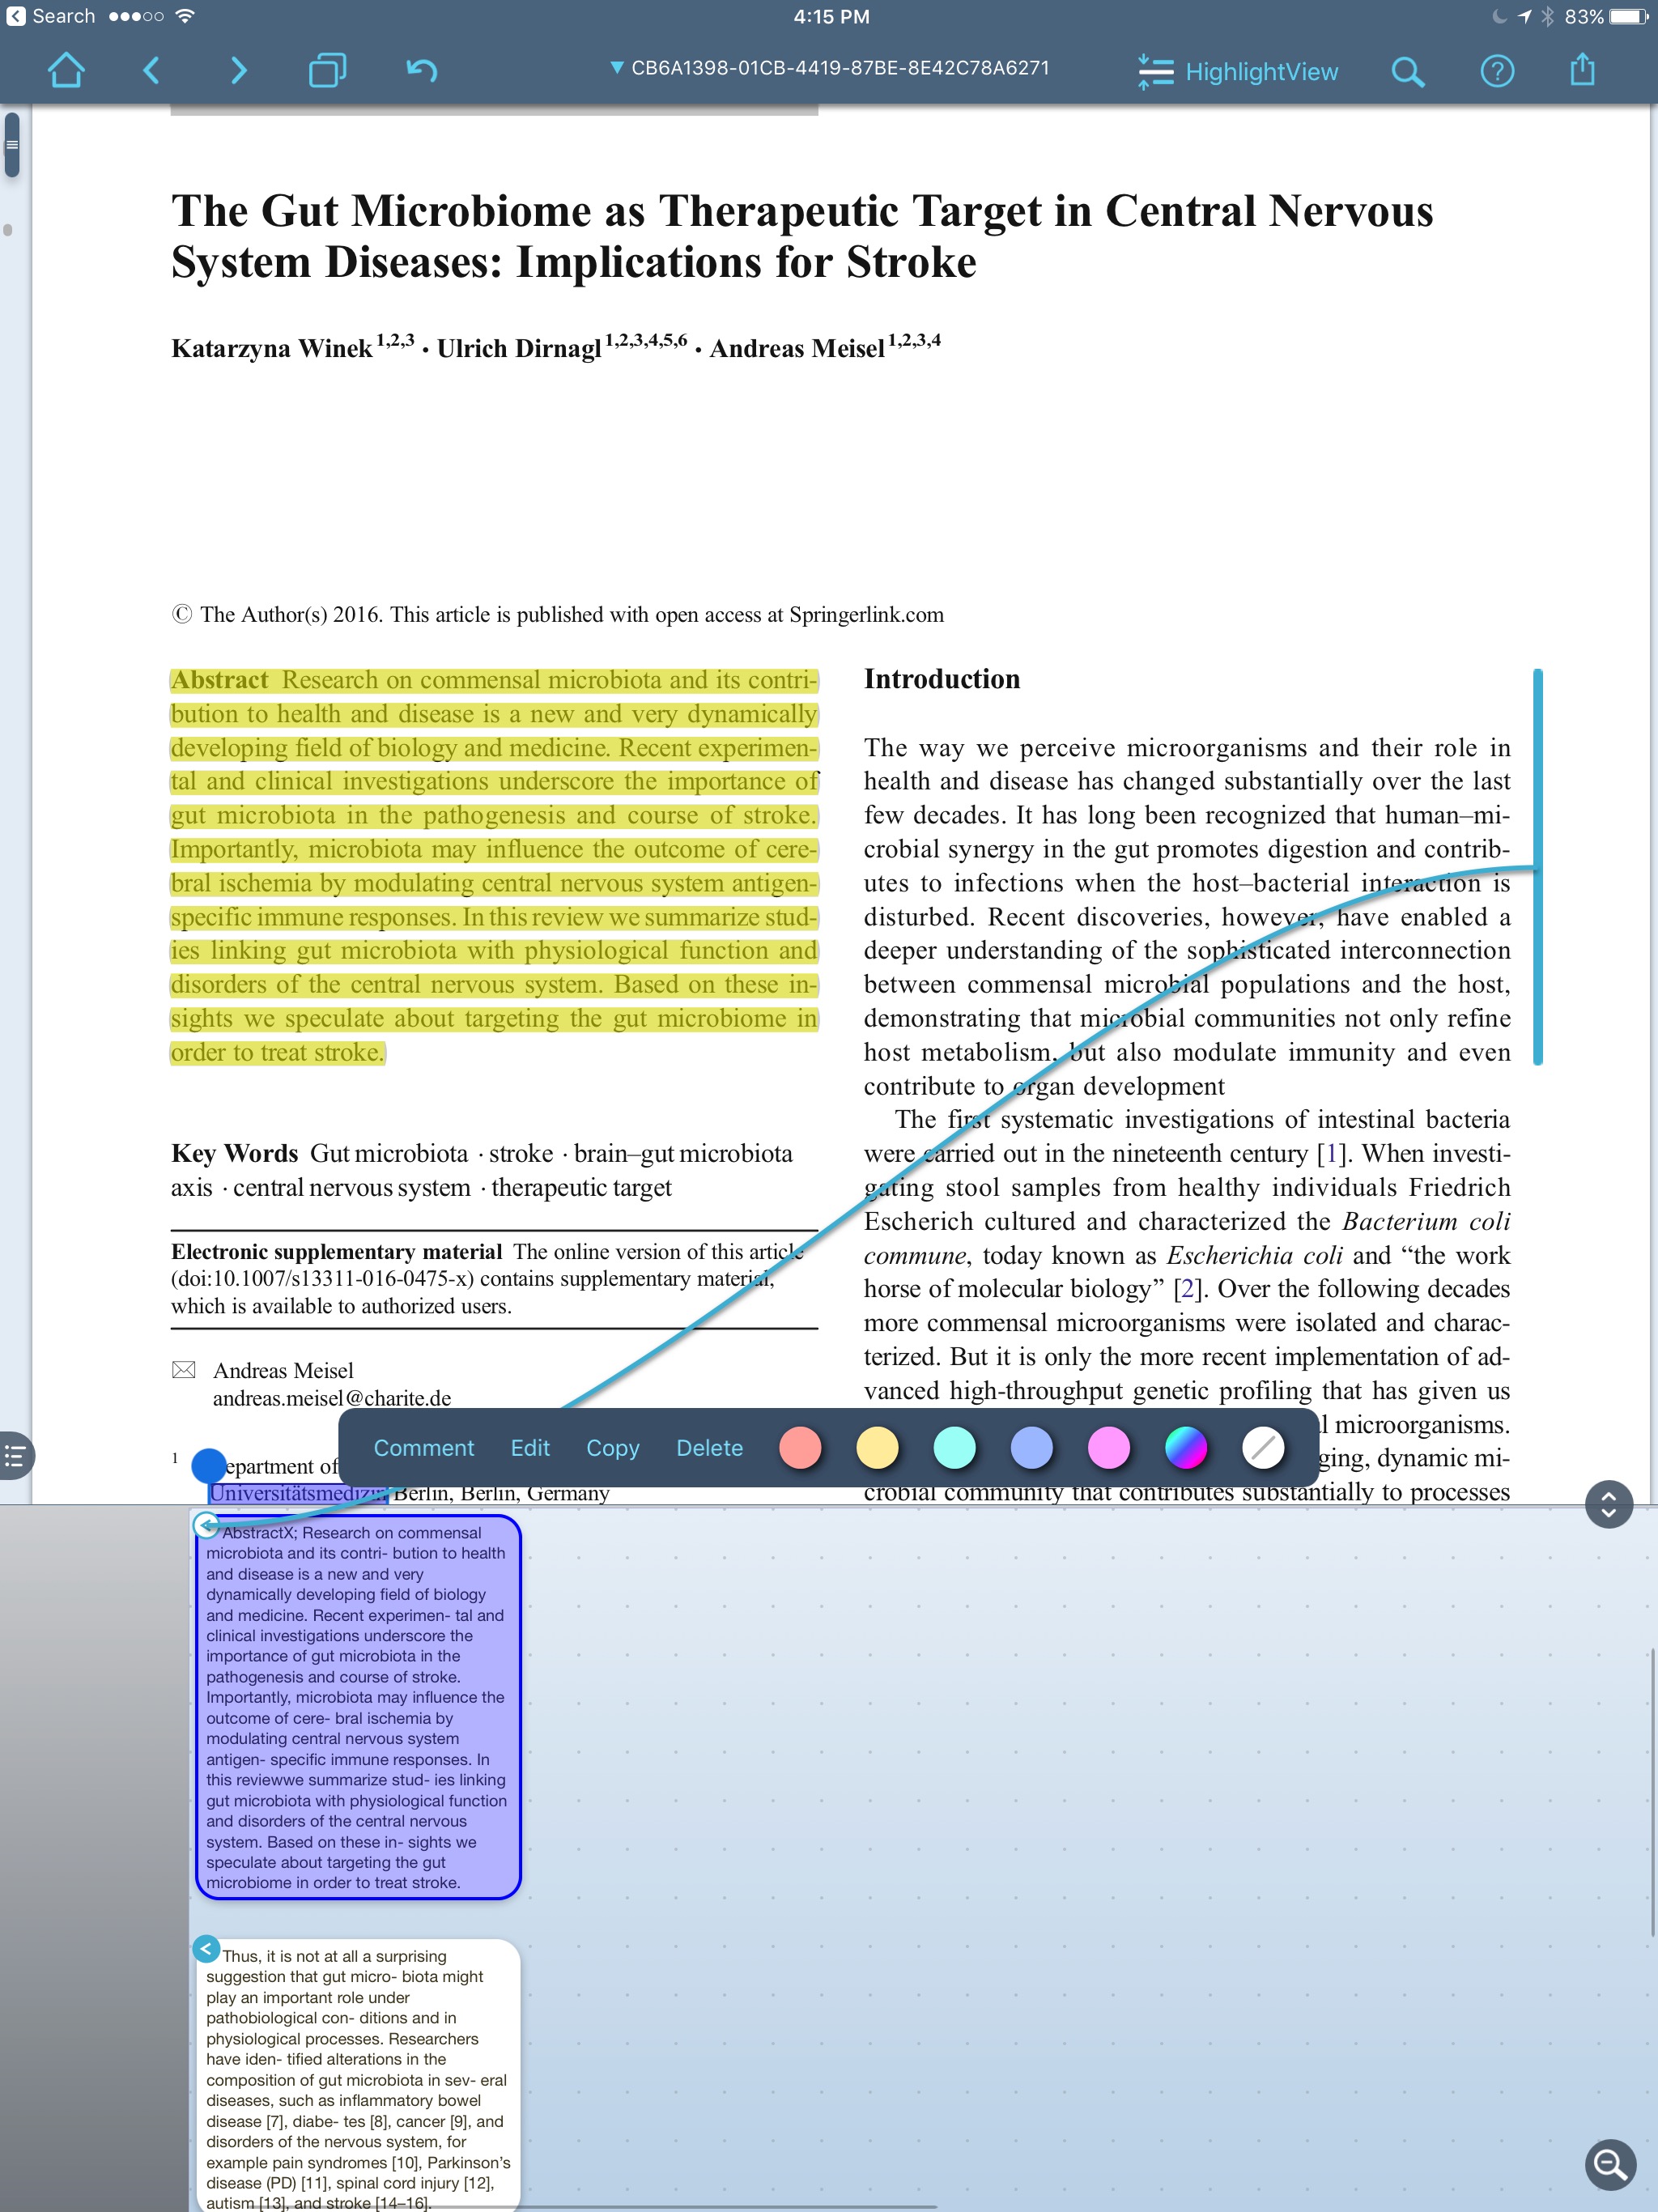
I have experimented with different PDF readers on my iPad. Over the past several months I’ve exclusively used a program called LiquidText.LiquidText has a unique, award-winning, interface that allows me to drag, drop, and manipulate text using my finger. LiquidText was named “Most Innovative iPad App of the Year” by Apple in 2015. LiquidText feels much more natural than any other PDF reader I’ve used on iOS--and I've used many. After highlighting with my finger, the exerpts / highlights / comments are extracted into their own area. The excerpts may be dragged around, linked, and repositioned at will.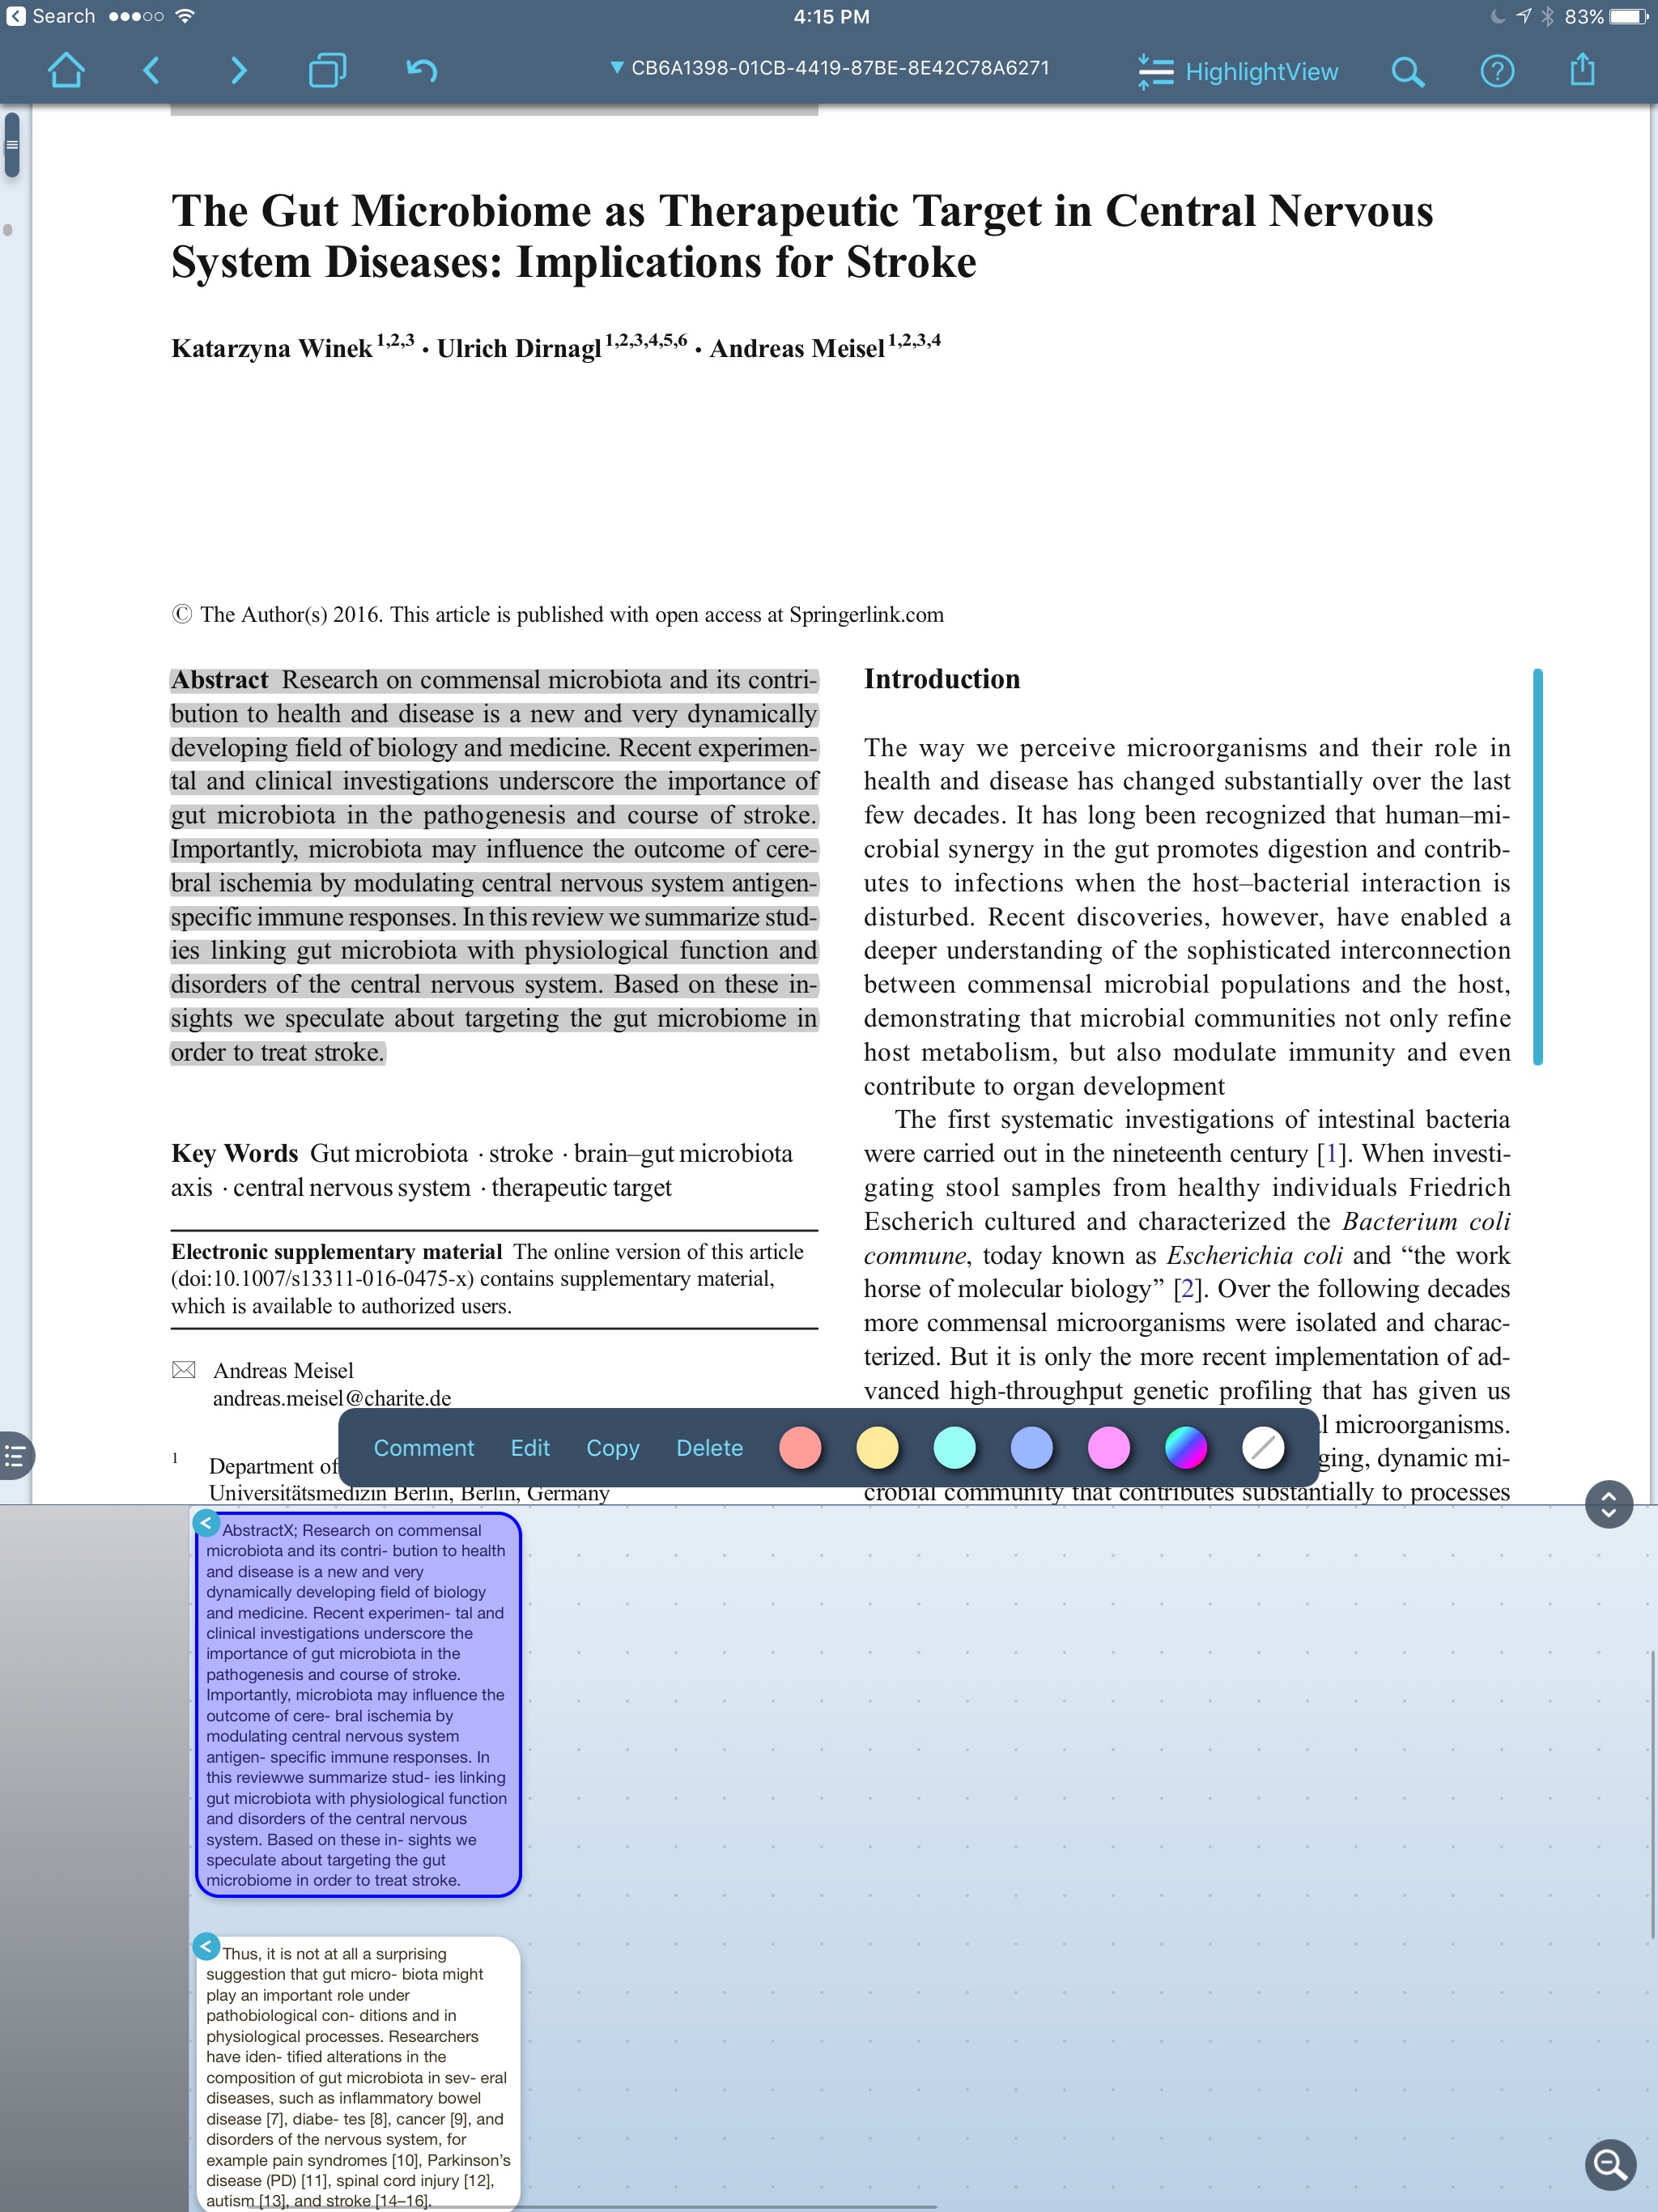 When reading and highlighting, I either drag text from the PDF into the notes area, or simply hit “AutoExcerpt” and the text is extracted for me. I can comment on the excerpted information.
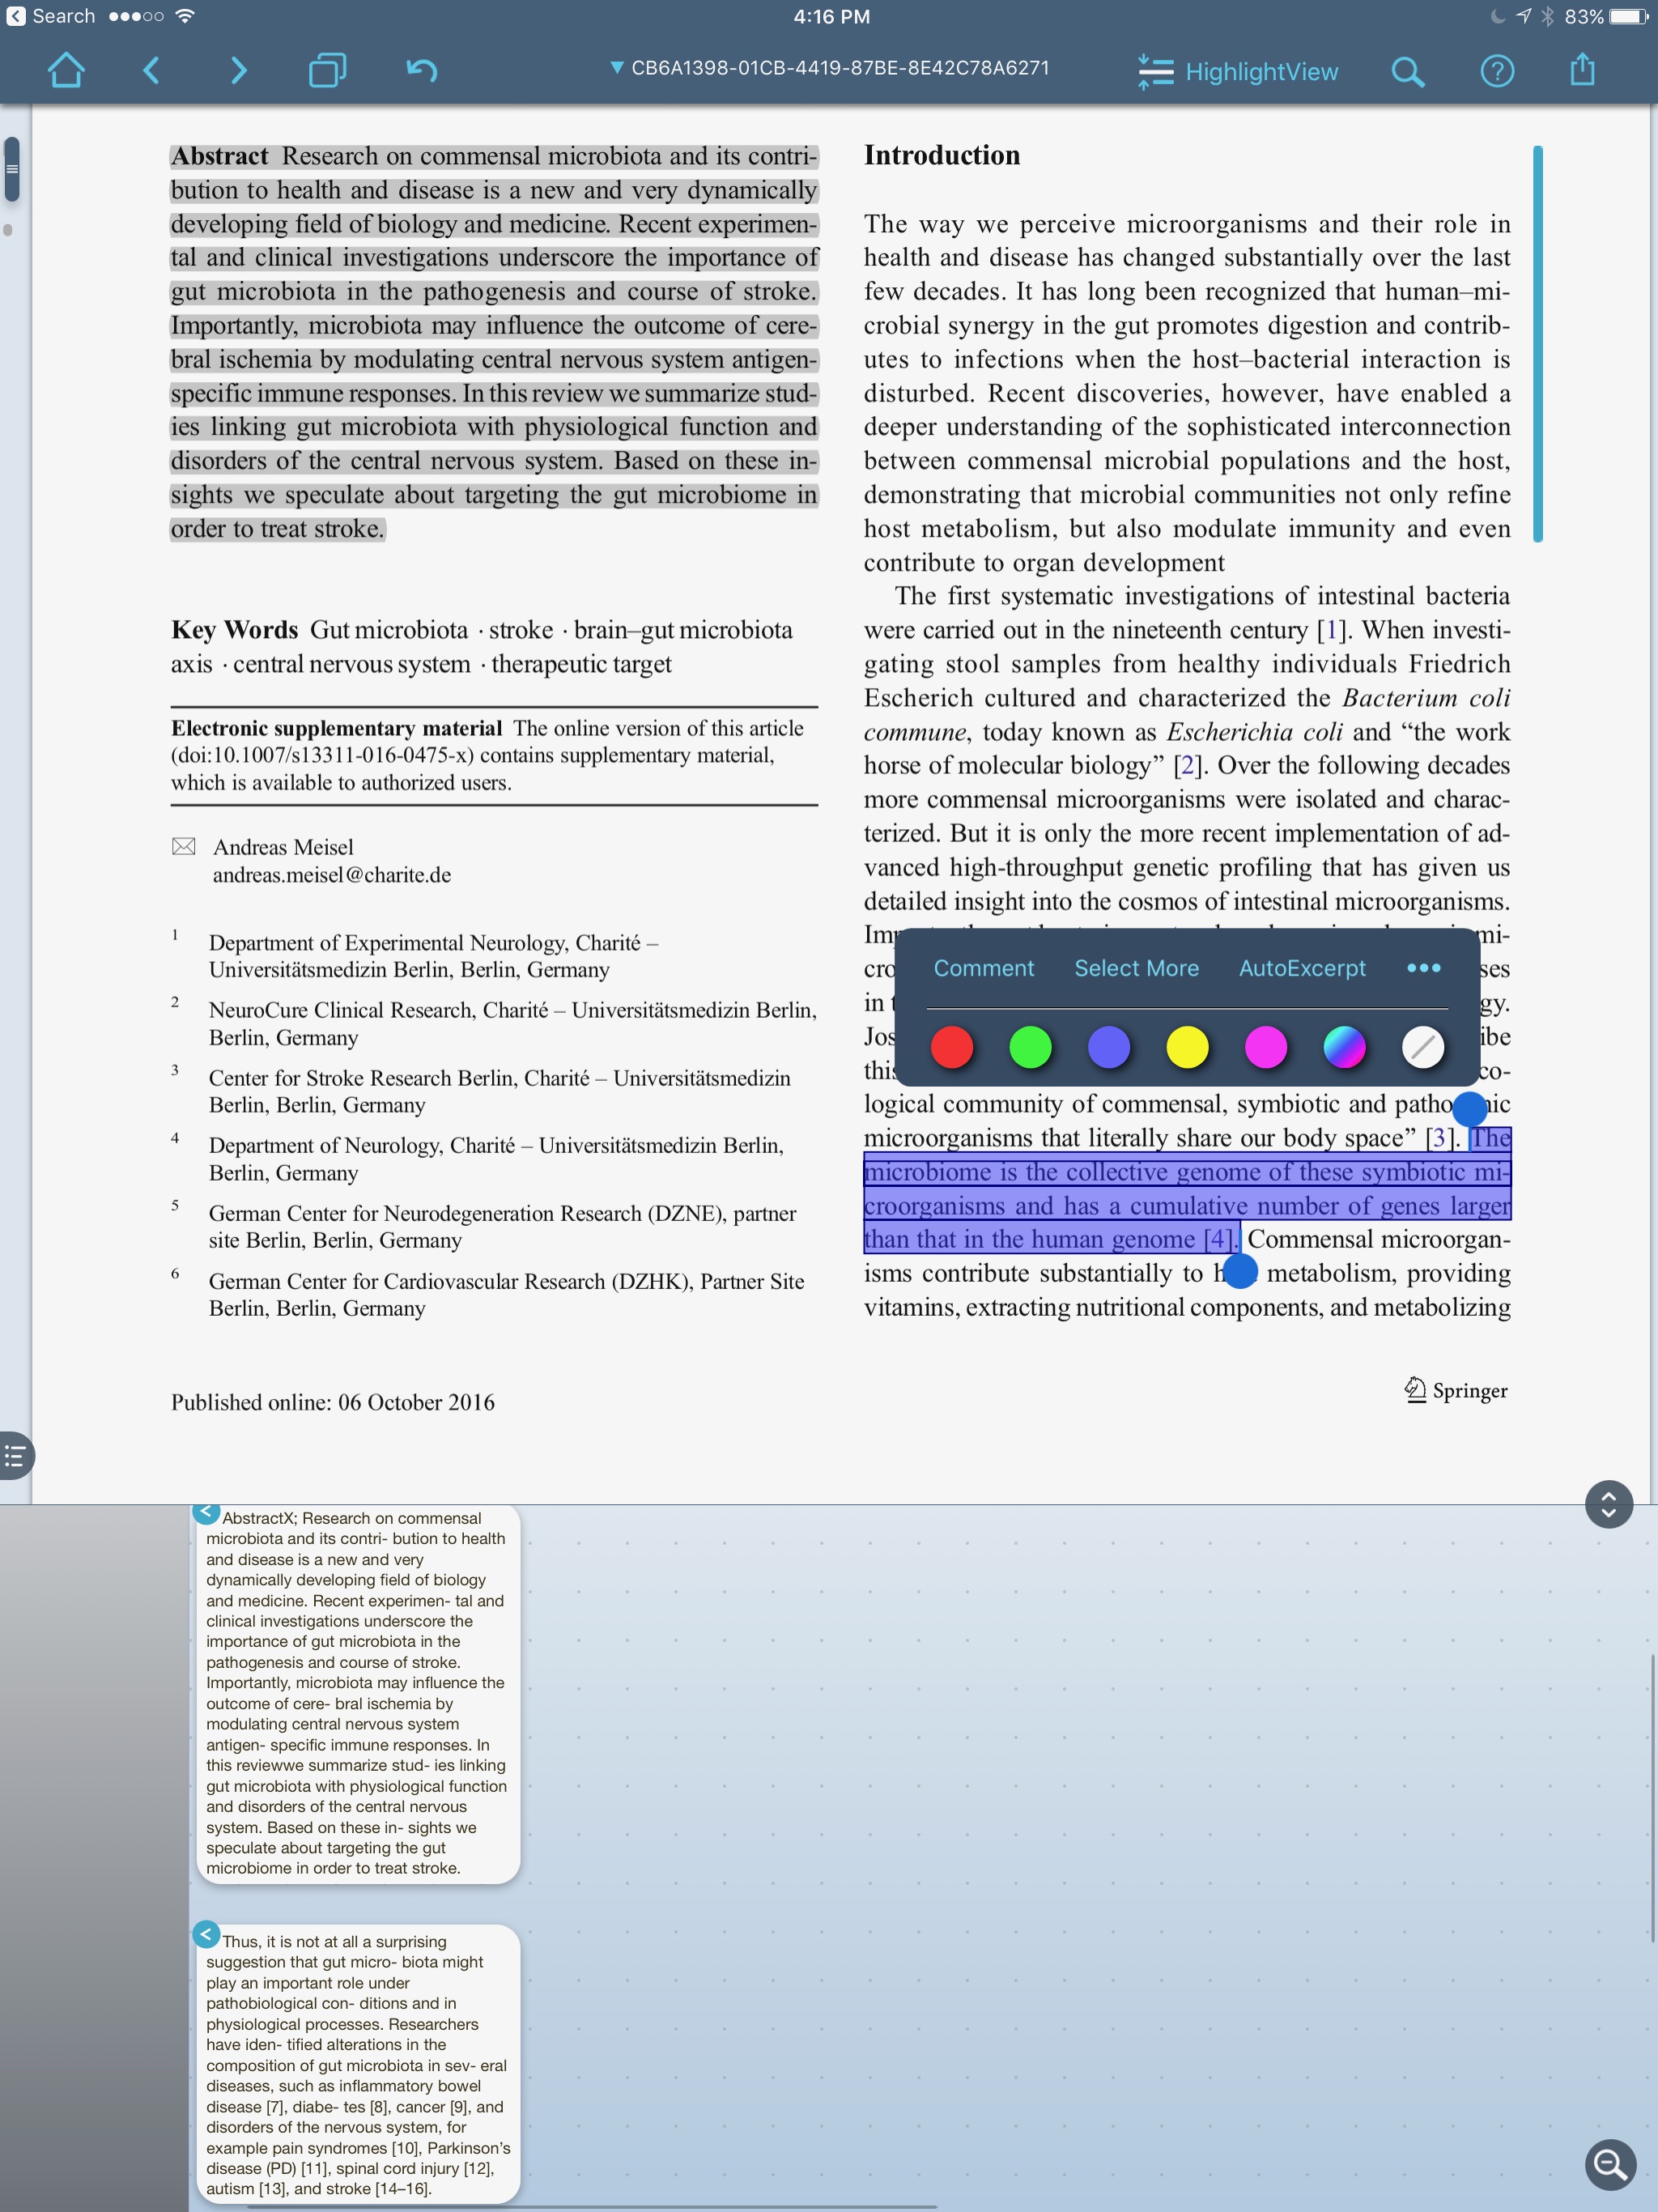 I can also view the place in the paper the highlight came from by merely touching the excerpt in the notes area.
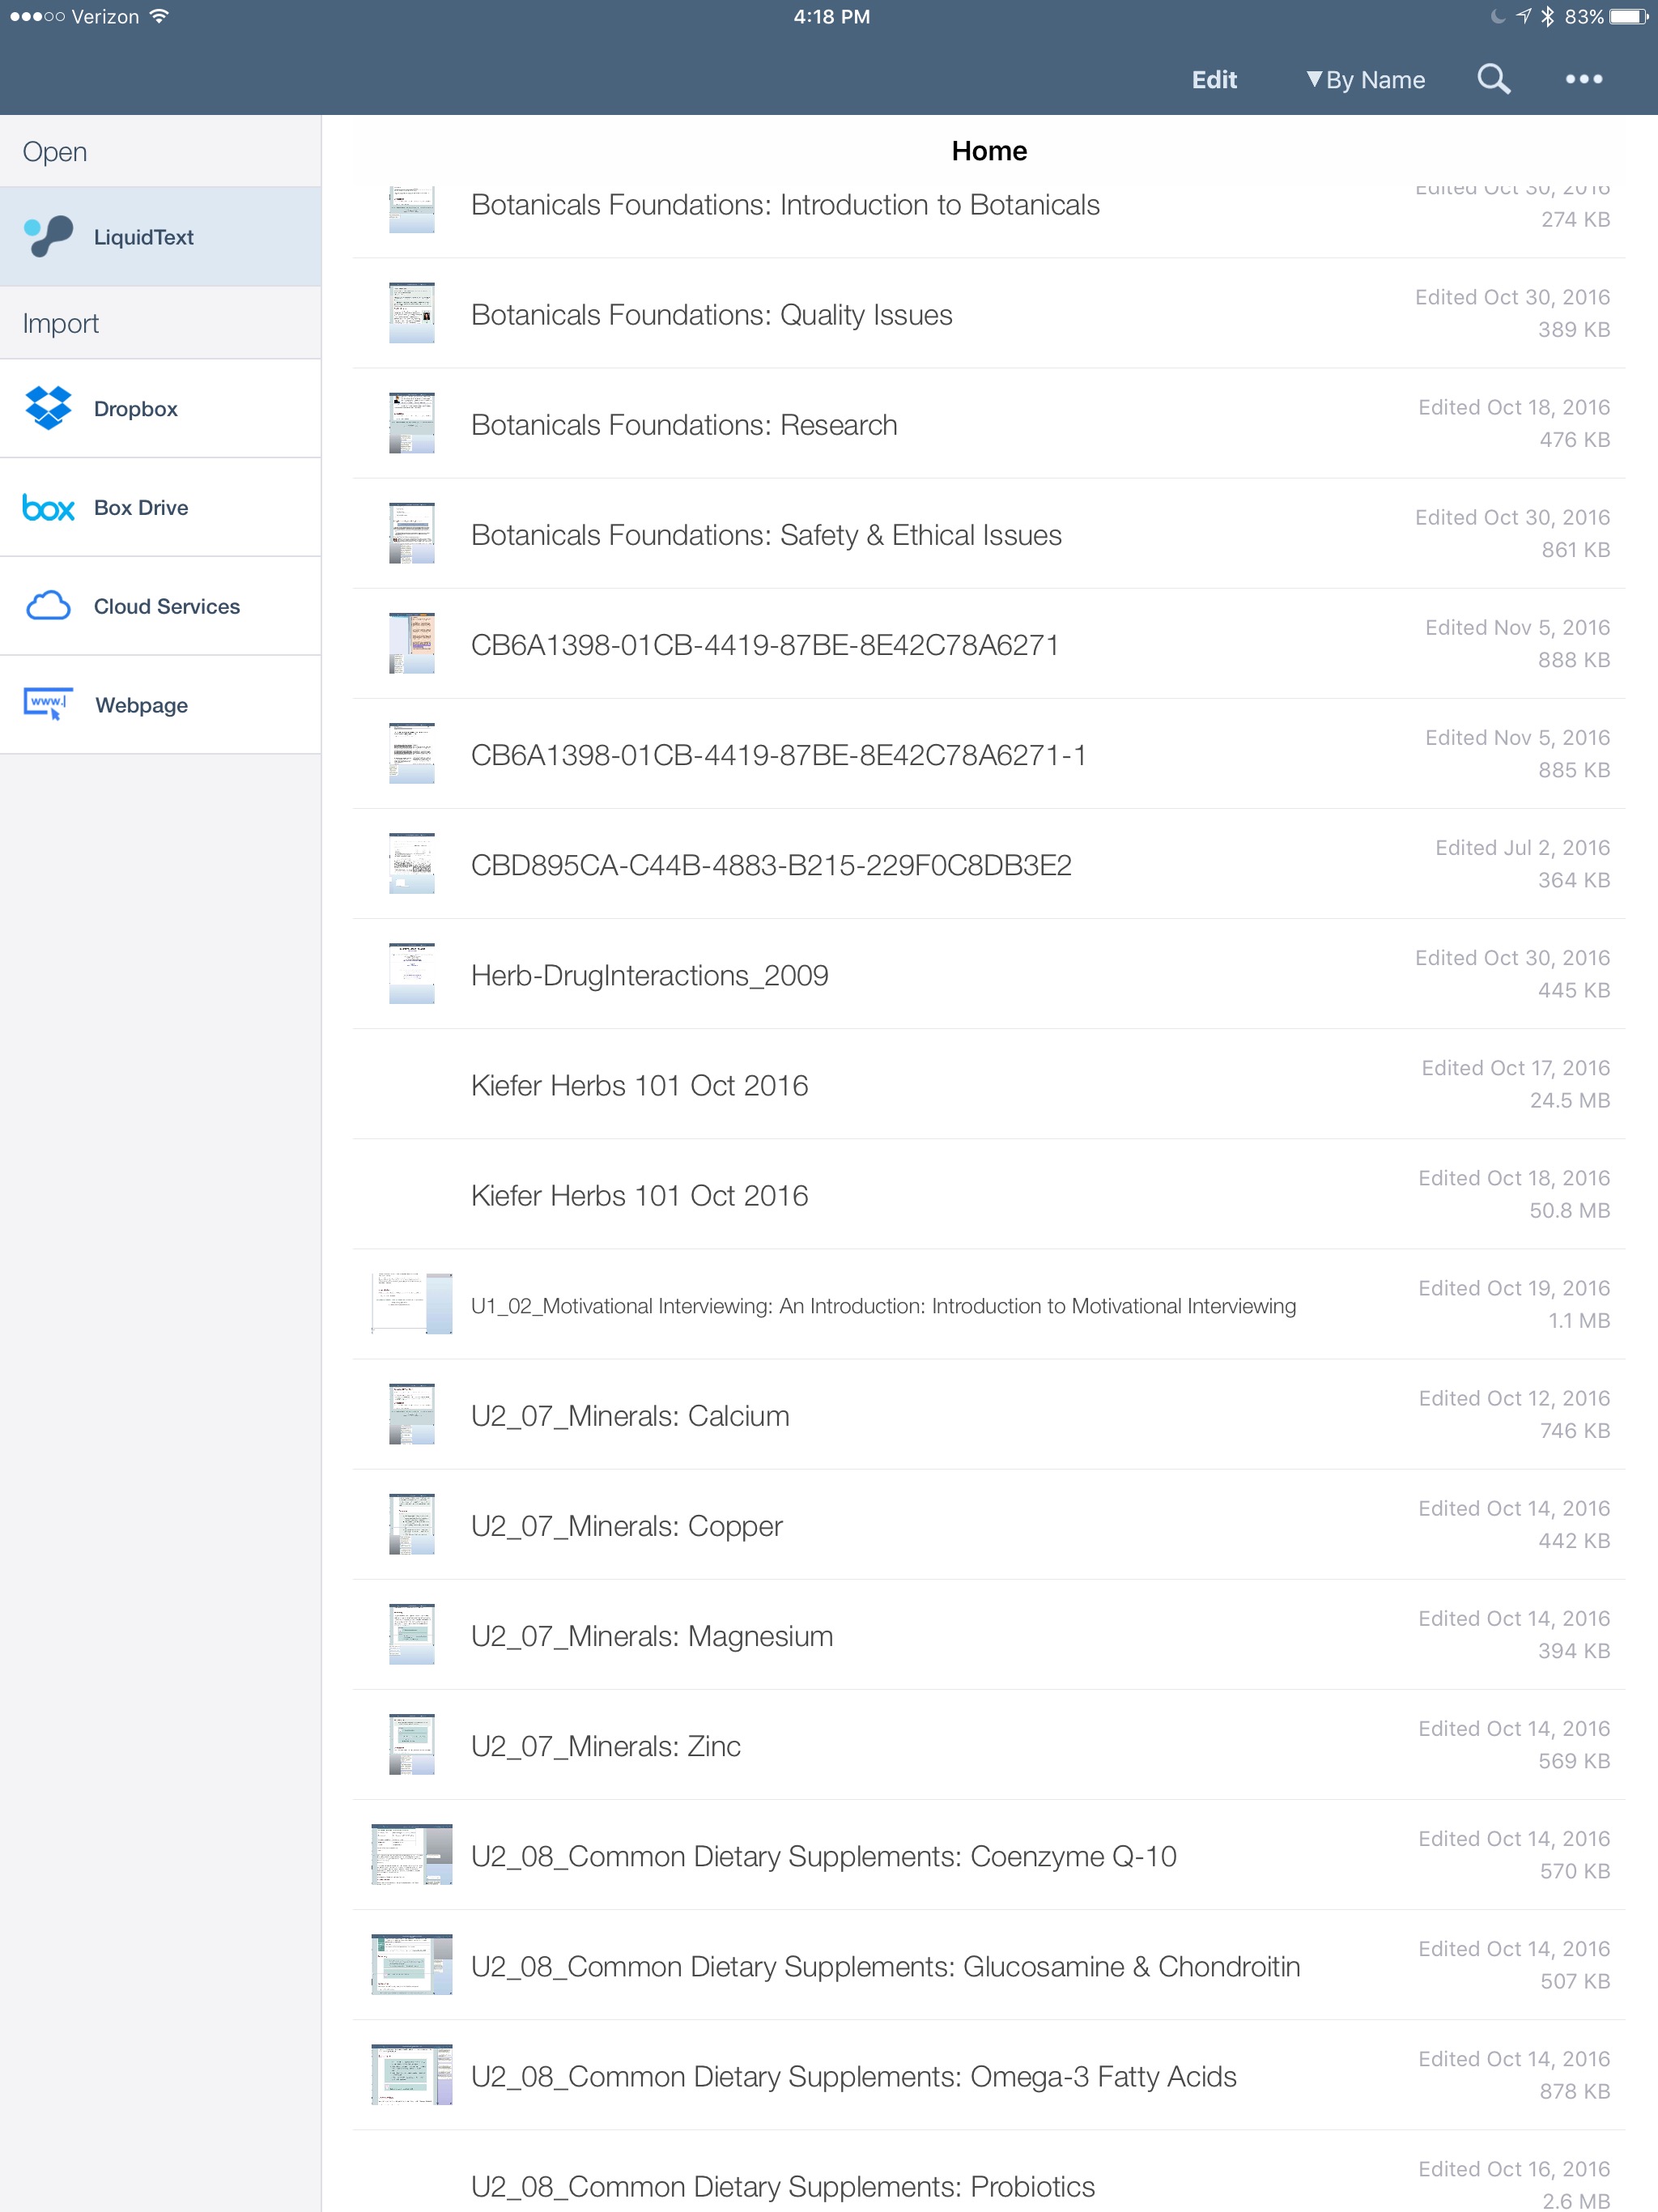
 LiquidText reads and writes to a whole range of cloud services, but has limited range of export document choices.
 An Enterprise version is available for $9.99 that adds features like multi-document search and the ability to comment on multiple documents simultaneously. I've been using the app so much, I upgraded primarily to support the developer.There are a few features that are not (yet) available—the most critical for me is the inability to export highlights into a text file—LiquidText only exports highlights to Microsoft Word. This, unfortunately, is not compatible with my workflow for extracting highlights, but I like Liquidtext so much, I figured out a workaround using Skim—here is my entire workflow:
- I set up a Dropbox LiquidText Folder to serve as a bridge with my desktop.
- I open the entry in Papers on iOS.
- From within Papers I select "open in". -this brings up action menu.
- I open, read, and annotate in Liquidtext. This includes linking the full-text of references to each excerpt (as suggested by reader GH).
- I export the PDF and Notes from Liquidtext to my Dropbox Folder.
- When I get to my Mac, I open the PDF in Skim.
- Under the File Menu in Skim, I choose “Convert Notes” making my highlights into Skim Notes.
- I then process the annotations as discussed in this blog entry.
- (If you want to take the time on your desktop you can also replace the Papers PDF with the LiquidText highlighted version).
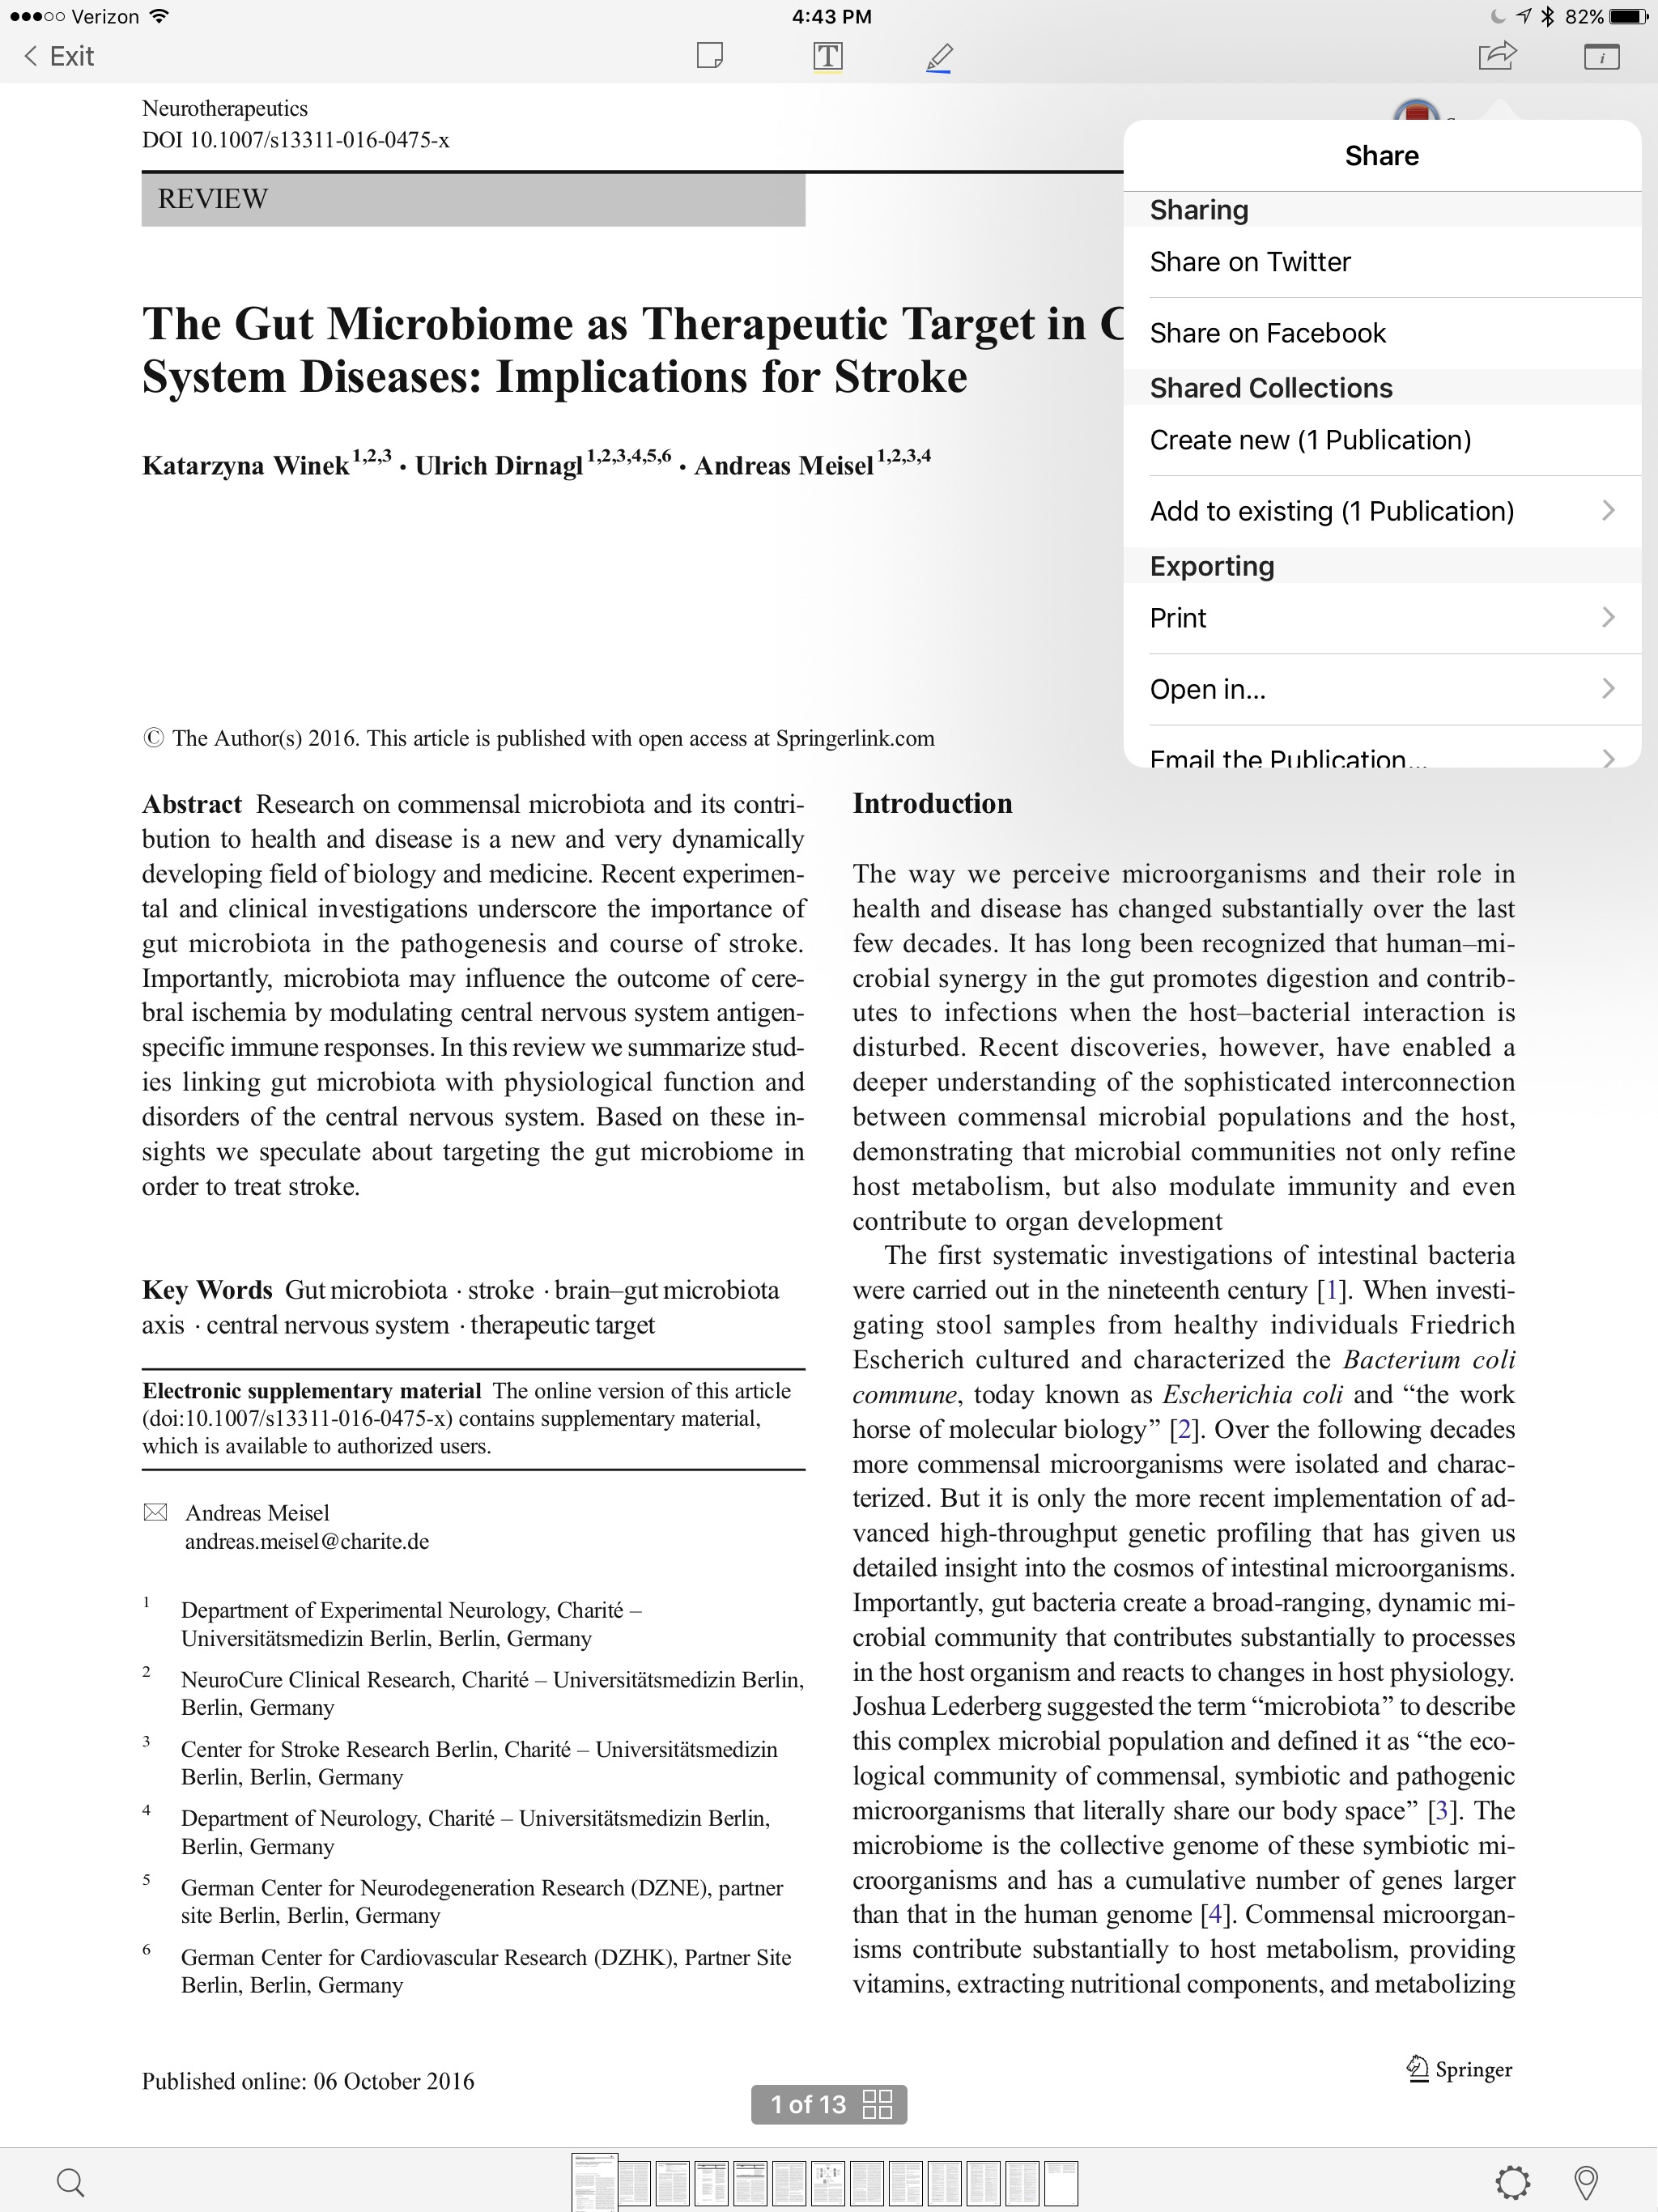
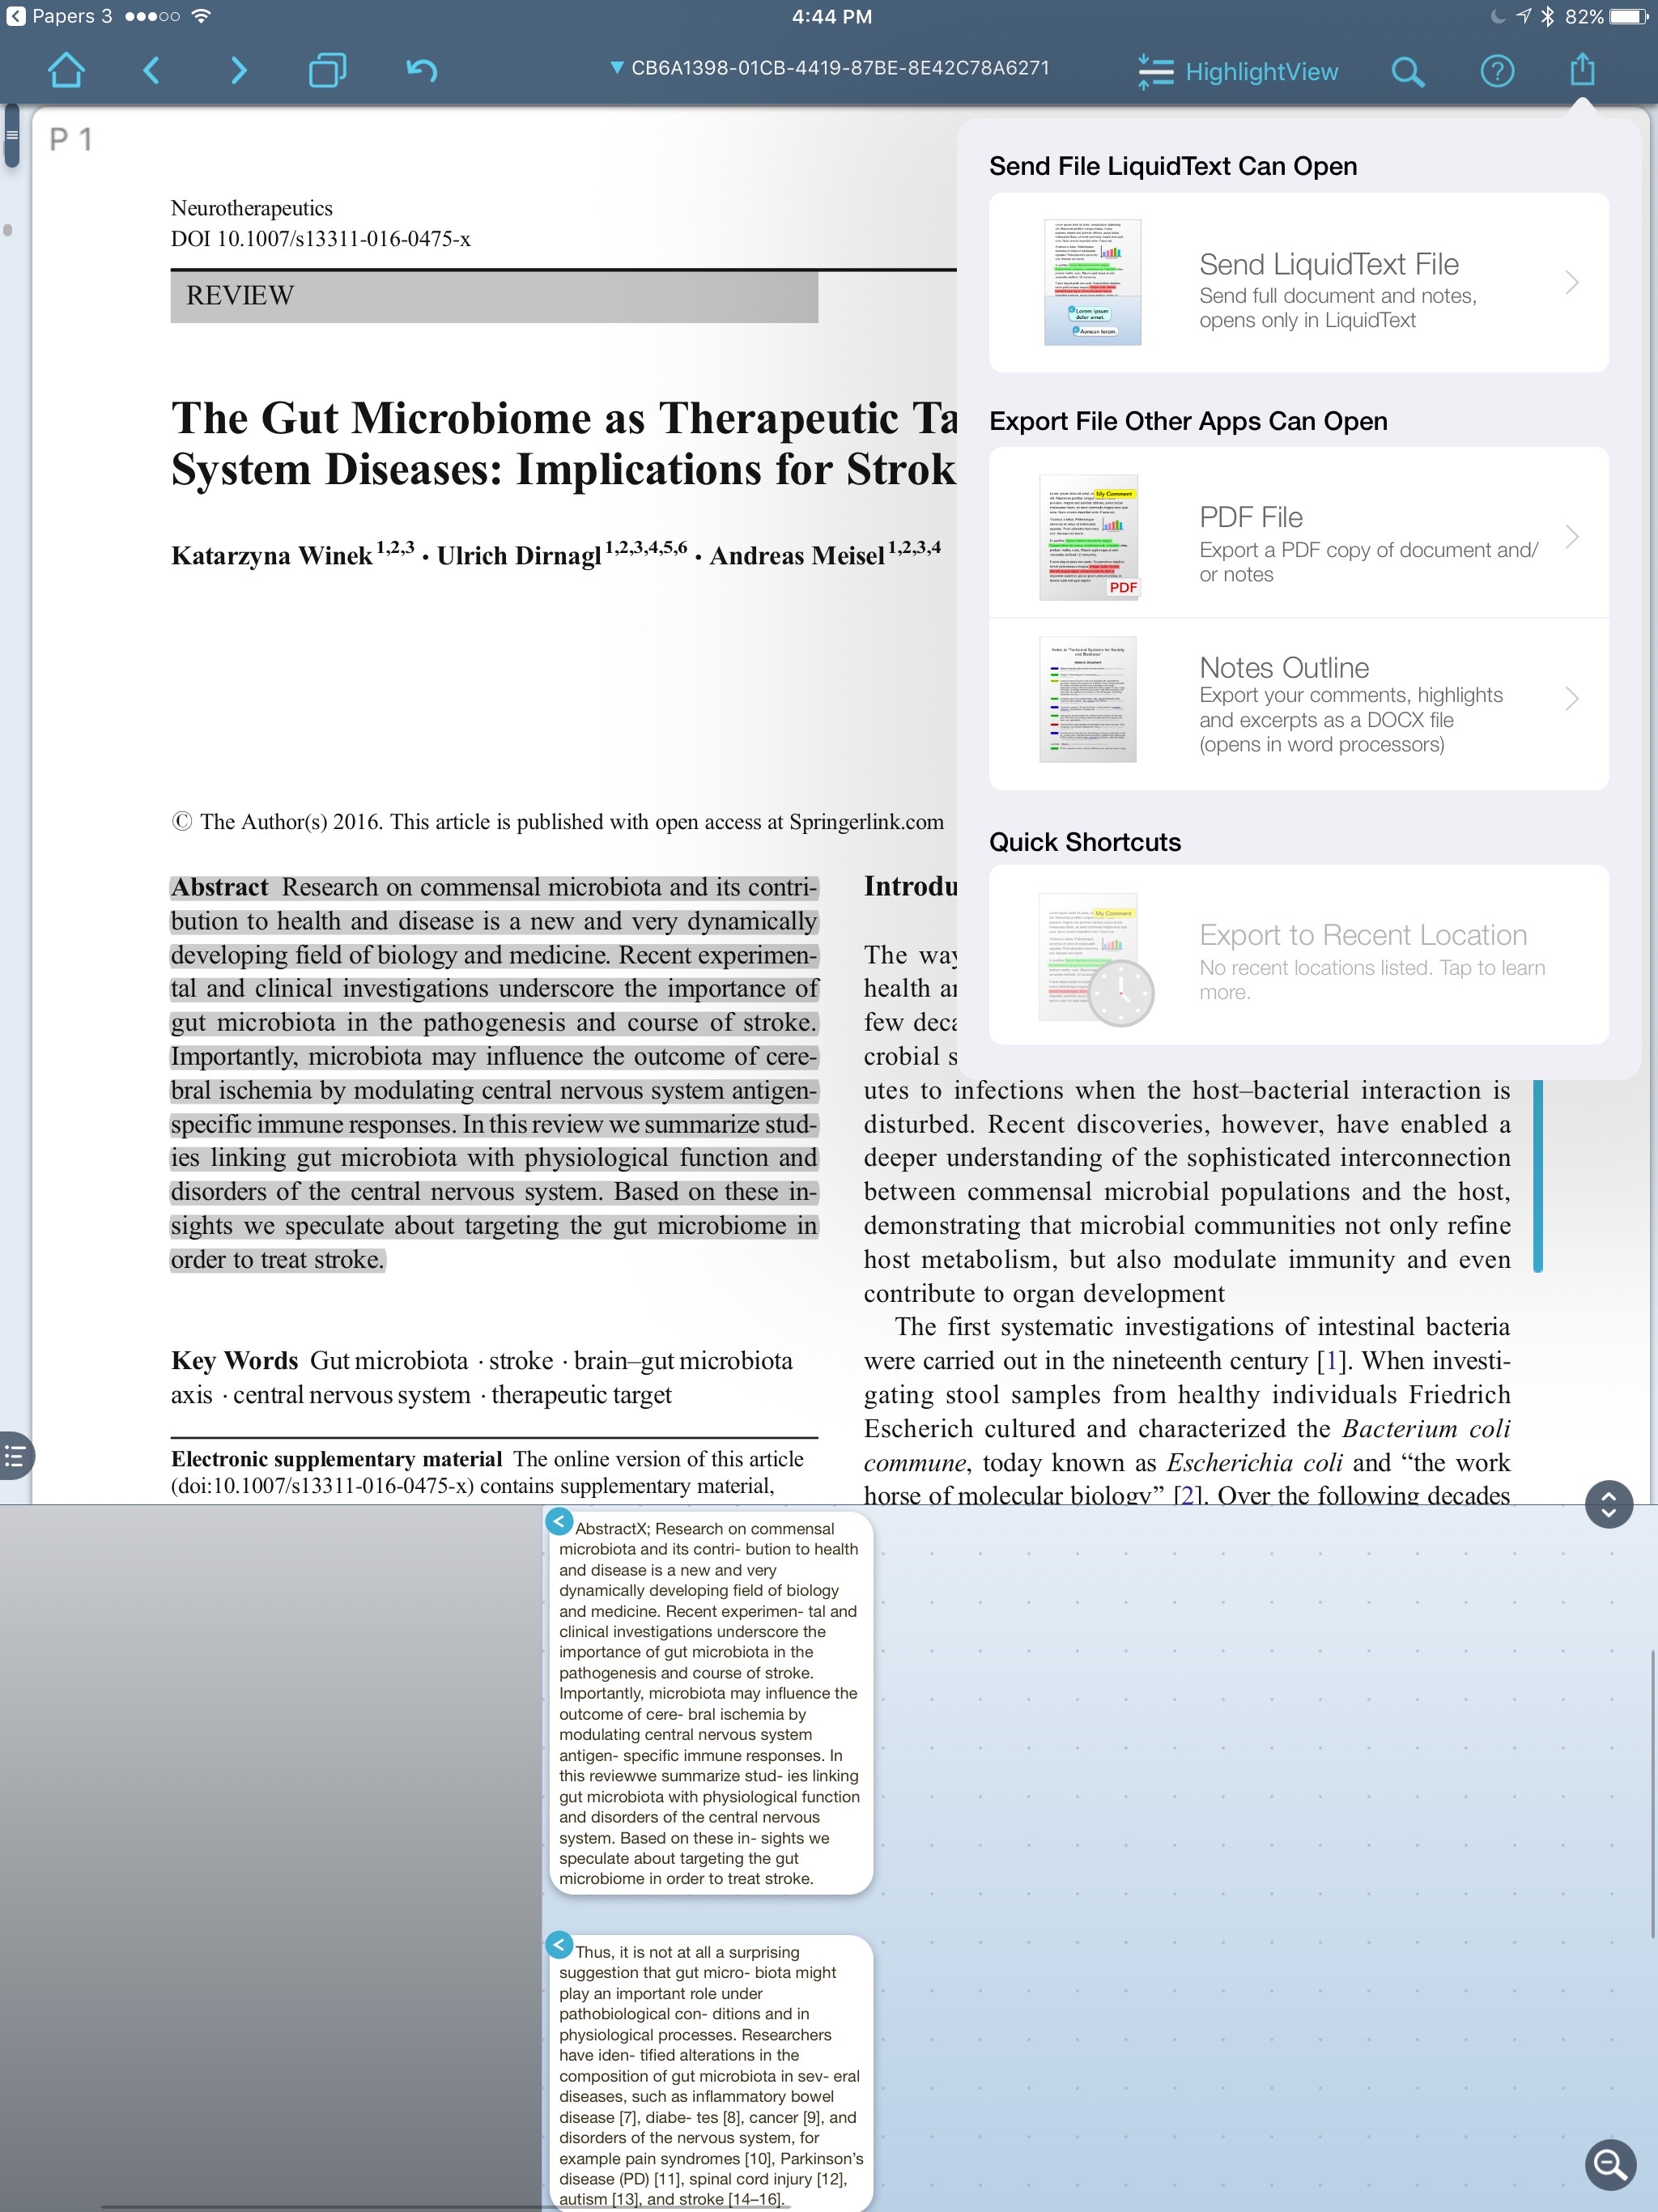
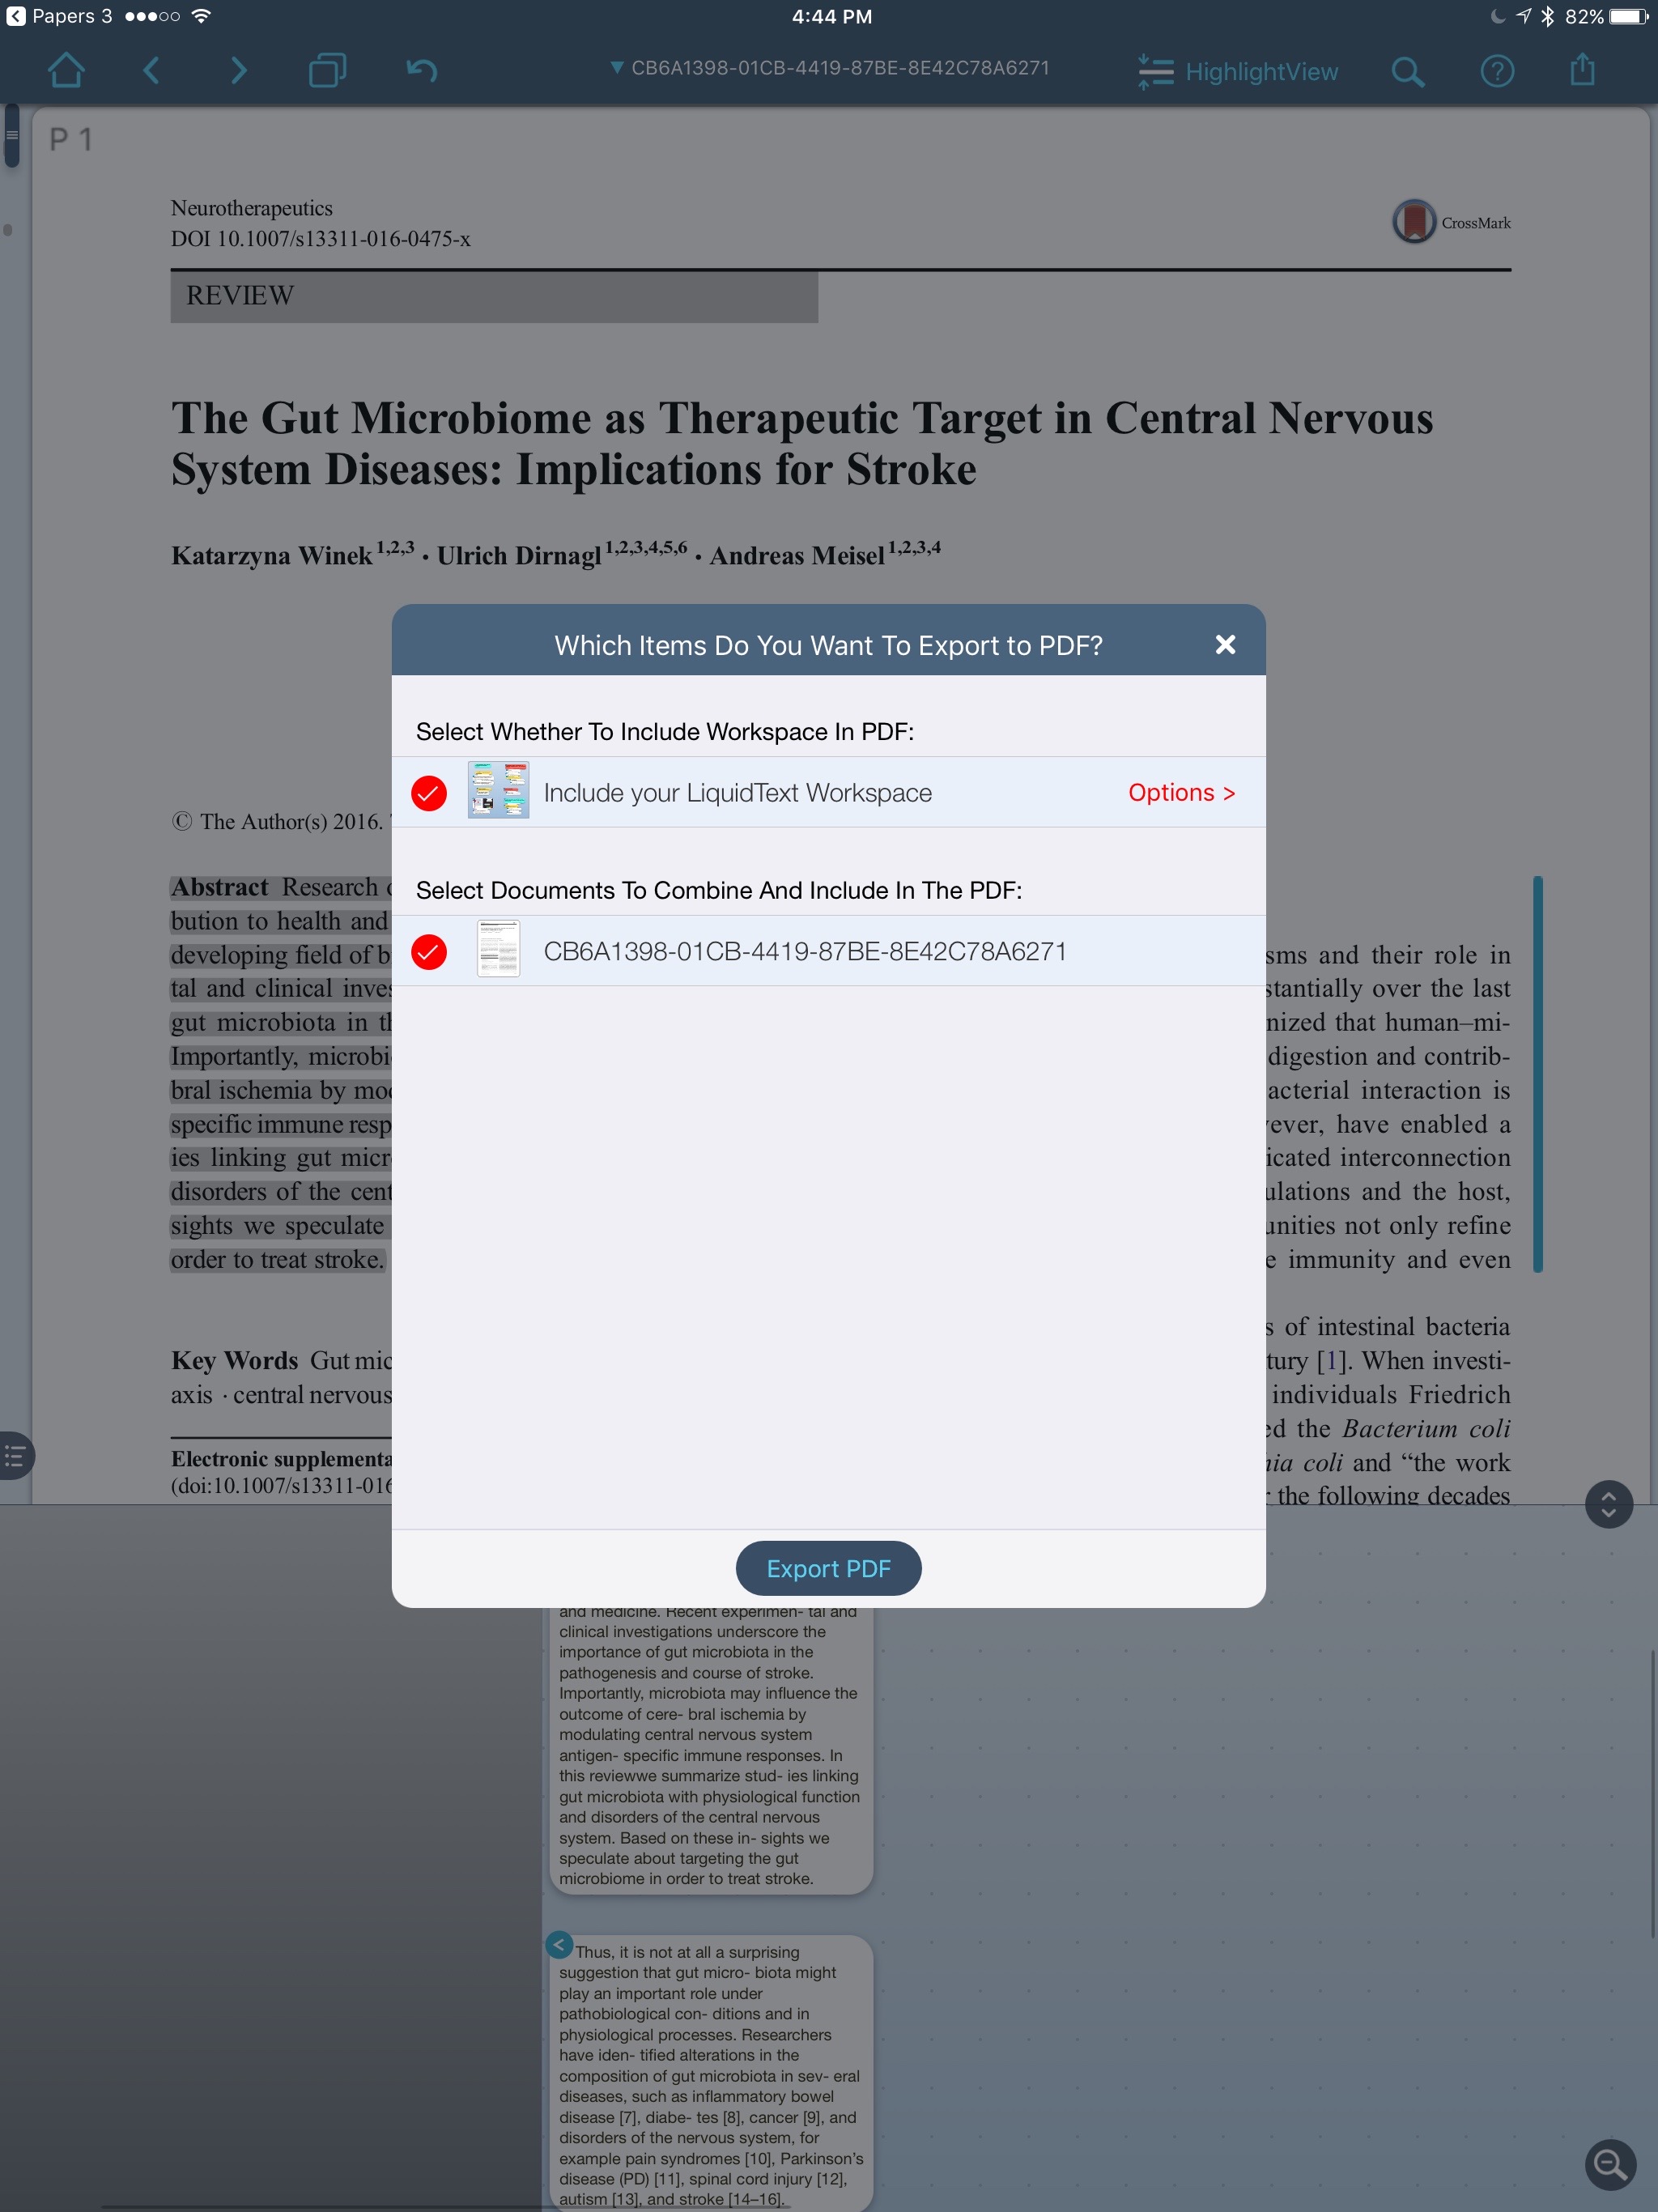
Give Liquidtext a try and please let me know what you think.
Capturing Clinical Questions Using Drafts and Evernote
Being a physician means a commitment to lifelong learning. In a busy clinical practice, two-thirds of clinical encounters generate at least one clinical question. In an average day the typical physician has at least 11 unanswered clinical questions. Only 40% of those questions ever get answered. Most of the questions are forgotten in the hustle and bustle of clinical care.In an attempt to improve my ability to capture (and answer) these questions, I've developed a new script for Drafts. This script uses the same concept as the technique I've mentioned to capture ideas, quotes, etc. This particular script saves information to Evernote but you could use Ulysses, DayOne, Wunderlist, or any other app you can program with an action. I chose Evernote since Evernote has the ability to find related notes anywhere in my collection. When researcing answers my question I capture those to Evernote as well-linking the question and answers in my Evernote database in perpetuity. Since Evernote is ubiquitous, the answer is available on my computer iPhone, and iPad.Here is how I approached this. First, I set up a new notebook in Evernote. I called this notebook "Clinical Questions." I then developed the following script in Drafts. Using this script it is now possible for me to quickly capture questions investigate later. I merely open Drafts and type or dictate my question, then hit the script. The question is logged to my Clinical Questions Notebook (along with date and prepended with tag ClinicalQuestionX).I’ve found myself using this script many times each day. I hope it helps you as well.Stats found on UptoDate: http://goo.gl/BDBqmH
Drafts Script to Capture Ideas to Ulysses
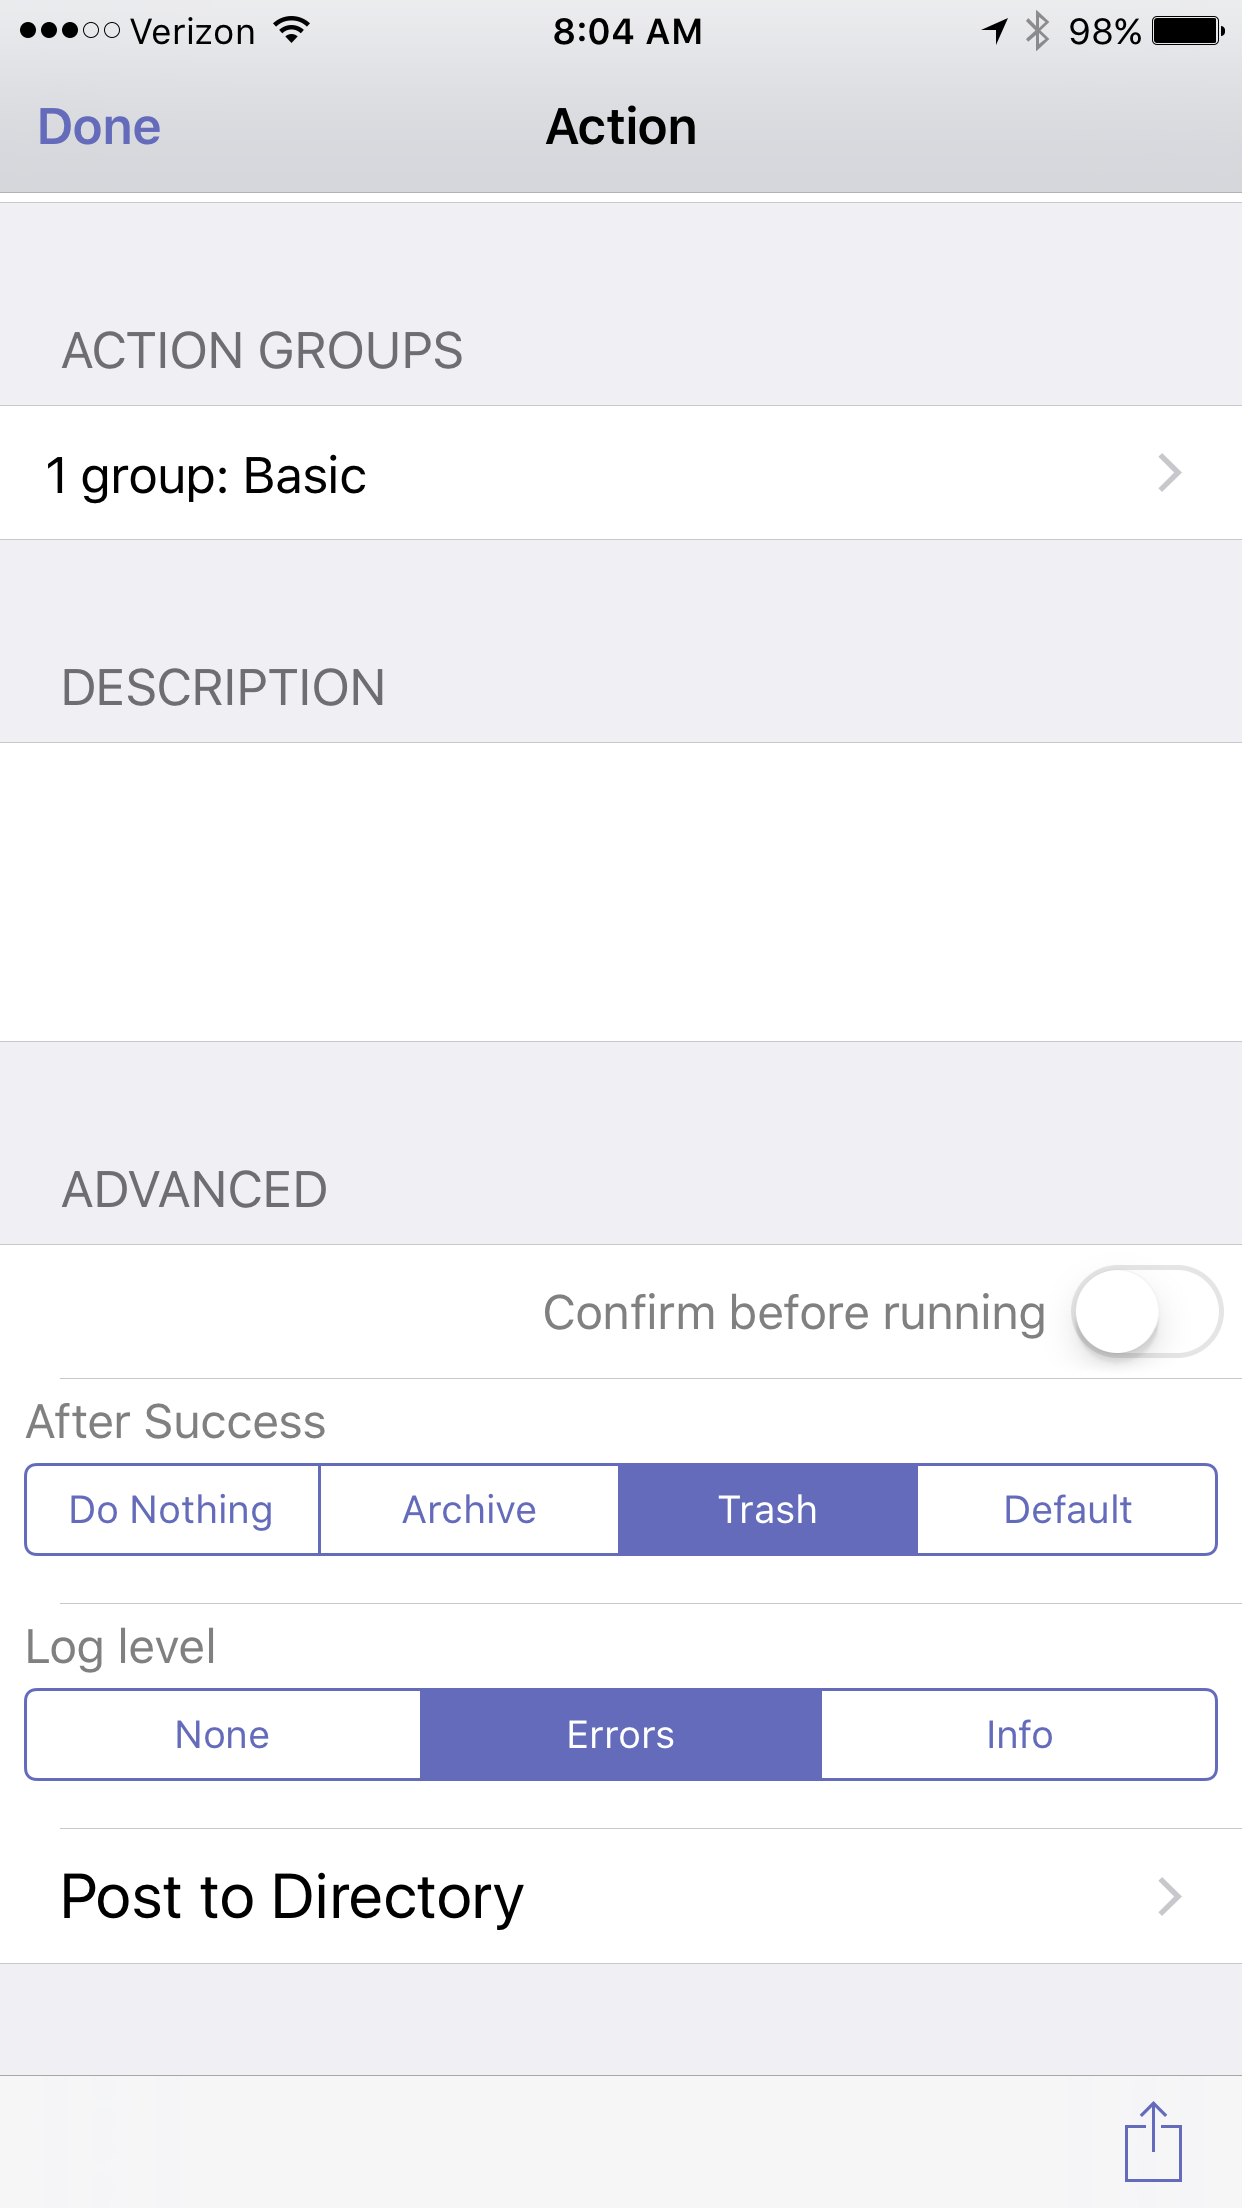
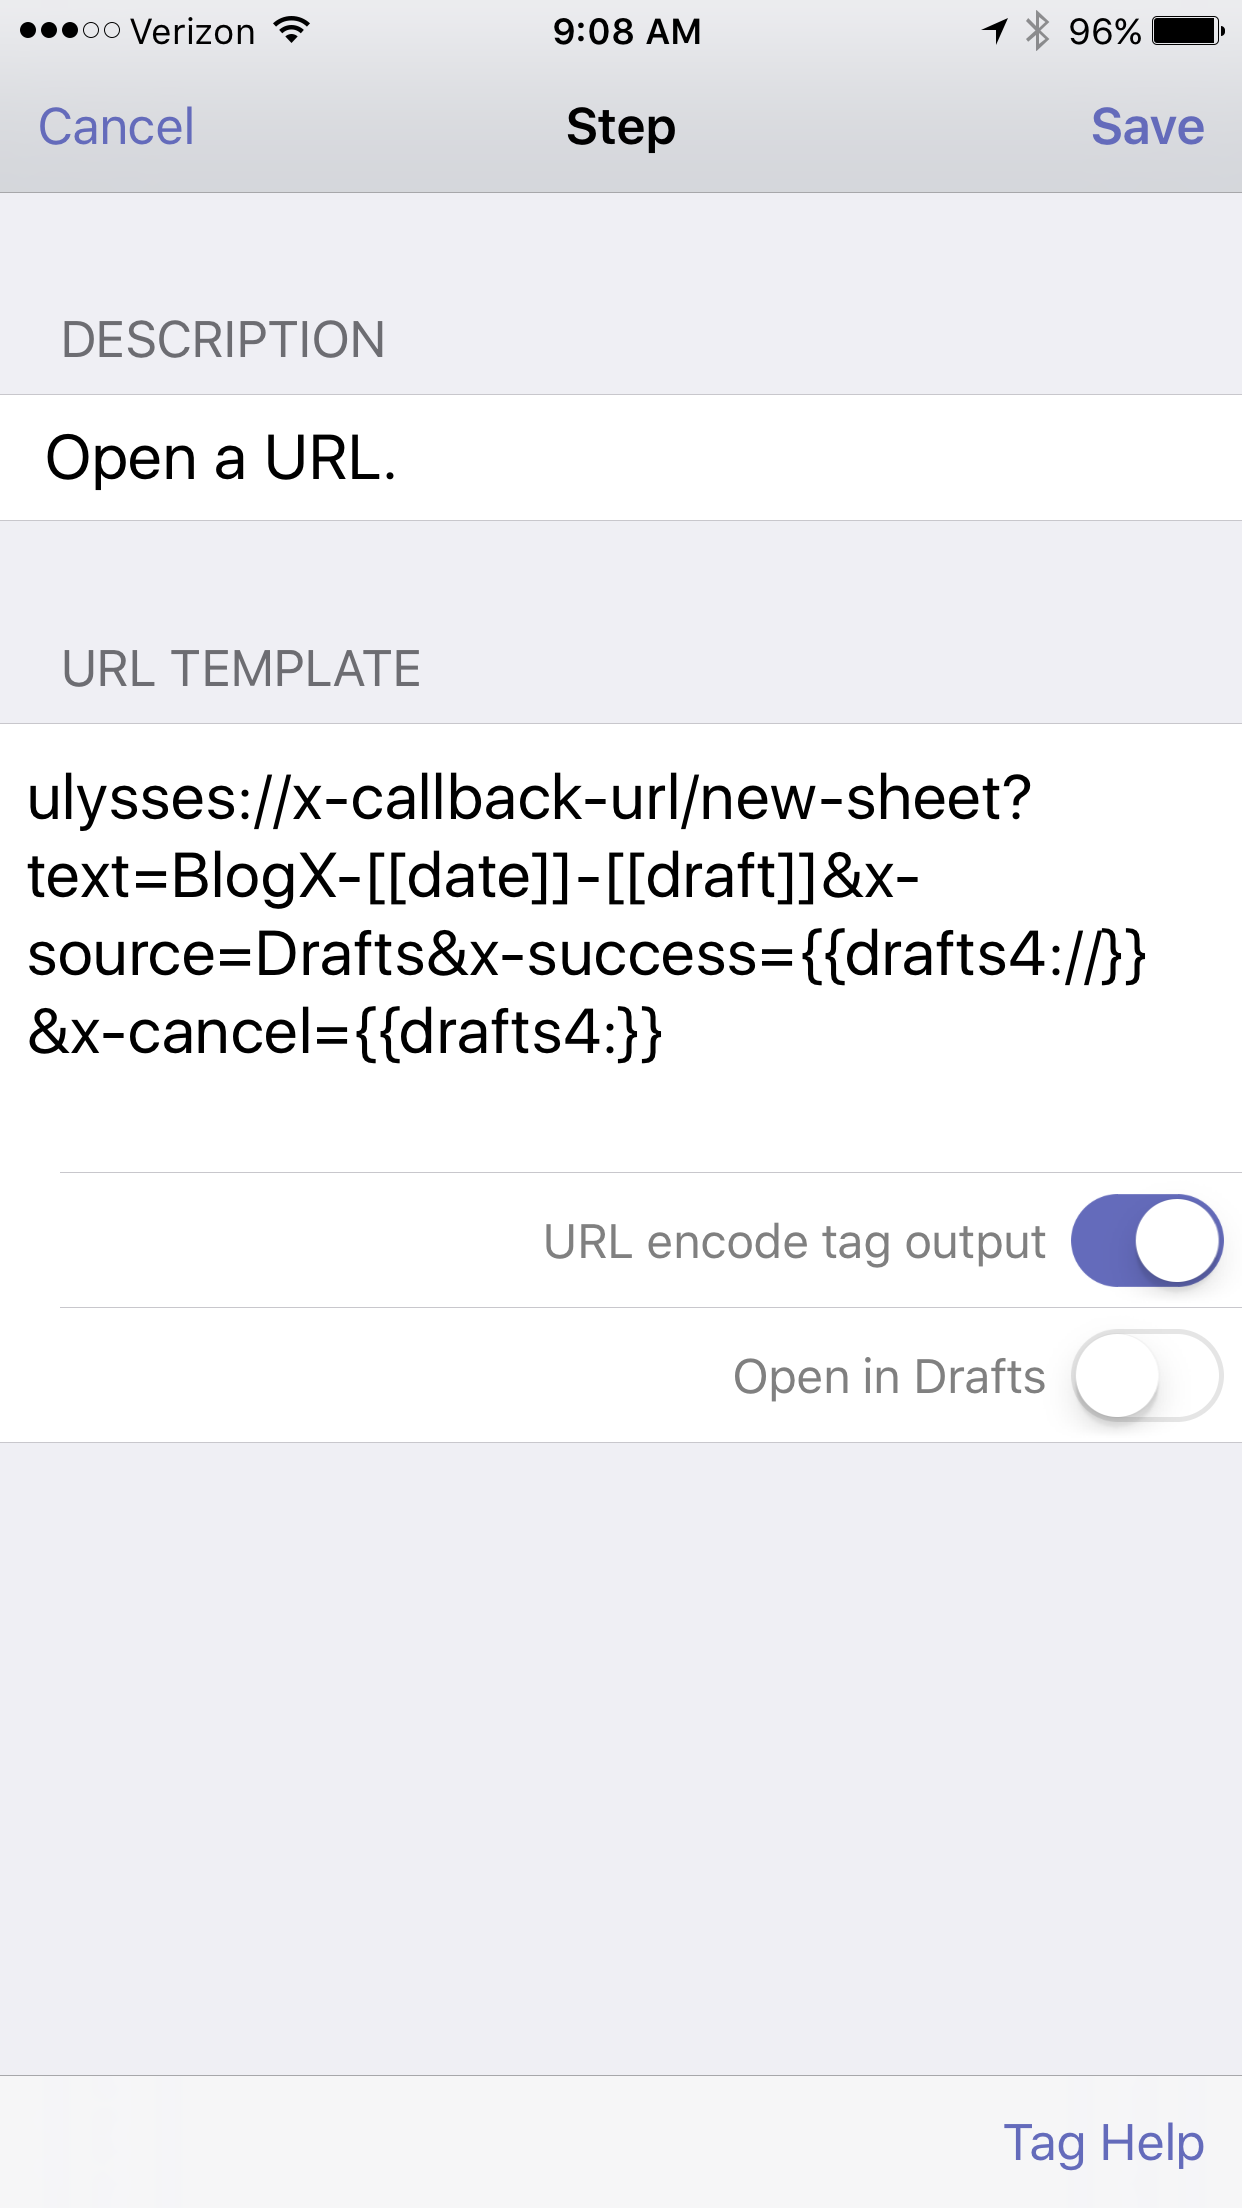
As I've mentioned in previous writing, I am a big fan of Ulysses. I now do all of my short writing in Ulysses, so I decided to transition my blog idea script from Drafts->Evernote to Drafts->Ulysses.The script prepends "BlogX" and the current date, erases the Drafts file, then places my new idea in my Ulysses Inbox.In Ulysses, I keep three blog related groups: Ideas, In Process, and Published. I no longer have to take time to move my ideas from Evernote to Ulysses. Instead, each idea is submitted to Ulysses, eliminating entirely the need for Evernote. If you use lUlysses, you can adopt this script for capturing other ideas as well. I hope you find it useful.
New NIH Grant Requirements - Critical Evaluation of Existing Literature
For those of you that write NIH grants for a living, you are well aware of the changes required for new grant applications in 2016. In an effort to improve rigor and transparency as well as to increase reproducibility, The NIH now requires the grants to be written in a whole new way. A major part of these changes has to do with critical evaluation of existing literature.In light of these changes I have been formally appending my manuscripts a new way. In previous entries I’ve written how I take notes while reading, then extract these highlights and notes to their own individual files. Now, as I'm reading, I make and effort to record perceived strengths weaknesses of each study appending my comments with the text “StrengthX” or “WeaknessX.” I then extract each comment as its own text file. When writing grants or manuscripts, using Devonthink, I’m able to find similar notes to the one I’m reading. By appending StrengthX or WeaknessX, I’m able to single out my own comments instead of a seeing every instance of each word.In a future entry, I’ll talk more about the ways I’ve updated finding extracted information using Devonthink (and Tinderbox). A good portion of my writing workflow from 2015 has changed. I will write an updated writing workflow after the official release of Scrivener iOS.I'd be interested to hear how other academics are dealing with the changes at the NIH. Please leave a note in the comments below.
Using Skitch and Papers to Capture Figures and Tables
Few would argue that the most important point of a scholarly manuscript is made in its figures and tables. I am going to share with you how I capture figures while reading scholarly information on my Mac. This workflow uses:SkitchPapersInstall Skitch and make sure, in Skitch Preferences, to enable the “keep Skitch Helper running in background when I quit,” and “Start Skitch Helper when I log in to my computer.” As I’m reading scholarly literature and come across a table or figure I want to save I do the following. I make the figure as big as possible on my screen. Then, from the Skitch menu in my menubar, I select the Crosshair Snapshot. I then select the figure (and sometimes the caption) trying to balance the white space surrounding the figure.Next, I go to Papers, select the reference in my Papers Library, and then from the Edit Menu:Copy As:Reference.I return to Skitch and double-click at the bottom of the figure then paste the reference text. I then balance the text. The height of the Skitch figure will expand to accomodate the new text.
 When I want to refer to or use the table or figure I view it directly in Skitch or find it in Evernote. Using this method, I can also search for words in the reference (e.g. the author’s name or the title of the manuscript) and sometimes even the words in the figure itself.If I want to use the figure in a presentation or to send it to a colleague or trainee I can export the figure from the Skitch File Menu.Using this method I’ve captured hundreds of figures. I hope this workflow helps you too.
My OmniFocus Set-up (Part 2)
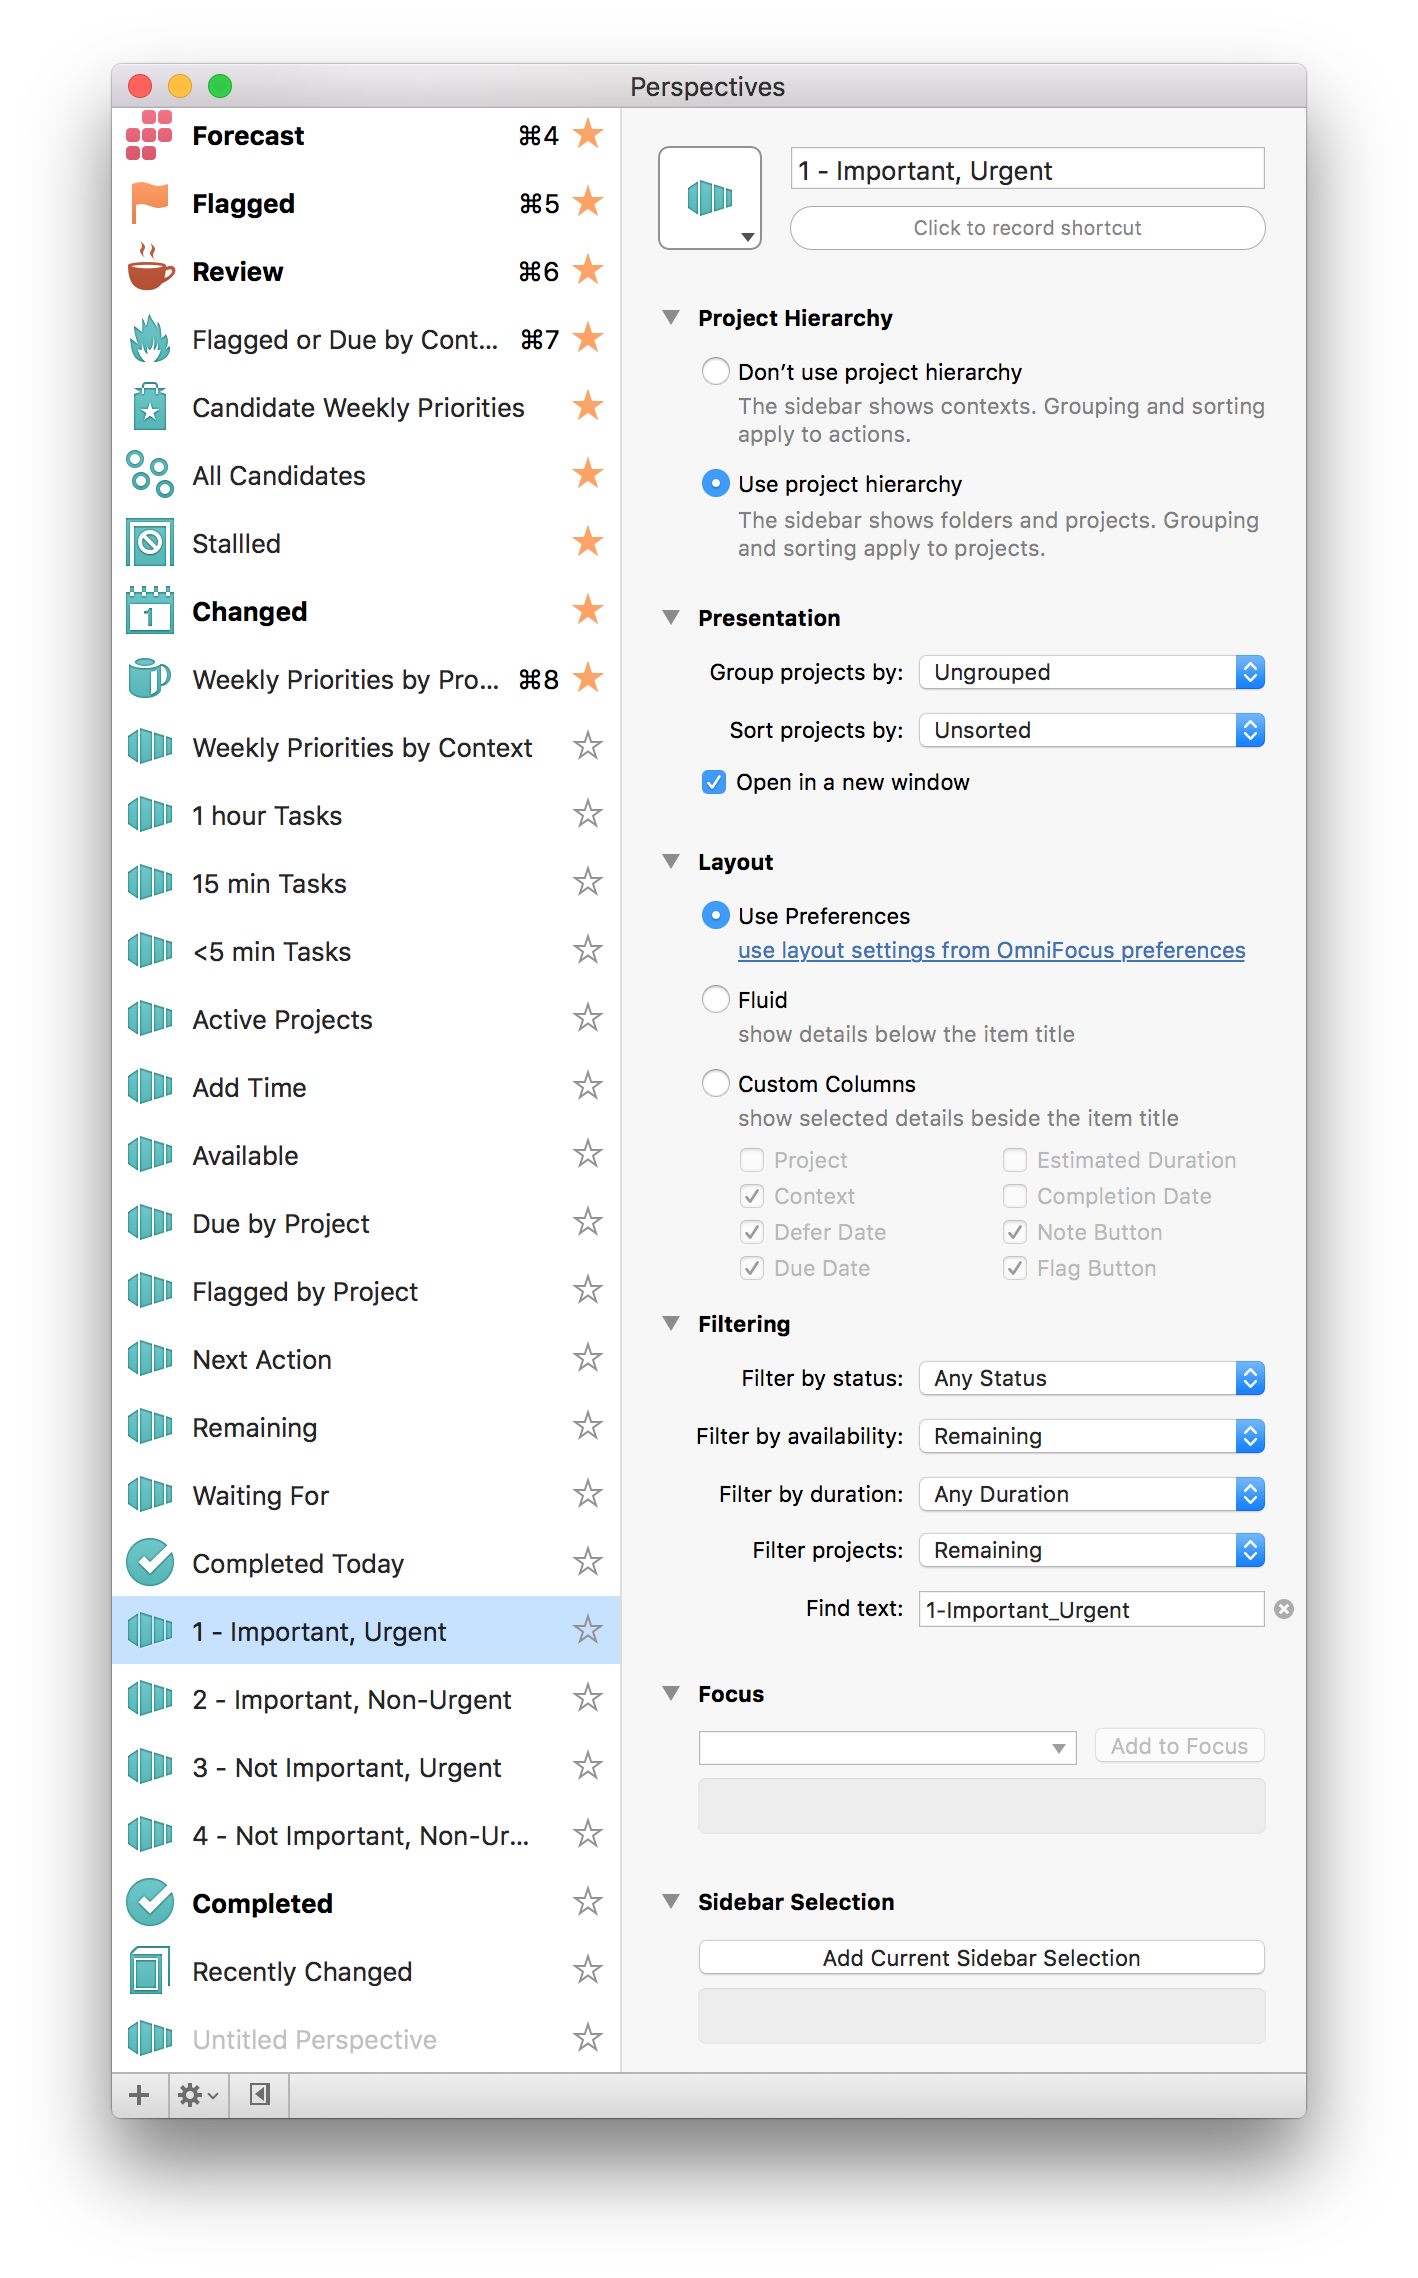
As i've mentioned numerous times before, I'm a huge fan of OmniFocus. In my last entry on OmniFocus, I offered a peek into the way I organize my folders. If you haven't read that post, please do so now. In this entry, I’ll answer some of the questions about triaging, prioritizing, and adding time to actions.Weekly ReviewI am not strictly adherent to GTD methodology, but I do use many of the practices. My practice includes both daily and weekly reviews. My weekly review normally takes about an hour. During the hour, I review existing projects and actions, clean up remaining items in my Inbox, and set up new projects. I look at each new and existing project through two main lenses—a hard due date (e.g. tax filing-Covey Quadrant 1-CQ1), and the strategic importance of the project to my personal or professional life (Covey Quadrant 2-CQ2).As you saw in my last entry, all my projects are organized into folders by my personal and professional roles. During my weekly review I decide on the CQ1 and CQ2 projects with greatest strategic value, or with the most urgent deadlines. These are the projects that go into my “Weekly Priorities” Folder. My next most important strategic projects go into my “On-Deck” Folder. I try to have no more than three projects in each the weekly priority and the on deck folders. Those projects that are lower priority at the end of the week, but still active, go back into my personal or professional “Role” Folders. I spend about 80% of my time working on items in my Weekly Priority and On Deck folders. I have a custom perspective that filters all my projects down to my priorities grouped by project or context.
 Another perspective shows all my flagged or due items even if they are not in my Weekly Priority or On Deck Folder.
 As I add new projects, or make new projects from items in my Inbox, I am cognizant of any hard EXTERNAL deadline—only items with EXTERNAL deadlines get a due date. I have a custom perspective that shows all due or flagged items regardless of whether they are in my priorities folder. This bubbles up items that are due allows me to stay on top of deadlines regardless of whether the item is strategic or not.The last part of my weekly review strays from GTD methodology—I try to roughly plot out my week, placing actions from my highest priority projects in my calendar. I try to leave free time to allow for interruptions and other inevitable delays.I’ve found time-based perspectives to be helpful in two ways…during my weekly review , when I am trying to sketch out my week, or on-the-fly when I have unexpected time (e.g. a meeting that finished early). When defining the time for actions, I try to keep each to an hour or less. If an action item looks like it will take longer than an hour, I break it down further.My weekly review is complete after I’ve sketched out my week in my calendar. Although having a plan is great, I don’t get stressed when things change. I often need to adjust my plan. This takes place in my Daily Review.Daily ReviewEach day I open OF next to my calendar and review my achievements of the day. I like to record my my major achievements (e.g. completion of a major project) in a journal app (I use Day One). Often, during my daily review, I need to adjust my plans for the upcoming day. I have a perspective actions associated only with my highest priority items. I look at this list first. Next, I look at a complementary perspective that shows me my entire list of actions, grouped by context. Anything that I have not formally placed in my calendar, but want to achieve on a particular day gets flagged in OF. When I get to the office, I use my my “Flagged or Due by Context” Perspective constantly.
 I hope it's helpful to see how I'm using OF.I'd love to hear what you think...and would love hear the ways you use the software in your life.Addendum:In response to Owen's request....
Quick Idea Capture Using Drafts and Evernote
Although I’ve already written about the way I capture ideas using Drafts and Evernote, I thought it was worth repeating since these techniques were buried in another entry. I literally use this method multiple times a day. Using Drafts, I’ve efficiently captured hundreds of ideas, blog thoughts,and lyrics. As you’ll see below, I also use Drafts to start entries in Day One., ------------------------------------------Capturing Ideas in Evernote using DraftsEvernote extends its great power by linking to many other applications. I’ve found capturing snippets of text into Evernote is even easier than the method I described a few years ago using plaintext.I use Drafts on my iphone and iPad to capture / brain dump just about everything. Drafts is an essential program on my iPhone. Drafts allows me to capture without thinking about what app I need to open. Once the text is captured, Drafts routes the information wherever I choose. I wrote about one way I use Drafts to capture and process meeting notes. When I want to capture an idea, I merely open Drafts and type or dictate my idea into the app. When I’m done, I route the information to Evernote using the following custom action: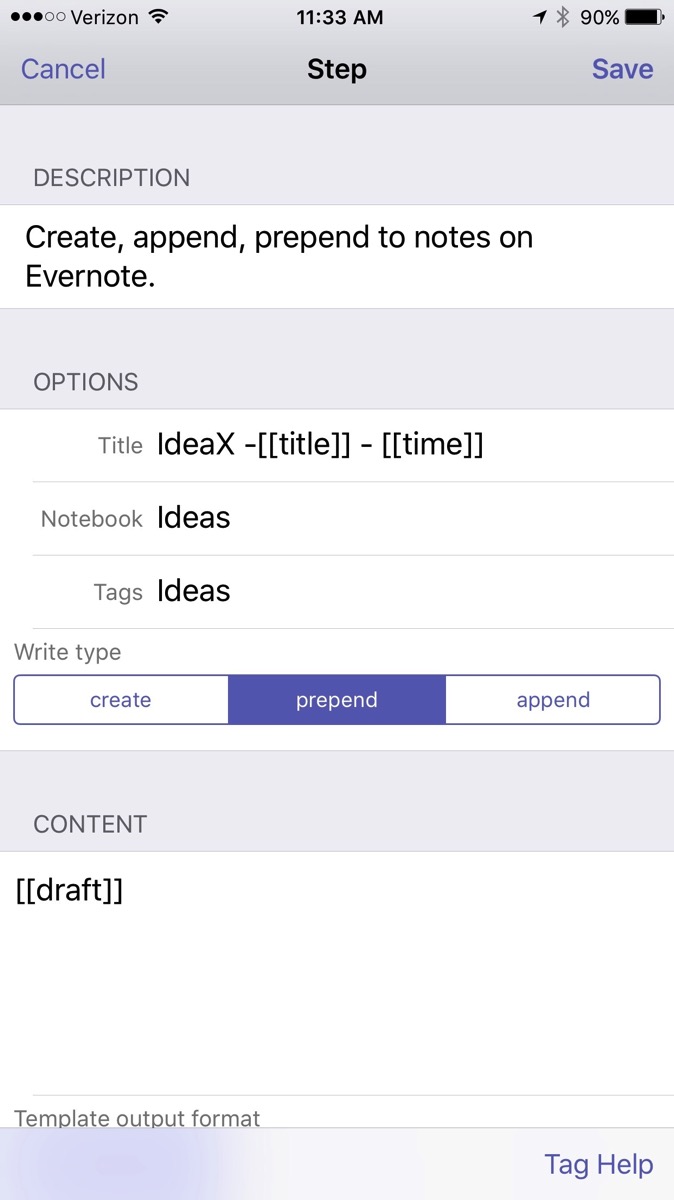
The action automatically derives a title from the first line of the text and appends the date and time. Furthermore, it files the note in my “Ideas” Notebook in Evernote and tags the note with the keyword “Ideas."The note ends up in Evernote looking like this:
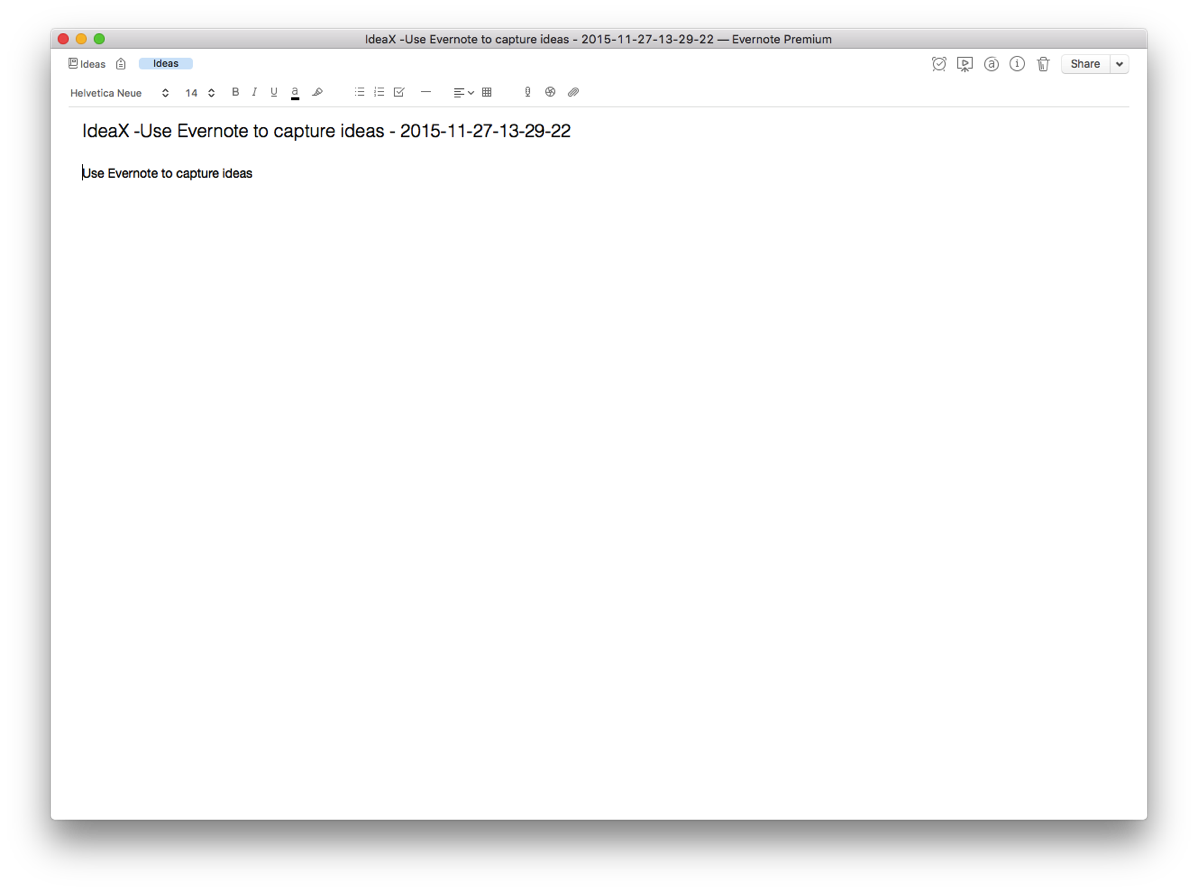
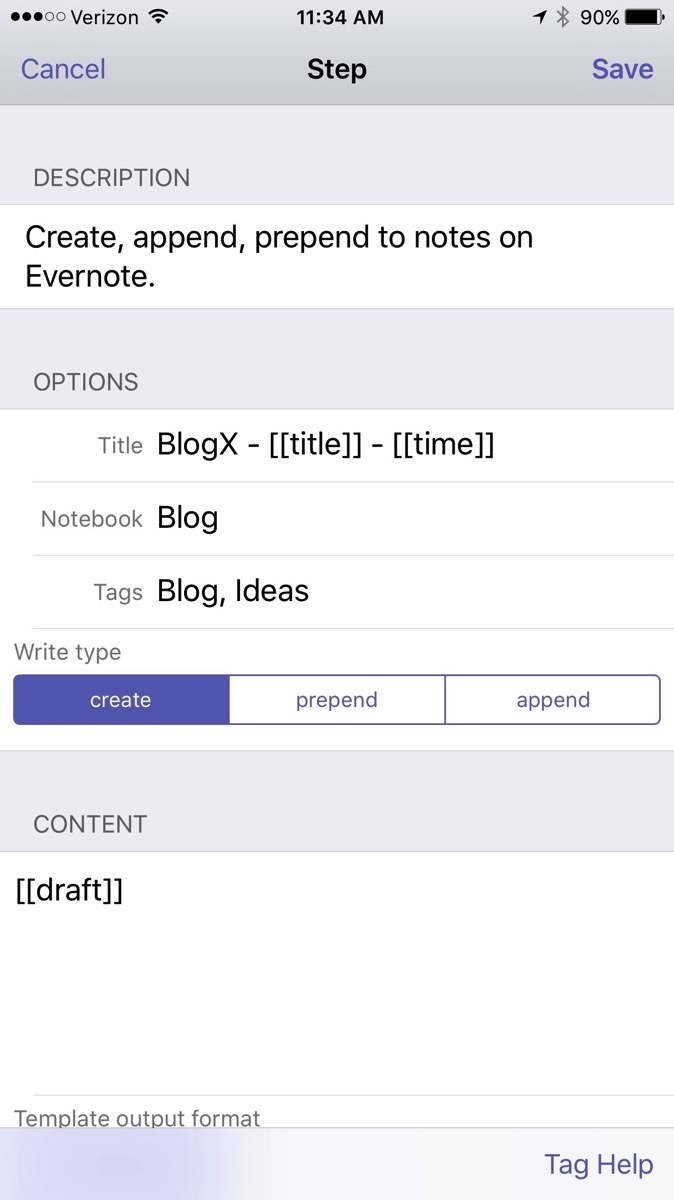
When I get to Evernote, I append further information in the note as needed. I use IdeaX in the header so when I search for a list of my ideas, they are not mixed together with information I’ve gathered from other sources. If I search for a keyword(s), I not only see my ideas, but all the information I’ve gathered in Evernote—very useful.Capturing Blog Ideas, Lyric Ideas, Quotes, and other Snippets in Evernote using DraftsI use a similar scripts in Drafts to capture a whole host of other information on the go. Each class of information is filed into it’s own Notebook in Evernote. For example, here is the action I use to capture information for my blog:
 Using Drafts for entries in Day One.Although I love Day One, I was not entering information often enough. Action URLs are a powerful feature of Drafts. Action URLs-open other applications, then perform functions. In order to increase my capture rate, I decided to make an Action URL that transfers text from Drafts to Day One.Here is how simple it is…..
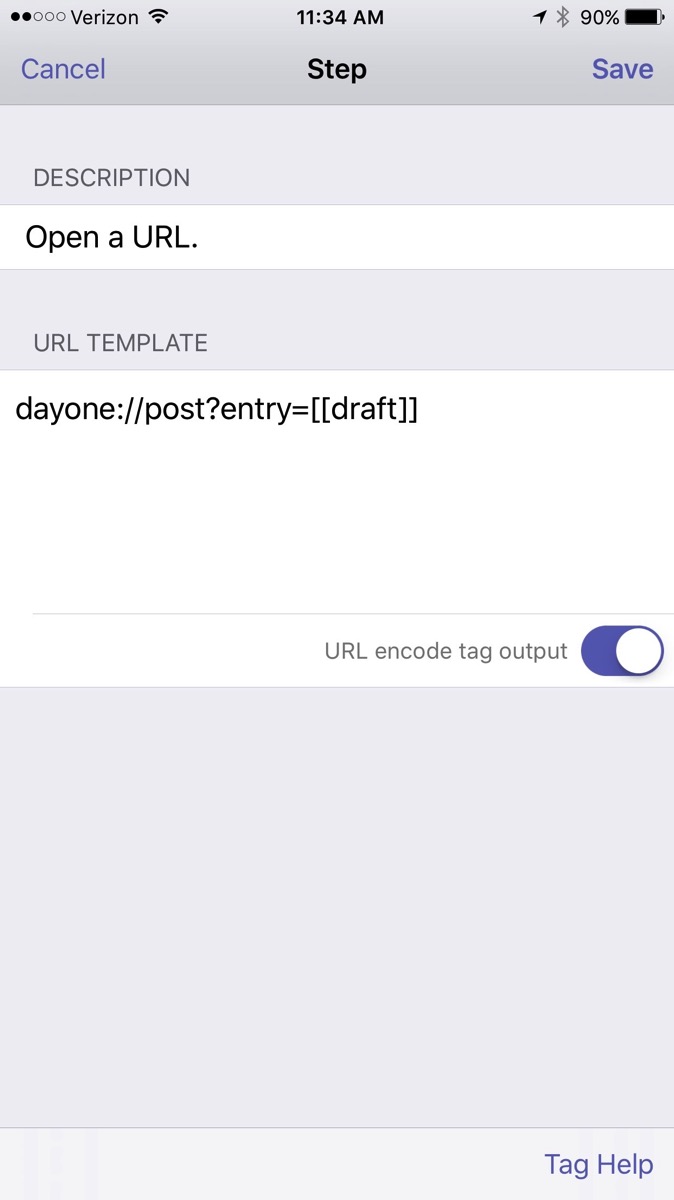 I have configured Day One on my Mac and iOS devices to sync. I also enabled the #hashtag feature in Day One. Hashtags are translated into keywords in Day One.Since enabling this script, I find myself capturing both personal and professional snippets each day. Give it a try!By incorporating Evernote, I’ve greatly simplified many of my capture processes. I highly recommend giving Evernote Premium a whirl and trying out a few of these workflows on your own. You won’t be disapointed.


