OmniFocus Mail Drop Trick

Here's a quick tip for getting tasks from your email to your OmniFocus Inbox.Many times, requests for my time arrive via email. Committing and tracking this type of request used to be a multi-step process. First, I'd add the email to my OmniFocus Inbox. Then I would reply to the email acknowledging my commitment (or requesting a follow-up).I realized there was an easier way....Now, when replying to an email with a task, I merely put my OmniFocus Mail Drop email address in the bcc field. Using this method, I can respond and track the task in a single button click.

Capturing Information on my Apple Watch with Drafts and Day One

I’ve found new ways to utilize my Apple Watch as a capture device. I previously wrote about how I capture OmniFocus tasks with only my voice.I’m using this same method to capture other information in Drafts and Day One. Both have Apple Watch applications.Most of the time, I capture items to Drafts on my Watch. I capture ideas, clinical questions, quotes, etc. My watch synchronizes the new item with my phone (in the Drafts Inbox). When I have a few minutes I can vector the new memo to the correct location using Action URLs.Occasionally, I will capture items directy to Day One (although this requires the Day One also to be open on my phone). I maintain multiple journals: Personal, Professional, 3GoodThings, Social Media, and Accomplishments. I’ll capture to Day One if I also wish to capture the location the item took place. Most of the time, I just capture to Drafts.Although I was a bit skeptical about the utility of my Apple Watch at first, it has become a useful tool both in my personal and professional life.

OmniFocus + Focus - Pomodoro Productivity

Combining Omnifocus and the Pomodoro Technique is an incredible way to get things done. Years ago, I used a program called Eggsellent. Eggsellent integrated seamlessly with Omnifocus ( flagged tasks in OF were added to the Eggsellent queue). The upgrade from OF to OF2 broke the integration, and the Eggsellent developer did not update his app.In searching for a replacement, I tried Vitamin R2 and Tomatoes. I settled on Tomatoes for its simplicity and visually pleasing interface. Tomatoes did not meet my needs. The only way to get OF tasks into Tomatoes was to drag and drop (or type). This was a far cry from the workflow I enjoyed with Eggsellent.From Tim Stringer’s Learn Omnifocus website, I found a Pomodoro app called Focus. Focus is one step closer to what I’ve been looking for since the demise of Eggsellent. The Focus Interface is clean, intuitive, and attractive. Although Focus does not autopopulate flagged items from OF2, it is easy to add a task using the “Share” menu. Timers and tasks are synchronized on Mac, iOS, and Apple Watch via iCloud.Focus is still missing some of the functionality I desire in a Pomodoro app. Besides missing automatic OF2 integration, there is no ability to add tags to each item. The only way to add metadata is via a text box. Add that to the relatively steep price ($19.99 for the Mac version, $7.99 for iOS).Despite these shortcomings, Focus is my favorite modern Pomodoro app and has replaced Tomatoes as my timer of choice. Give it a try.

Capturing Reminders with Apple Watch Using only your Voice

I received an Apple Watch for the holidays. I had avoided the technology until I was compelled by the features and capabilities. This year, with the release of the 3rd generation of watch software, the device finally made my list.So far, I’ve been most intrigued by the ability of the Watch to capture reminders. I merely say “hey Siri, remind me to…” and my item is automatically captured. I’ve set up Omnifocus to grab my Apple Reminders. So now, with only my voice, I’m able to capture my to-dos on the run using only my voice. I'm sure to use this feature both in my personal and professional (especially clinical) lives.

Airmail 3 - A Unified email Experience to Rule Them All

Several months ago I wrote about my discovery of Spark email. I wrote about what I like and disliked in the app. Although Spark wasn’t perfect, I preferred it to the built-in iOS Mail app. I used Spark exclusively on iOS for a month.But then, a reader wrote and told me I should check out Airmail by Bloop. I had tried an earlier version of Airmail, but was less than impressed. Regardless, I decided to check out what had changed in the latest version.When I read the updated features of Airmail along with the promise of a simplified unified experience across all devices, I decided to give it a try. I’m glad I did—I’ve used Airmail exclusively as my email client since mid-July.From the Airmail website:

Airmail 3 is a new mail client designed for El Capitan with fast performance and intuitive interaction. Support for iCloud™, MS Exchange, Gmail™, Google™ Apps, IMAP, POP3, Yahoo!™, AOL™, Outlook.com™, Live.com™Airmail was designed from the ground to retain the same experience with a single or multiple accounts and provide a quick, modern and easy-to-use user experience. Airmail is clean and allows you to get to your emails without interruption - it’s the mail client for the 21st century.

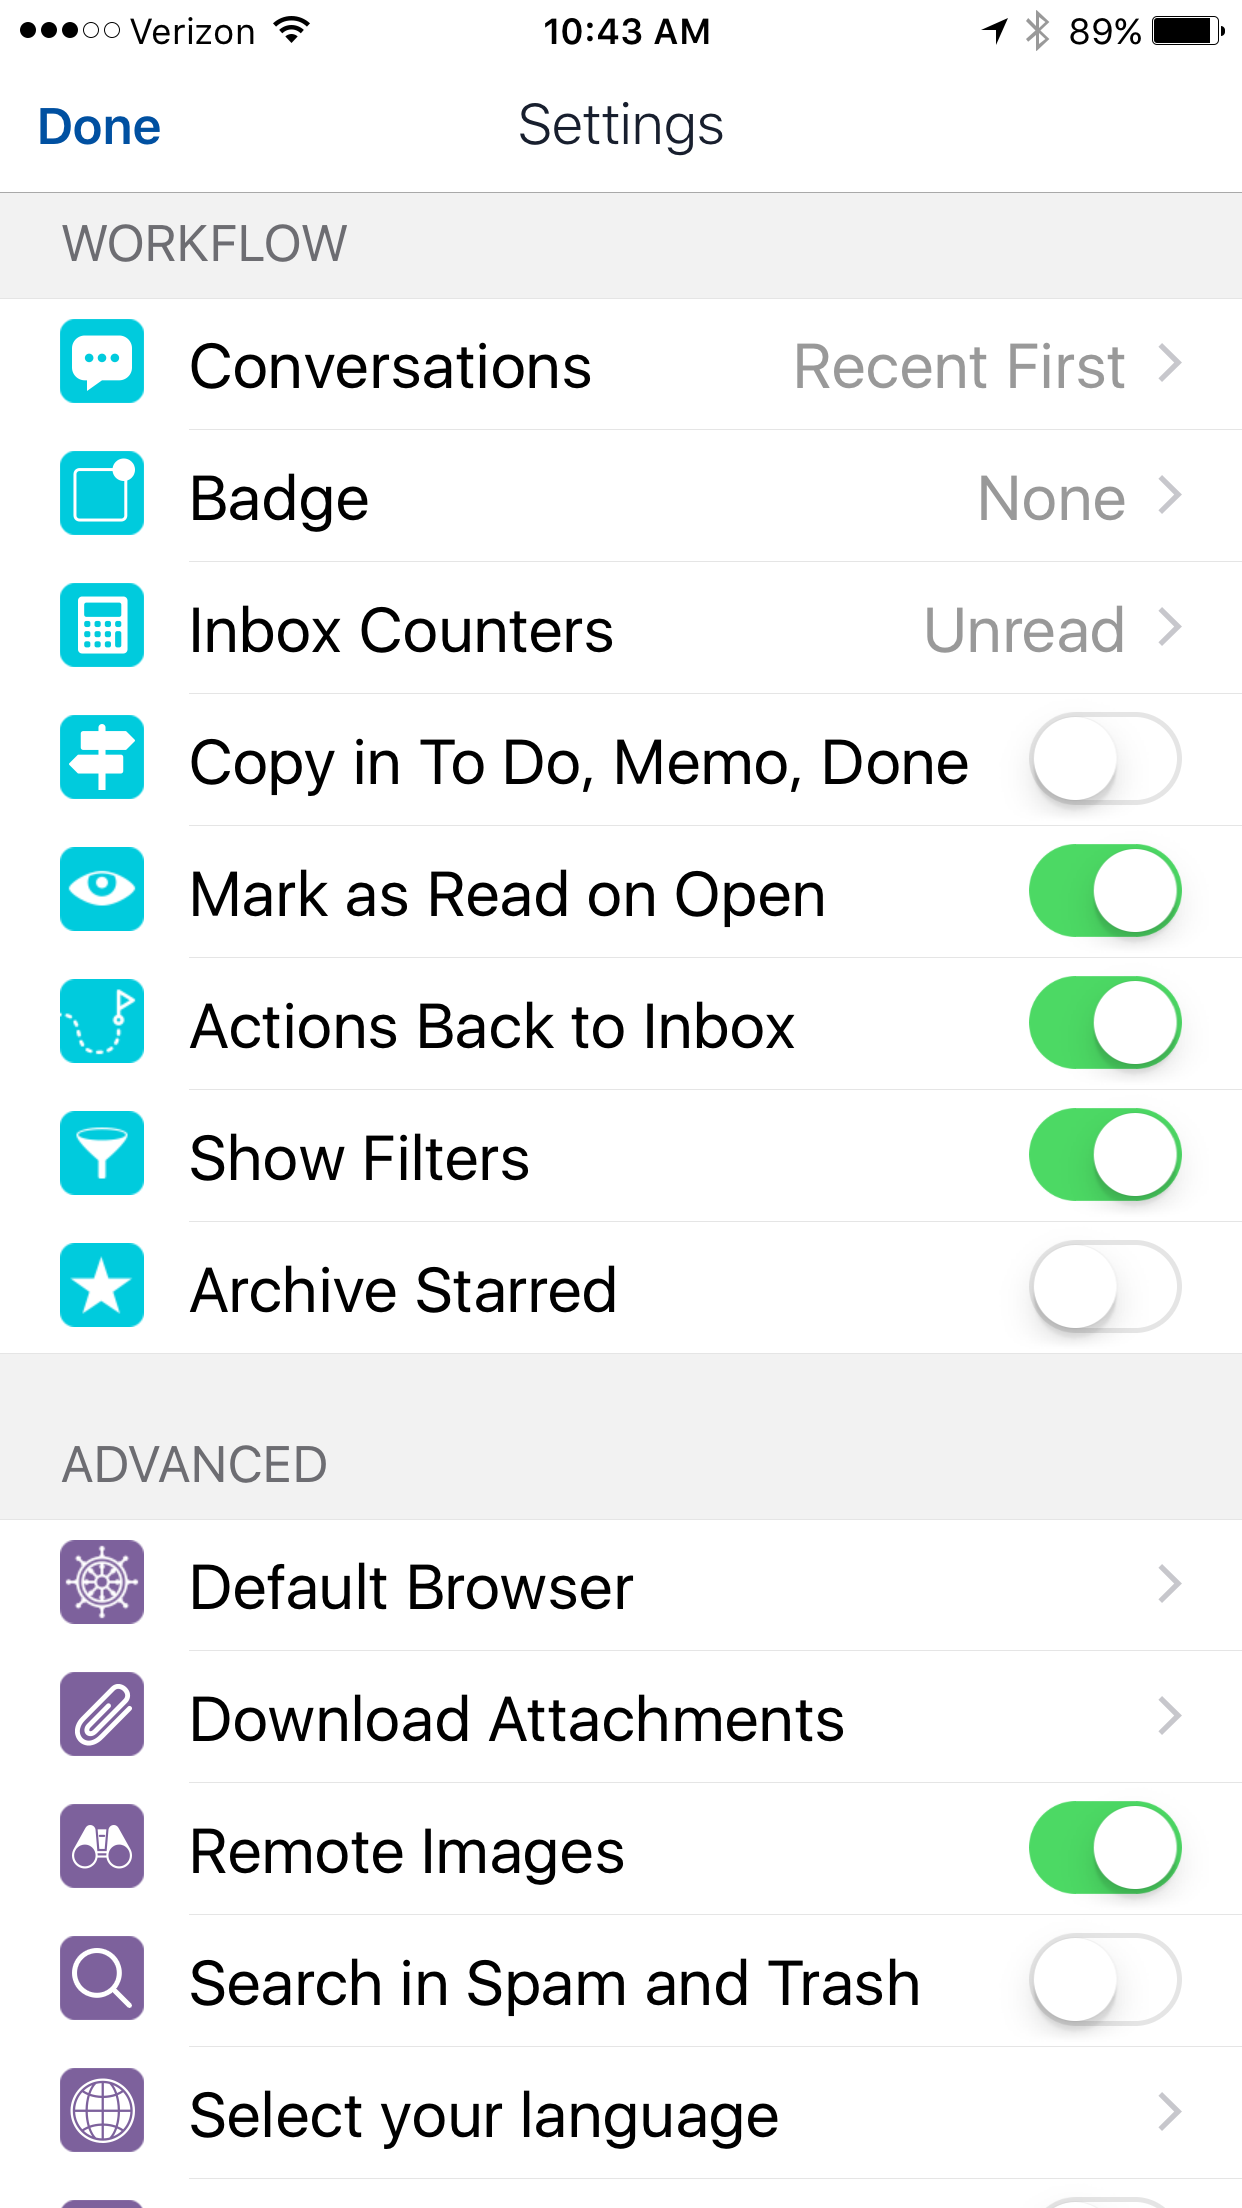
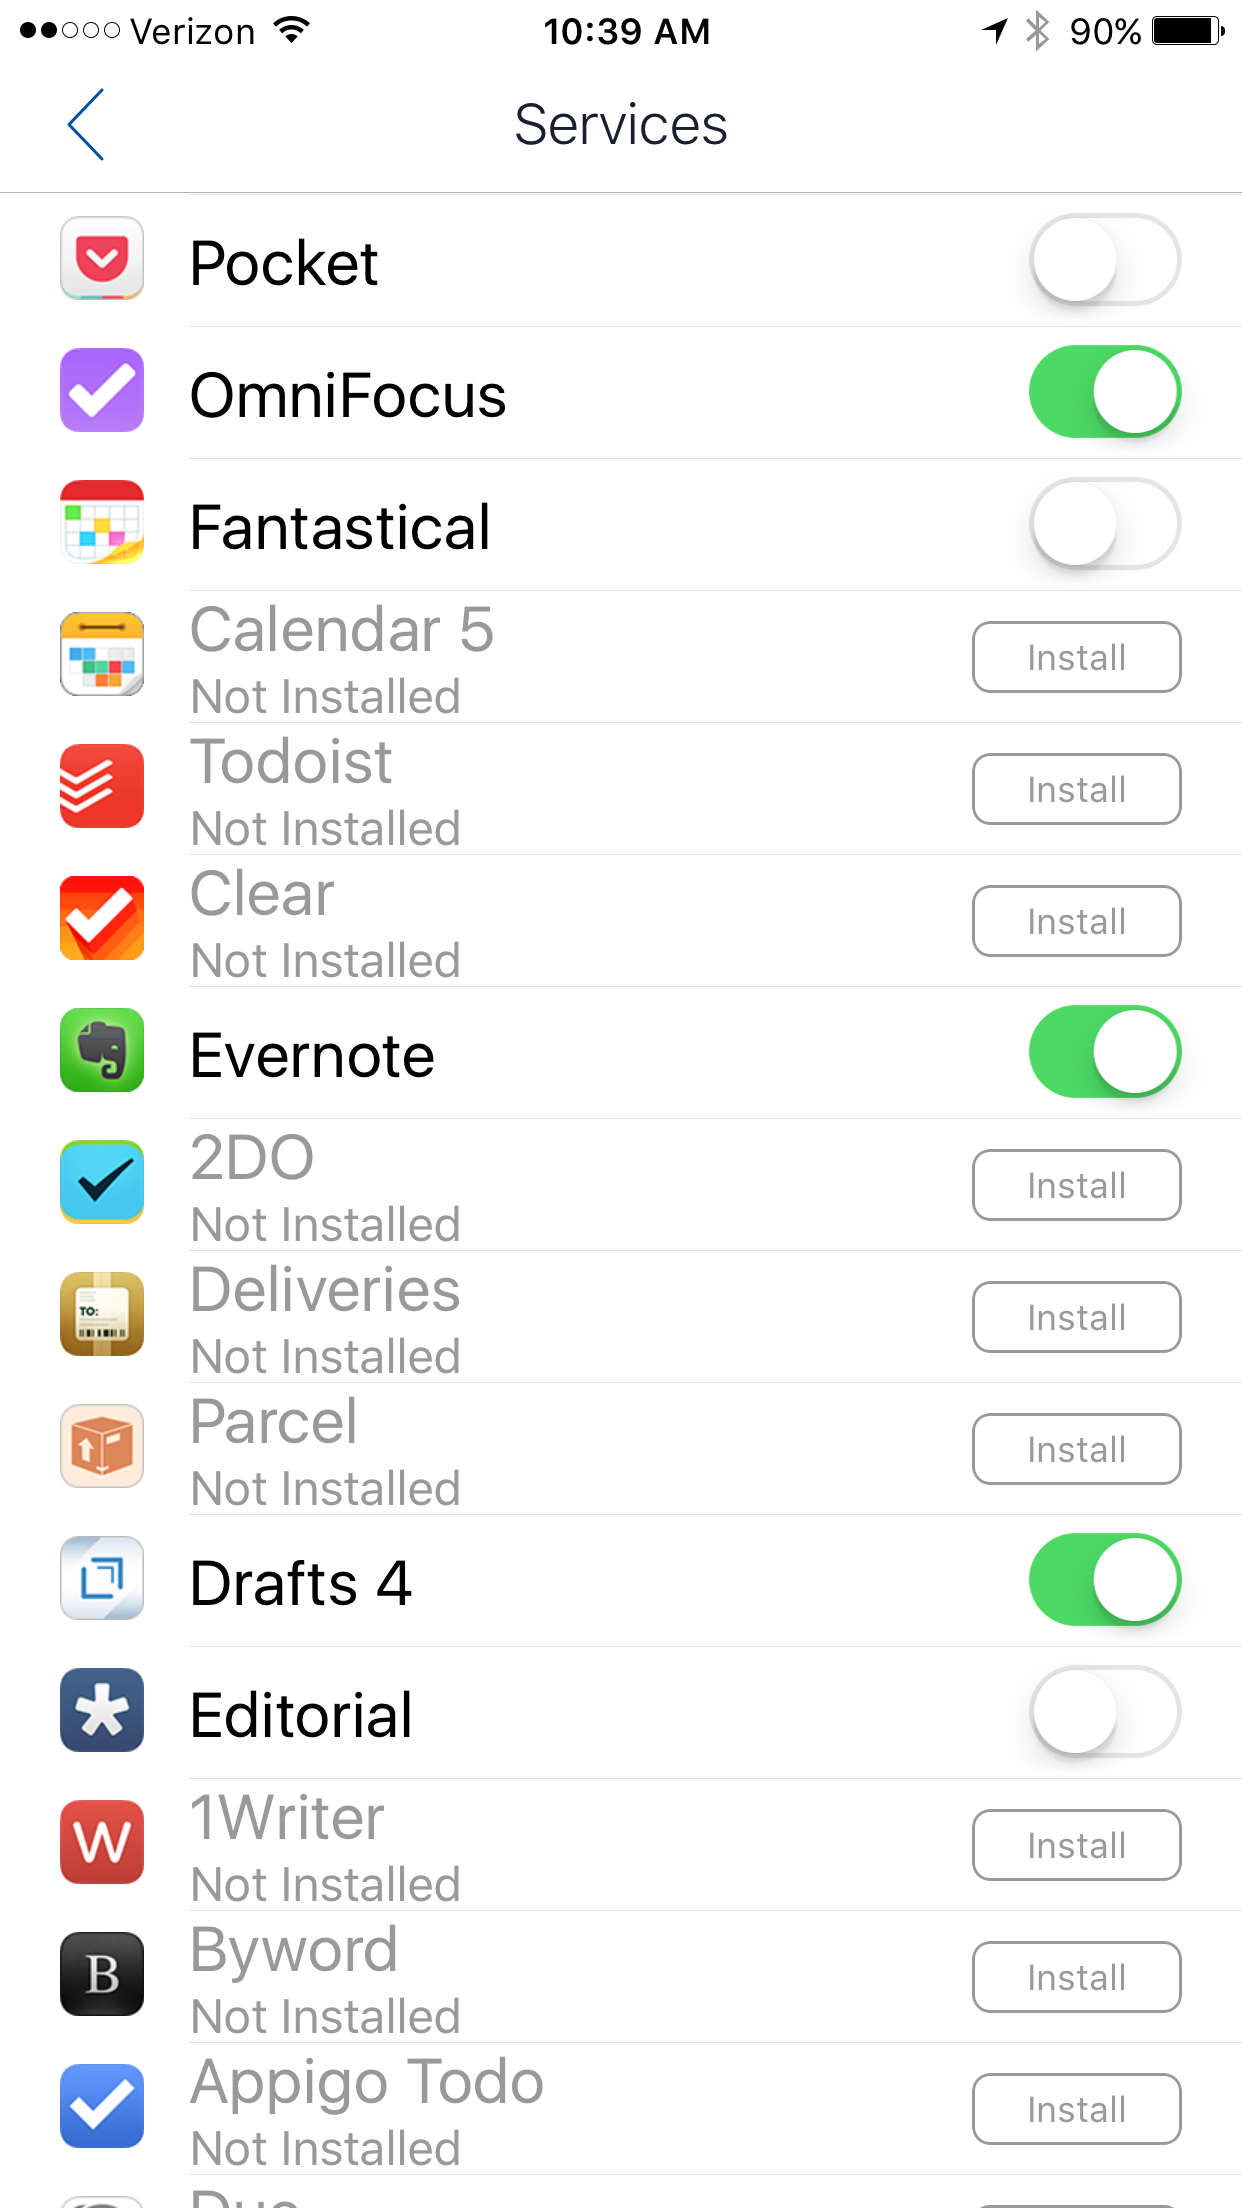
Beside the unified experience, I particularly appreciate the ability to customize every aspect of the email experience.In addition, Airmail supports services (the actions I use most commonly include saving attachments to Evernote or moving an email to an Omnifocus task).There are 4 customizable swipes. I  chose to customize this feature in the following manner:

  1. short left swipe-DELETE email
  2. long left swipe-bring up action menu
  3. short right swipe-Archive
  4. long right swipe-Snooze (message disappears to re-appear at a future time).

Another nice perk is the ability to synchronize accounts and settings using iCloud. This feature alone saved me tons of time when setting the app up on my Mac, iPhone, and iPad.I’ve been incredibly happy with Airmail over the past several months and don’t anticipate this changing. I hope you’ll give Airmail a try.

My OmniFocus Set-up (Part 2)

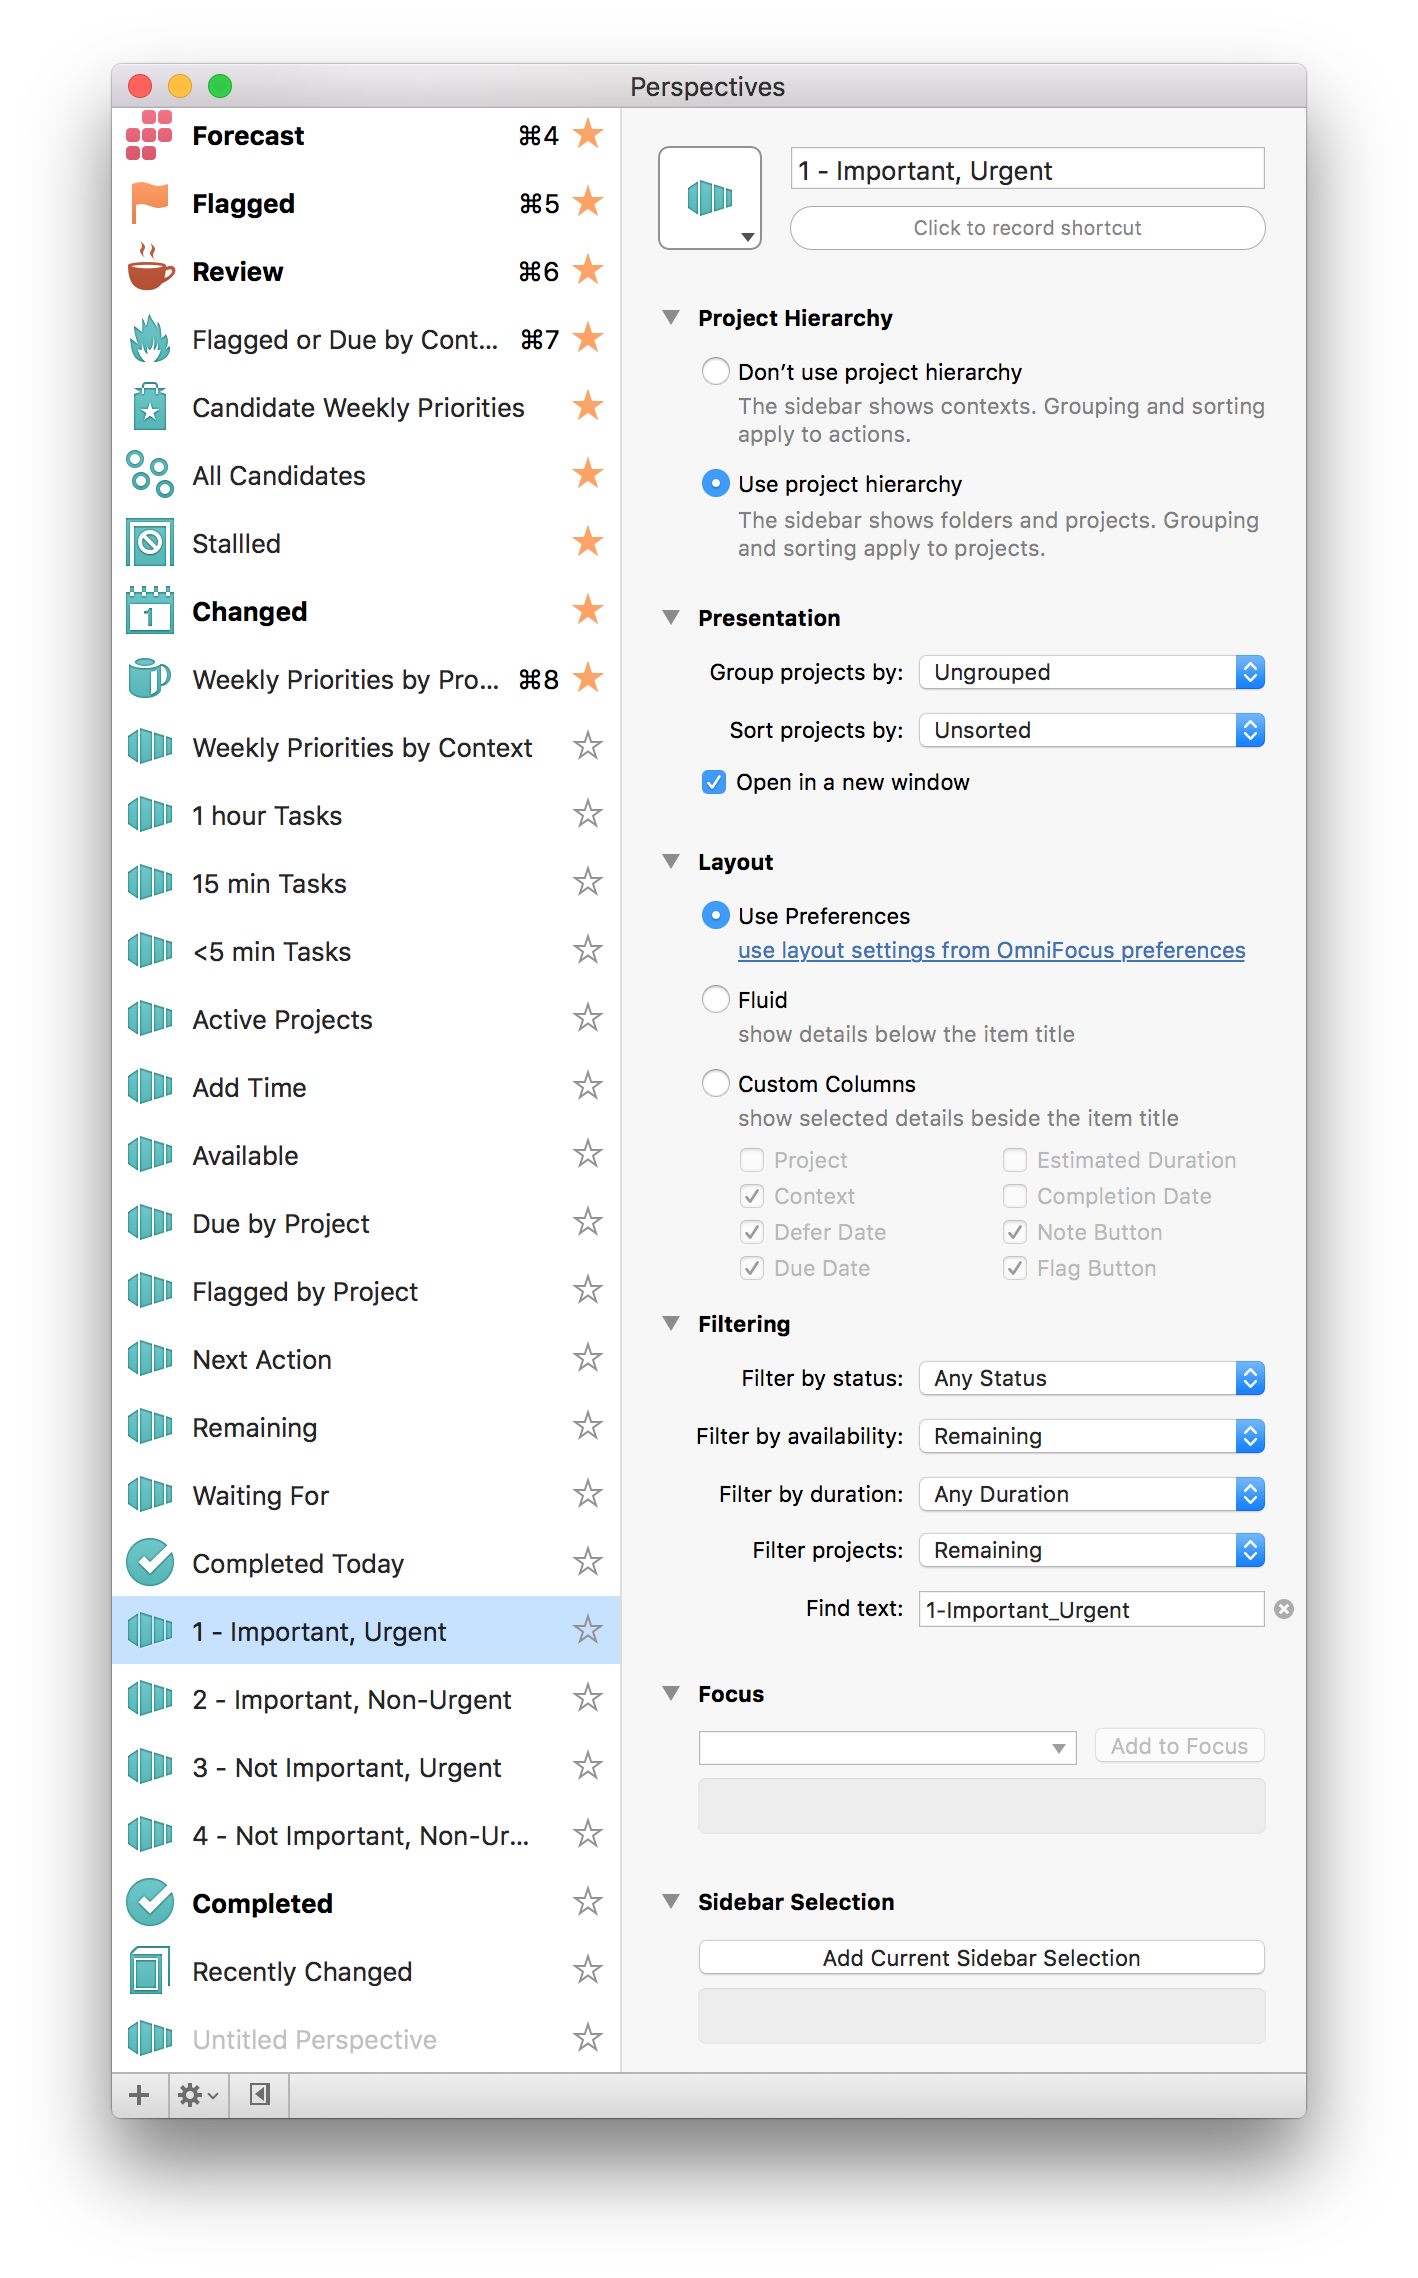
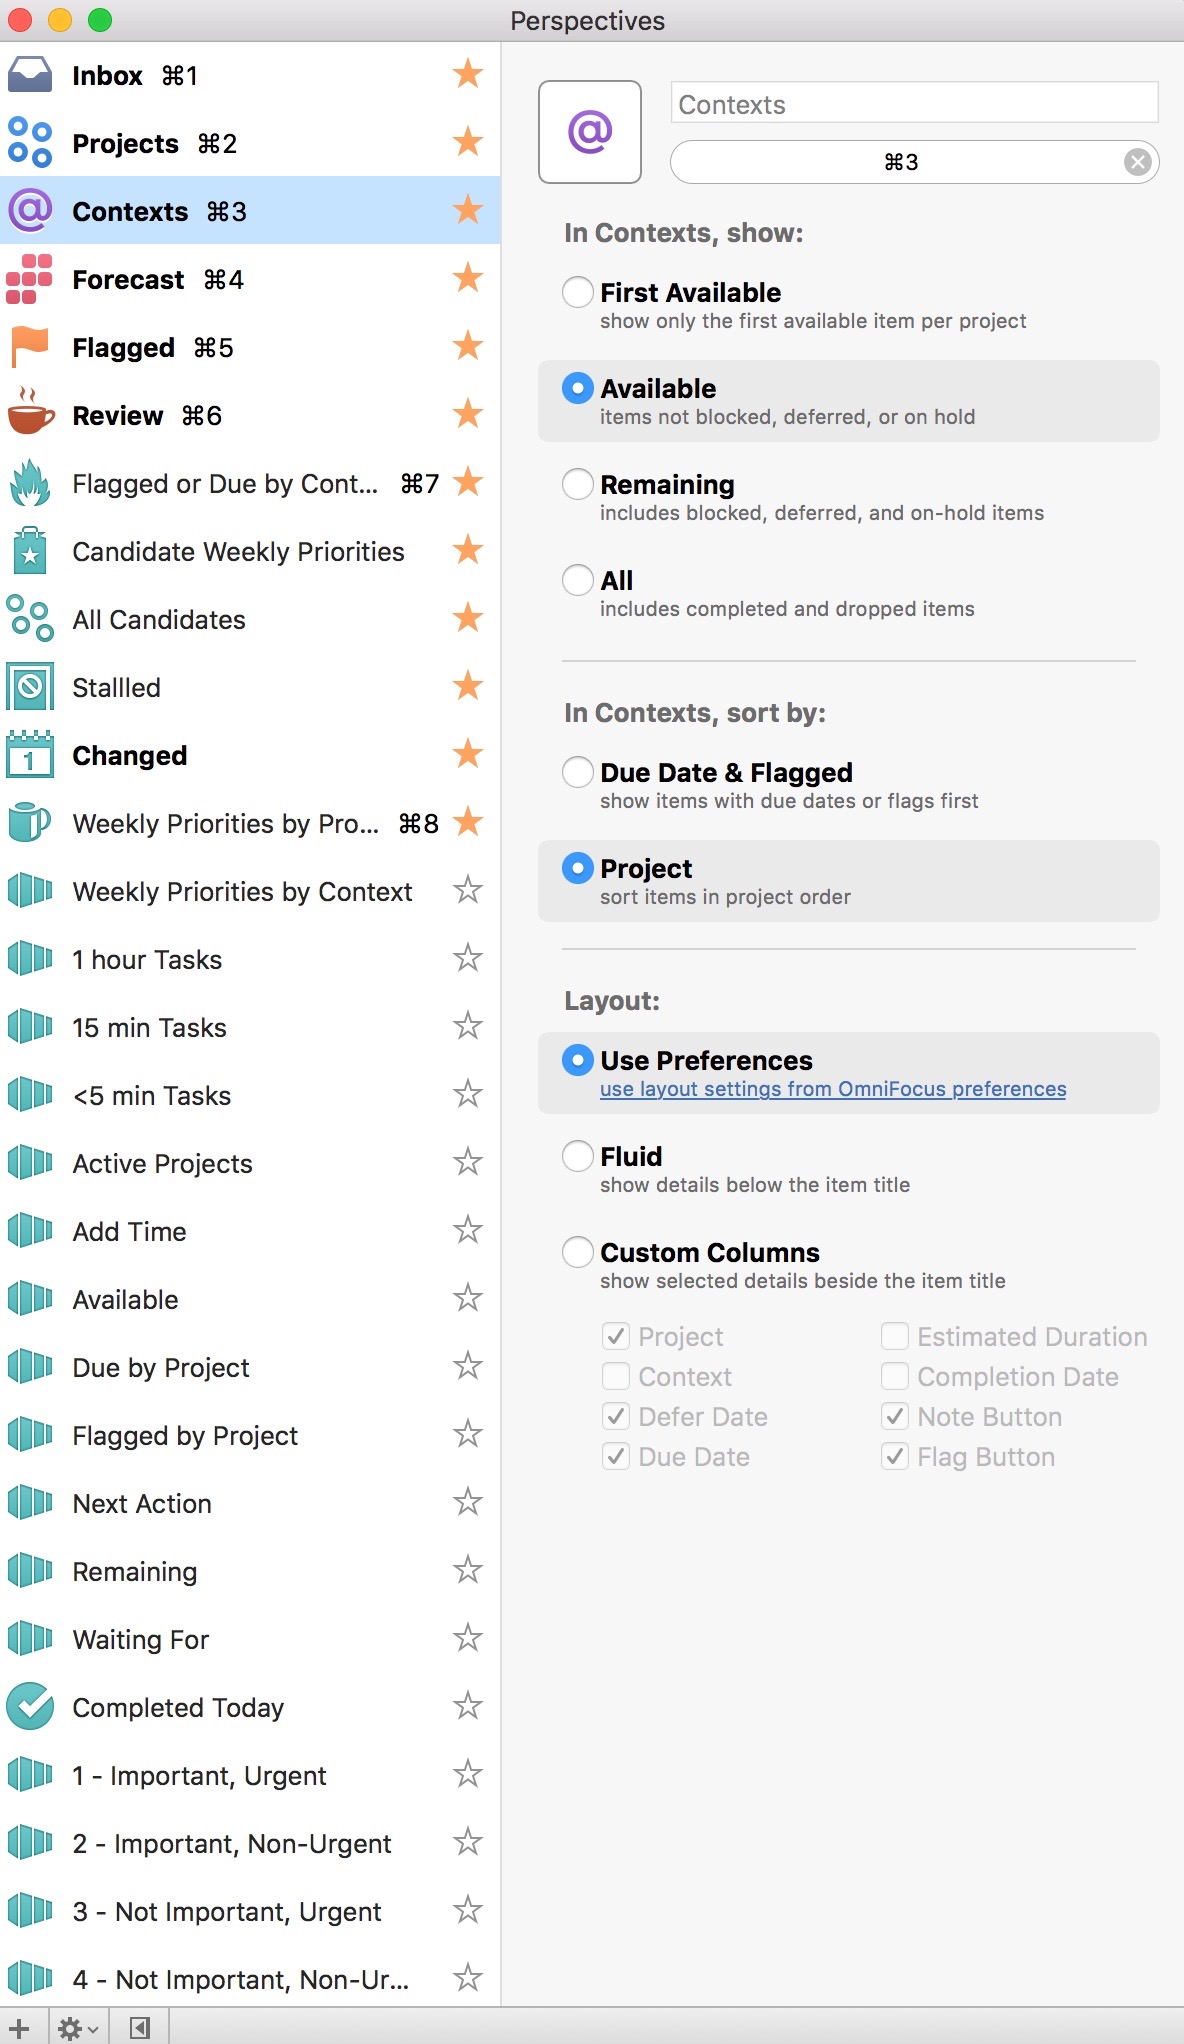
As i've mentioned numerous times before, I'm a huge fan of OmniFocus. In my last entry on OmniFocus, I offered a peek into the way I organize my folders. If you haven't read that post, please do so now. In this entry, I’ll answer some of the questions about triaging, prioritizing, and adding time to actions.Weekly ReviewI am not strictly adherent to GTD methodology, but I do use many of the practices. My practice includes both daily and weekly reviews. My weekly review normally takes about an hour. During the hour, I review existing projects and actions, clean up remaining items in my Inbox, and set up new projects. I look at each new and existing project through two main lenses—a hard due date (e.g. tax filing-Covey Quadrant 1-CQ1), and the strategic importance of the project to my personal or professional life (Covey Quadrant 2-CQ2).As you saw in my last entry, all my projects are organized into folders by my personal and professional roles. During my weekly review I decide on the CQ1 and CQ2 projects with greatest strategic value, or with the most urgent deadlines. These are the projects that go into my “Weekly Priorities” Folder. My next most important strategic projects go into my “On-Deck” Folder. I try to have no more than three projects in each the weekly priority and the on deck folders. Those projects that are lower priority at the end of the week, but still active, go back into my personal or professional “Role” Folders.ProjectsI spend about 80% of my time working on items in my Weekly Priority and On Deck folders. I have a custom perspective that filters all my projects down to my priorities grouped by project or context.Screen Shot 2016-04-16 at 10.37.22 AMAnother perspective shows all my flagged or due items even if they are not in my Weekly Priority or On Deck Folder.Screen Shot 2016-02-14 at 1.27.05 PMAs I add new projects, or make new projects from items in my Inbox, I am cognizant of any hard EXTERNAL deadline—only items with EXTERNAL deadlines get a due date. I have a custom perspective that shows all due or flagged items regardless of whether they are in my priorities folder. This bubbles up items that are due allows me to stay on top of deadlines regardless of whether the item is strategic or not.The last part of my weekly review strays from GTD methodology—I try to roughly plot out my week, placing actions from my highest priority projects in my calendar. I try to leave free time to allow for interruptions and other inevitable delays.I’ve found time-based perspectives to be helpful in two ways…during my weekly review , when I am trying to sketch out my week, or on-the-fly when I have unexpected time (e.g. a meeting that finished early). When defining the time for actions, I try to keep each to an hour or less. If an action item looks like it will take longer than an hour, I break it down further.My weekly review is complete after I’ve sketched out my week in my calendar. Although having a plan is great, I don’t get stressed when things change. I often need to adjust my plan. This takes place in my Daily Review.Daily ReviewEach day I open OF next to my calendar and review my achievements of the day. I like to record my my major achievements (e.g. completion of a major project) in a journal app (I use Day One). Often, during my daily review, I need to adjust my plans for the upcoming day. I have a perspective actions associated only with my highest priority items. I look at this list first. Next, I look at a complementary perspective that shows me my entire list of actions, grouped by context. Anything that I have not formally placed in my calendar, but want to achieve on a particular day gets flagged in OF. When I get to the office, I use my my “Flagged or Due by Context” Perspective constantly.Screen Shot 2016-02-14 at 1.27.05 PMI hope it's helpful to see how I'm using OF.I'd love to hear what you think...and would love hear the ways you use the software in your life.Addendum:In response to Owen's request....Screen Shot 2016-07-04 at 9.07.12 AMScreen Shot 2016-07-04 at 9.06.54 AM

My Omnifocus Set-up (Part 1)

I am a huge fan of OmniFocus (OF). I am so dependent on the software, I’m not sure I could function without it. Although there has been much written about the use of OmniFocus, I have yet to see anyone else that uses the software quite the way I do. In this entry, I’ll introduce you to my OmniFocus set-up. In future entires I’ll demonstrate how I use this set-up to maximize the impact of my work in my personal and professional life.My set-up is an amalgamation of many different things I’ve read online. I’m sure, after seeing what I do, others will continue to build on my ideas.The struggle to keep on top of one’s commitments is not new. Before Getting Things Done and OmniFocus, the go to resource for productivity was Stephen Covey’s First Things First (amazon link). This book suggested breaking down your personal and professional lives into various roles (e.g. Researcher, Clinician, Mentor). Each week, within each role, you were to decide up to three important tasks to accomplish (based on both urgency and importance). Each task could be added to one of 4 quadrants:Covey's QuadrantsThe fact that not all urgent tasks are important, nor are all important tasks urgent was a complete revelation for me. Once I understood this, it was much easier to prioritize my personal and professional life. Per Covey, in order to maximize productivity, one is to spend the majority of their time in Quadrant 2 (Not Urgent, Important). Rather than working on projects haphazardly, Covey recommended spending the vast majority of time focused on Quadrant 2 projects. I choose to define Importance as the project’s impact on my long-term goals.I have blended Omnifocus and First Things First (and a little bit of Agile Programming—but that’s an entry for another time) to develop a system that’s truly my own. In the image below, you can see how I organize Omnifocus. I have four high-level folders: Weekly Priorities, Single Tasks, Projects, and Meta.ProjectsMy Weekly Priorities Folder contains three folders: Maintenance, Weekly Priority, and On Deck. The Maintenance Folder contains all the projects to keep my system running—reminders for my daily, weekly, and monthly reviews. The Weekly Priority Folder contains my weekly highest priority level projects (both personal and professional) I chose during my weekly review. The On Deck Folder contains other important projects—if I’m ultra productive and blast through my priority projects, I look in the On Deck Folder for next tasks to accomplish.The Single Tasks High Folder is self-explanatory.The Projects Folder contains two subfolders: Professional and Personal. Within each of these subfolders I have folders that define each of my professional and personal roles. For instance, my Professional Folder contains the following role folders: Administrator, Clinician, Communicator, Consultant, Fundraiser, Innovator/Entrepreneur, Mentor/Teacher, Researcher, Society Member. Each new professional project is placed within the folder of one of my roles.The Meta Folder Contains my Someday/Maybe project folders (things I’m interested in, but have not yet committed to doing). I also store my completed and dropped projects here.After defining a new project, I place the project into one of my personal or professional subfolders. In the Notes Field of OmniFocus, I use Text Expander scripts to label each project by Covey Quadrant. I then may use OmniFocus Perspectives to quickly locate ALL my projects of a particular quadrant.Window_and_PerspectivesUsing these methods, I am able to juggle a huge number of concurrent projects, each week prioritizing those most important to my personal and professional life. In case you’re wondering, I do most of my heavy lifting / organizing on my Mac. I primarily use OF on my iOS device as reference.In a future entry, I’ll explain how I use this set-up in my daily, weekly, monthly, and annual reviews.

Embracing Evernote

Workflows evolve. A few years ago I was hesitant to use Evernote because of its proprietary nature. I was using plaintext to capture everything, but had to work out a complex syncing system to be efficient. Over the last year, I’ve overcome my fear and have increasingly built Evernote into my life. I started using it in so many ways, I finally subscribed to thePremium service. I’ve found Evernote to be a flexible and reliable tool readily available on all my devices — both for capture and to find information when I need it.

Here are a few ways I’m using Evernote:

Clipping Service

The first thing I installed when I started using Evernote was the Mac Clipping Tool. Using the clipping tool I easily capture, attach keywords, and annotate pages from the web. Using the “Share” menu in the web clipper, I copy a link to the note directly as a reference in OmniFocus or Calendar entries. When I’m on my iPhone or iPad I use the Action Button (the square with the arrow emerging from the top) to get items into Evernote.

Emailing notes directly into an Evernote NoteBook (premium feature)

I have transitioned my personal email client to Postbox. Postbox, unlike Mail.app, has an Evernote clipping tool embedded into the interface. Sometimes, I’m unable to use either of these methods and will choose to email a note into Evernote. To learn more about this premium feature, read the excellent overview of Evernote email features (including naming the file, placing the file directly into a specific notebook, or tagging the file with a keyword or reminder time).

I most commonly use this method when I’m answering an email, placing my unique Evernote email address and Omnifocus MailDrop Address in the bcc field of my email. Using this method, I can kill 3 birds with one stone (responding to the email, keeping the reference material, making an Omnifocus entry to keep up with the item).

Linking to reference material for Omnifocus or Calendar

Once information is captured Evernote,  each note has its own unique URL. I use this feature extensively to link reference material to OmniFocus and my Calendar. I have different ways of linking depending on the situation.

By control-clicking on a note in Evernote and then selecting “More Sharing” I copy the web-based URL to my clipboard. I then paste the URL into the note field of Omnifocus or into the appropriate field of my Calendar. Then, even when I change devices, I have access to my reference material.

Another method of grabbing URLs is with Launchbar. As I mentioned, I  now use Launchbar extensively. I can select a note in Evernote and then invoke Launchbar, then I select “Evernote – Copy Link of Selected Note.” This copies the URL of the slected note to my clipboard to be pasted into any other app.

Capturing Ideas in Evernote using Drafts

Evernote extends its great power by linking to many other applications. I’ve found capturing snippets of text into Evernote is even easier than the method I described a few years ago using plaintext.

I use Drafts on my iphone and iPad to capture / brain dump just about everything. Drafts is an essential program on my iPhone. Drafts allows me to capture without thinking about what app I need to open. Once the text is captured, Drafts routes the information wherever I choose. I wrote about one way I use Drafts to capture and process meeting notes

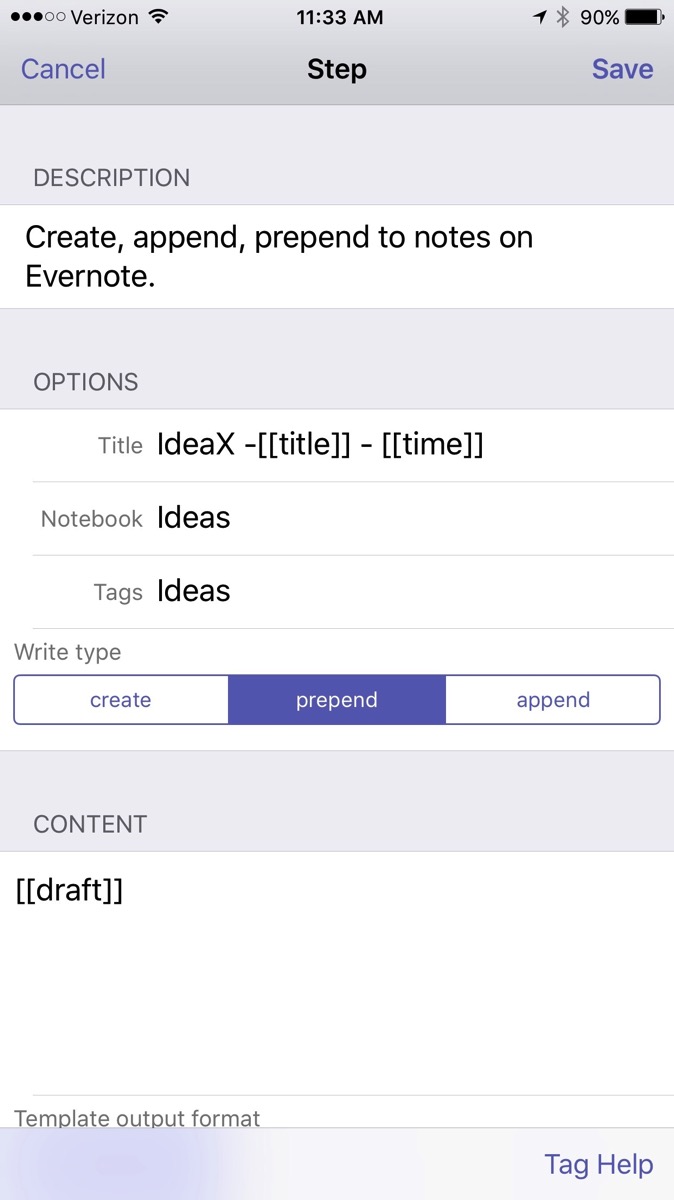
When I want to capture an idea, I merely open Drafts and type or dictate my idea into the app. When I’m done, I route the information to Evernote using the following custom action:

IMG 0608

The action automatically derives a title from the first line of the text and appends the date and time. Furthermore, it files the note in my “Ideas” Notebook in Evernote and tags the note with the keyword “Ideas."

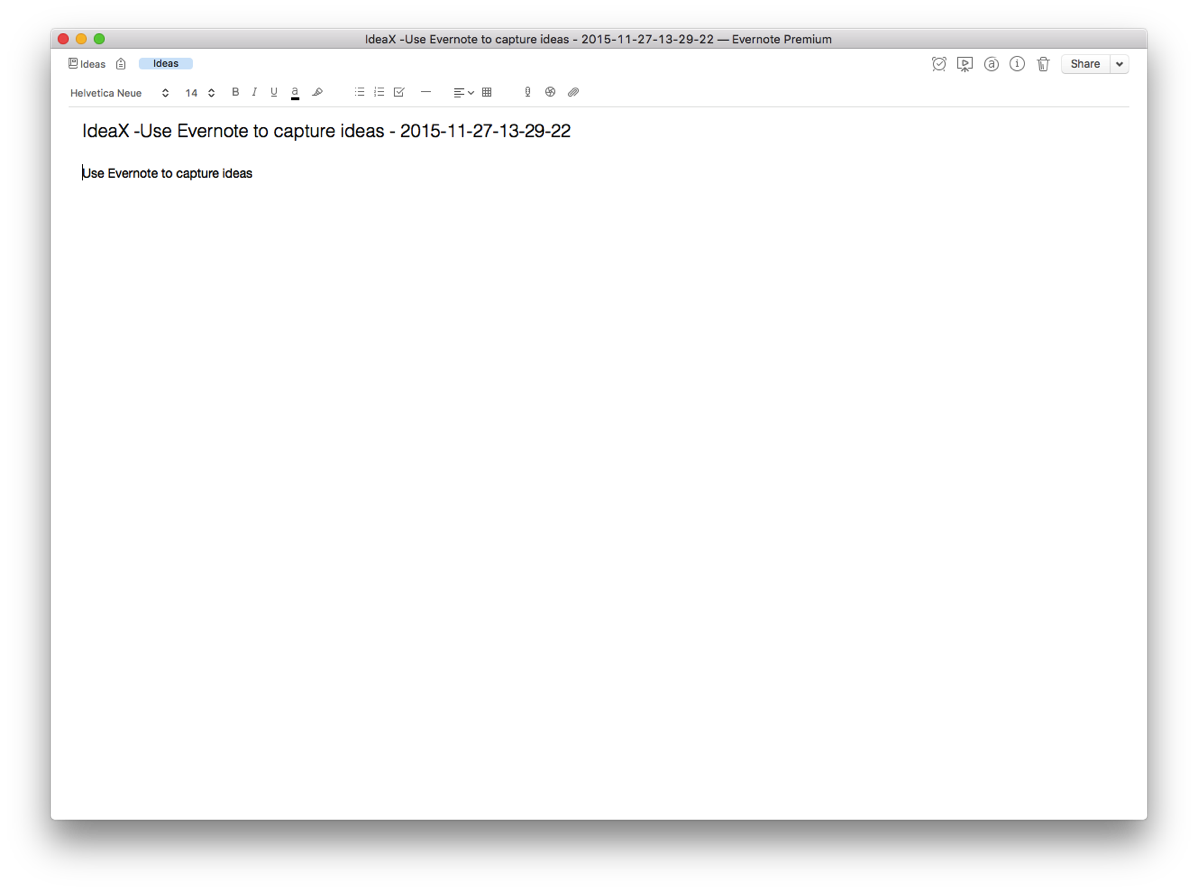
The note ends up in Evernote looking like this:

Screenshot 2015 11 27 13 29 52

When I get to Evernote, I append further information in the note as needed. I use IdeaX in the header so when I search for a list of my ideas, they are not mixed together with information I’ve gathered from other sources. If I search for a keyword(s), I not only see my ideas, but all the information I’ve gathered in Evernote—very useful.

Capturing Blog Ideas, Lyric Ideas, Quotes, and other Snippets in Evernote using Drafts

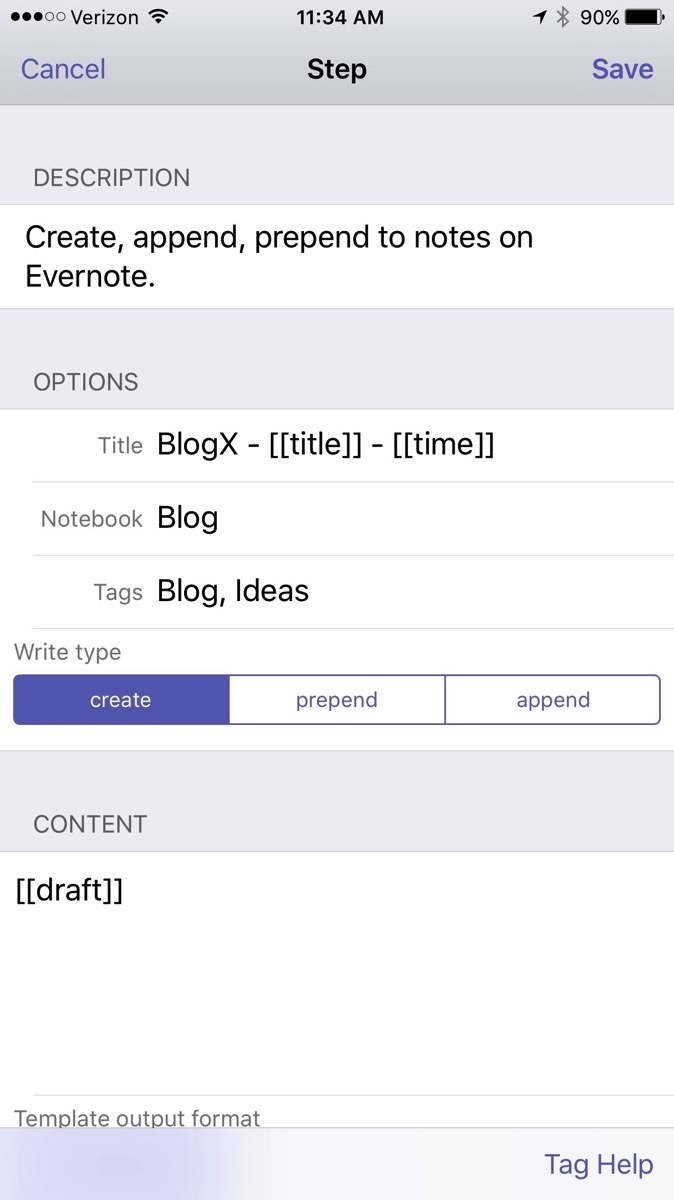
I use a similar scripts in Drafts to capture a whole host of other information on the go. Each class of information is filed into it’s own Notebook in Evernote. For example, here is the action I use to capture information for my blog:


IMG 0609


By incorporating Evernote, I’ve greatly simplified many of my capture processes. I highly recommend giving Evernote Premium a whirl and trying out a few of these workflows on your own. You won’t be disapointed.

Automated Dictation and Task Delegation using Evernote and Workflow App

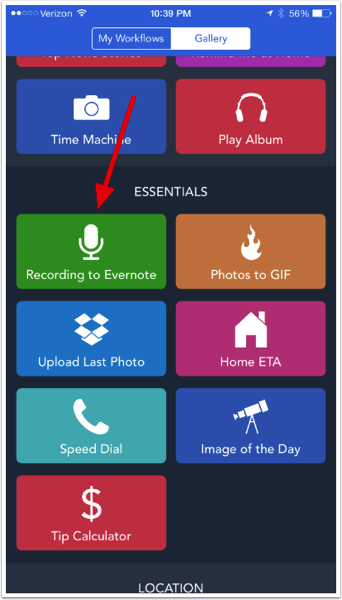
As usual, David Sparks (Macsparky) inspired me. After finishing the MacSparky Workflow Video Field Guide, I decided to try my chops at buidling something new. As I was exploring the Gallery (the pre-baked workflows that come with the app), one of the examples caught my eye; "Recording to Evernote."I have a twenty minute commute between my home and work. When not listening to audio books, I attempt to be productive. While driving, I'm frustrated by my inability to delegate tasks to my administrative assistant. Before Workflow, in order to send a request (or dictation), I'd have to ask Siri to transcribe an email and then hope for the best. As I'm sure you're aware, Siri makes many mistakes. It's both difficult and unsafe to proof while driving. Siri was not a viable option.That's where Workflow comes in. I built a Workflow that records my voice then, at the same time, sends a link to both my admin and to Omnifocus. Here's how I did it.

Add the "Recording to Evernote" from the Gallery

First, download Workflow. Once you've installed the app, click on the "Recording to Evernote" workflow in the Gallery. Select "Get Workflow." Your workflow will be added to your "My Workflows" Area. Now it’s time to edit.add-the-recording-to-evernote-from-the-gallery.png

Programming the workflow

I didn't change any of the programming at the beginning of the script, but you can.programming-the-workflow.png

Programming the workflow - screen 2

Here is where I altering and appended the built in script:

  • (1) I customized the name of the note and included the current date variable
  • (2) After the audio note is recorded, the file is saved to Evernote. "Get Note Link" retrieves the unique URL for this brand new note.
  • (3) "Copy to Clipboard" passes the URL of the audio to the clipboard.
  • (4) "Send email" command takes the clipboard and pastes it into my email
  • (5) I put my admin's email address is in the "To:" field
  • (6) I included my OmniFocus MailDrop email address in the "Bcc" field (so I can track what I've delegated in Omnifocus).
  • (7) I customized the Subject Field (and appended the current date)

programming-the-workflow-screen-2.png

Add to my Home Screen

Finally, when I was finished programming (and after I customized the color and icon of the button), I added the button to my HomeScreen. Now, when I touch the button a screen comes up that reminds me to "tap to record." I tap, record my message, and then tap again. Workflow automatically saves the recording to Evernote then sends two emails: one to my admin (with a link to the audio recording) and one to my Omnifocus Inbox (where I can keep track of the delegated task).As you can see, Workflow makes automation ridiculously easy. I hope you find this simple application useful.

Glass, Omnifocus, and prospective memory errors

It’s been almost a week since I picked up my Glass. I’ve been experimenting with its built-in functions.

One of my colleagues in the Duke University Human Simulation and Patient Safety Center, Noa Segall, is working on research related to prospective memory errors–fascinating stuff.

I personally believe if we're able to capture our clinical to-dos quickly, we could mitigate many of these errors. One possible solution might be using the Getting Things Done (GTD) method clinically. Using voice to capture is key–especially for those of us procedurally based physicians and nurses that use our hands. Along these lines, I tried Siri, but it didn’t work well (since I had to pull my phone out of my pocket and activate the device each time I wanted to capture).

Glass changes everything! I can now capture my clinical to-dos using only my voice. Here’s how I set it up.

I added my personalized Omni Sync Server email address as one of my Glass Contacts (I named the contact OmniFocus). When I want to capture on the move, I activate Glass by tilting my head back, then saying “OK Glass, send a message to…Omnifocus.” An icon with a mic shows up in Glass indicating it’s recording. When I finish speaking, Glass automatically sends my message to the Omni Server.

When I get to my computer or iphone–my to-do is waiting for me, dutifully synced by Omni Server. I am careful NOT to include any identfiable patient information. Instead, I use operating room numbers or post-anesthesia care unit bed numbers to indicate the location of the action. Very handy and hands-free.

Glass Rocks!

Writing and Reading Workflow: Batching and Automating Full-Text Retrieval

In my work at Duke University on simulation, games-based learning, and learning technology, I frequently read and write scientific information. I’ve developed a series of workflows to help me efficiently deal with information when writing papers and grants. In a previous entry I talked about how I try to batch operations, doing similar things at the same time. This entry will be about my workflow for reading scientific manuscripts.

I use Skim for scientific reading, typically using the bottom pane of the “Split PDF” feature to look at the title of references as I come across them in the body of the manuscript. On average, I’m interested in downloading about 10% of these references to my personal library.

Although I love Skim, one feature I have not been able to figure out is how to highlight items in the bottom split screen. Thus, I’ve created a workaround. Before I start reading an article in Skim, I create a note called “Get Manuscripts” As I’m reading, I merely record the references number of articles I want to fetch in my “Get References” note. Because I create this note first it’s always located at the top of my Skim Notes. When I’m done reading the current article and processing my annotations, I retrieve the supporting articles I identified while reading. 

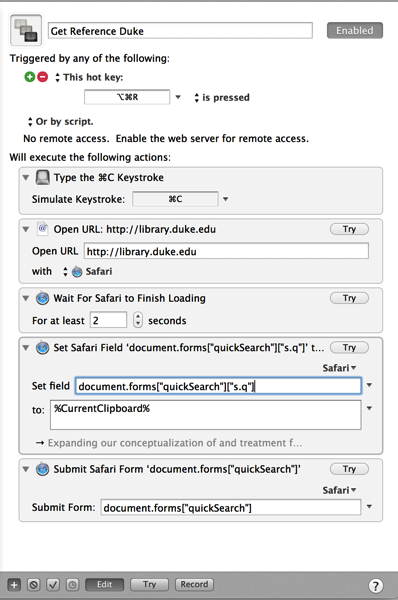
To do this, I use a phenomenal program called KeyBoard Maestro. Keyboard Maestro lets me type a single keyboard command to trigger an entire workflow. One by one, I work through my “Get References” numbers, highlighting the title of each corresponding article. After highlighting each title, Keyboard Maestro does the rest (invoked by Command-Option-R).

Keyboard Maestro automatically  (1) copies my highlighted text, (2) surfs to the Duke Library literature search page, (3) pastes the text string into the appropriate field, and (4) submits the search. Thus, with a single key combination, I am able to download the full text of supporting literature. Once I find the full text I'm interested in (usually a PDF), I save it to my Download Folder, where Hazel takes over and imports the paper into my Papers Library.

If I'm not ready to retrieve the articles, I create an Omnifocus Action for each to be collected at a later time.

My macro is not limited to Skim, it works with any text I’ve highlighted, be it on the web, in a manuscript, or somewhere else. Here is a picture of the programming, but obviously, you’ll have to modify it for your own favorite full-text repository. Enjoy!

Maestro Automate Full Text Retrieval


Addendum (January 14, 2014): If you’re searching at Duke, you’ve probably noticed the library changed its search interface. I’ve updated the Keyboard Maestro Script accordingly. It’s only configured to search for peer-reviewed articles. Download the script and import it into Keyboard Maestro (will only work for Duke Libraries).

Meeting WorkFlows: Efficiently Capturing Meeting Notes

In academics, like every other corporate entity, meetings are a necessary evil.

I’ve tried all sorts of solutions for capturing notes and action items from my meetings. For many years, I would haul my MacBook Pro into the room, relying on a slew of software invoked through Launchbar.

Next, I transitioned to the cool LiveScribe Echo. The Achilles Heel of Smart Pen Technology for me, true to the physician stereotype, is that I have awful handwriting. Most of my handwritten notes were illegible. To make matters worse, sending handwritten notes to OmniFocus was a kludge.

Recently, I’ve been carrying my iPad + Zagg Folio to meetings. Although convenient and portable, I have continued to depend on a slew of software to capture my notes and to-dos. None of my methods were standardized; my notes would constantly get lost.

This inefficient workflow was why I was so interested in the 512 Pixel post, The Capture Form. The author developed a standardized PDF form to capture meetings. But that wasn’t what I found interesting. It was the very last line of the article, with a link to a TextExpander version of the form.

I riffed on his work and developed a new workflow for my iPad + Zagg that I’ve been trying out.

My workflow starts with setting up the following TextExpander snippet:

MeetX - Untitled - %Y-%m-%d at %H:%M


ATTENDEES:

JMT

BACKGROUND / REFERENCE:


NOTES:


ACTION ITEMS FOR ME:


ACTION ITEMS FOR OTHERS:


The first line automatically names the note as a meeting, appending the current date and time. I use the title "MeetX" to help me with search. I know if I search for MeetX I'll only see my meeting workflow notes (instead of every document that had Meet or Meetings). All that's left to do is fill in the title. Since I synchronize TextExpander between my Mac, iPad, and iPhone using DropBox, my snippet is immediately available on my all my devices.

The second part of the set-up involves OmniFocus and their Mail Drop service (note: in order for this to work you have to sync OmniFocus with the Omni Sync Server). If you haven’t done so, log onto the Omni Sync Server, and apply for the Mail Drop Beta (when I applied, I received my invite in a matter of minutes). Once accepted, you set up a unique email address that is your direct link to Sync Server. To learn more, check out the Omni Mail Drop story at MacSparky.

When I want to take meeting notes, on my iPad, with TextExpander running, I launch Drafts. I expand my snippet (in my case by typing “.mtg”), fill in a title, and am ready to go. If I’m preparing for a meeting in advance, I type in my reference material under the appropriate heading, then fill in the remaining fields during the meeting. Most days, I get started with my note taking immediately when I enter the room.

When the meeting is over, within Drafts, I forward my notes to Notesy Simplenote. Since I’ve set up Notesy to synchronize with NValt on my Mac (as I wrote about previously), my meeting notes are immediately available and searchable on all my devices.

If personal to-do items came out of the meeting, I have another step. From within Drafts, I select “forward to email,” type out a subject name, then email the note to my personalized Omni Mail Drop address. When I open OmniFocus, the item is waiting for me as an Action in my Inbox. Even cooler, the complete meeting text is available in the "Notes" field . If there are multiple actions embedded in the original meeting notes, I spend a few minutes processing the set into single unique actions.

An alternative: from within Drafts select "Send to Omnifocus as note" (of course you have OmniFocus installed on your iPad for this to work). Drafts will launch Omnifocus and the notes of your meeting will be placed in the appropriate section of a new action. The only thing left for you to do is type in the name of the action.

This workflow has helped me immensely. I now have an efficient, standardized, searchable, multi-device method for recording and retrieving my meeting notes.

I’m really excited about this workflow–I hope it works for you too. Let me know what you think.

Appended March 2, 2013: Read this entry on why I switched from SimpleNote to Notesy.

Launch Center Pro + OmniFocus

After seeing this video, I immediately went out and bought Launch Center Pro for my iPhone-it's like "speed dial" for other apps.

To get an idea of how it works, consider the following example:

I frequently send text messages to my wife. Before Launch Center Pro I'd have to unlock my iPhone's screen, launch the iMessage app, click the address button, scroll down to my wife's name, then type my message. Bleh. Using Launch Center Pro, I push a single button and the app does the rest (launching the app, addressing the text message to my wife, and moving the cursor to the text input field).  I have similar buttons configured to launch and configure TweetBot (my favorite Twitter client), as well as entering new calendar items using Week Cal.

But perhaps the best use of Launch Center Pro is having it interface with OmniFocus--as explained by  Michael Schecter. After watching the following video, I was able to set up the Omnifocus actions within Launch Center Pro in about 10 minutes.

Enjoy!

OmniFocus Continued: Capturing Information in OmniFocus

In my last entry, I spoke about the power of Omnifocus. To get the most from the program, you must have easy ways to capture data. As I mentioned in my last entry, there are versions of Omnifocus available for the Mac OS as well as the IOS–I own them all. In this blog entry (and accompanying screencast) I’ll discuss the main ways I get information into Omnifocus.

Direct Entry

The least complicated way of entering a task is by manually entering it into the program itself. There are two ways to do this: (1) launch Omnifocus: Select Inbox: and type in the new Action (remember to frame the new item with a verb) or (2) Launch Omnifocus: select File: select “Quick Entry”: and enter the action.

Using the Quick Entry Box, you can capture a task and process it later, or if you expand the columns of the Quick Entry box (using the gear icon) you can type in the context, start date, etc at the time of entry. I try to estimate the amount of time it will take to complete the item at the time of entry.

If this is the first item in a new project, type in the name of the project in the Project column and then hit Command-Return. This will create a new project in the Omnifocus database. If you designate a Project while entering your item, it will be filed directly into that project. If you don’t, it will end up in your Inbox for later processing. Of all the ways to get information into Omnifocus, I find direct entry the most cumbersome.

Clippings

Clippings are incredibly handy and convenient. You highlight what you want, hit a key combination and, boom, Omnifocus launches and creates your Action item (with a link back to original item you highlighted). I use this method of capture Actions dozens of times each day. In order to get this to work you must set up your preferences in a specific way.

To set up Clippings go to the menu bar, and choose Omnifocus, then choose Preferences. In the Preferences menu click on the Clippings Tab. Define a Clippings Shortcut that works for you (I use the Command-Space-Period). Next you have to choose whether the clipped item shows up in Quick Entry (which allows you to do some additional quick editing) or whether you want the item dumped directly into your Inbox (I use Quick Entry).

Underneath the Copy Clipping to radio buttons are the different programs that work with Clipping. You can learn more about how Omnifocus will handle the clipping by highlighting each individual item next to the check box. I have all the programs checked. The most important selection is the final item: Any Application- make sure this is checked. You can then make and Action item out of information anywhere on your computer.

There is a special add-on for Apple’s Mail.app called the Clip-o-Tron 3000. Make sure this is installed (the installer is in the bottom right hand corner of the Clippings preference panel). The Clip-o-Tron let’s you highlight an email message and then use the key combination you designated above to automagically make a new Omnifocus Action. This new action contains the text of the email as a note AND a link back to the original email in your email database. This is my most common method of capturing Action items into Omnifocus.

If you’ve set up Omnifocus to synchronize (more on that in another entry)–the new Action will show up on all of your devices. Both Direct Entry and Clipping describe how I capture information from my MacBook Pro. Direct Entry also works on the iPad and iPhone. But I find myself usually using a third method to capture information from my iOS devices.

Capturing Information by Sending email

I’ve found I use my iPad more than my laptop these days. Unfortunately, capturing information is less convenient on my iPad. How do I get around this shortcoming yet maintain my productivity? By using email!

Open Preferences under Omnifocus menu bar and click on the Mail Tab. Make sure that the Mail Rule to create Omnifocus actions is checked. Next, look at the options under “Process messages having: radio buttons. I use the ”+omnifocus" before the @ sign option ( found it’s easier to have mail autocomplete a mail address than navigating to the subject line and typing). Next, you can choose the processed messages to be filed in a dedicated folder (I have a specific folder called at @Archive). If you leave this unchecked, the item will just remain in your email Inbox. Finally, (and critically) you must specify which e-mail addresses Omnifocus will accept mail from (I use all of my current e-mail addresses).

Now open Mail.app and select Preferences. Select the Rules Tab. Omnifocus should have placed a rule for you to edit. Here is how I’ve configured my “Send to OmniFocus” Rule.


Once configured, all I have to do is send an email to myself inserting +omnifocus just before the @ sign in the email address. When Mail.app is launched on my MacBook Pro, the item is automatically processed by Omnifocus and filed into the appropriate folder.

This is a handy method to use when you are reading email or a web page on your iPhone or iPad. I forward the email (or send a link to the web page) using my +omnifocus email address. This method  of capture is powerful, but what if I'm unable to safely send an email to myself yet want to capture something to OmniFocus (say, perhaps, while  commuting in my car or walking from one location to another)? It turns out that’s possible too, using Siri!

Using Siri to Capture to OmniFocus

This final method works only if you have an iPhone 4S with SIRI. As with the other methods, it takes a bit of configuration.

You must have Omnifocus installed on your iPhone. Launch Omnifocus on your phone and on the main Omnifocus Home Screen choose the Settings button (looks like a gear). Under Capture select the iCloud Reminders menu.

Make sure iCloud Reminders is turned ON. You also must enter your Apple ID and Password. Once this is configured, then hit the “Connect” button.

Siri understands two commands for OmniFocus. If I ask Siri to "Remember to..." the entry will be placed in my Inbox without an associated time. If I ask Siri to “Remind me to…..” do anything, for instance: “Remind me at 10am to call Dr. Smith about Patient Y’s operative plan,” a timed entry is placed in the OmniFocus Inbox and an alarm will go off at the requested time. What really happens is the entry is entered into Apple’s native Reminders App but when OmniFocus is launched, the reminder is transferred to your Inbox and the Apple Reminder is erased. The Omnifocus Inbox synchronizes with all your other devices.

The SIRI "Remind me to..." entry is context sensitive–if it’s before the time I specified, an alarm will go off to remind me to call today. If it’s after the time I specified, the alarm will be set for tomorrow.

I find this method of entry especially useful to capture items during my commute to and from work or when I’m walking between one location and another. In my opinion, this is one of the best applications of the SIRI technology–and has improved my productivity immensely.

Conclusion

I’m a heavy user of OmniFocus. In fact, Omnifocus is the hub of almost all of my workflows. During a typical day I’m inputting information constantly from many different sources. In this entry, I’ve covered the four most common ways I capture information into OmniFocus.

In my next Omnifocus entry, I’ll discuss how I organize and use Omnifocus in my daily work (and in the process discuss some of its strengths and limitations).

Until next time! Jeff Taekman


Omnifocus 1: OmniFocus-The Center of The WIPPP

I thought I’d kick off my blog with a discussion of one of my most critical pieces of software, Omnifocus by the Omni Group. Although I have modified and tweaked David Allen’s system to work for me (more on this in another entry), the software is based on David Allen’s Getting Things Done (GTD). There are versions for my Mac, my iPad, and my iPhone.

In a nutshell, Omnifocus serves as the central hub of organization for my personal and professional life. David Allen’s method depends on getting stuff out of your head and into a holding place called your Inbox. Each time you are confronted with something to do you have three choices: Do it, Delegate it, or Defer it. If you can to do it immediately (in 2 minutes or less), you should do it right away, otherwise, if not delegated,  the task should be sent to your Inbox for processing.

Core concepts to understand about OmniFocus:

  • Inbox is where you dump (capture) everything for further processing. The Inbox is a temporary holding area to be processed daily. 
  • Actions are single events. Actions should always start with a verb. An example of a good actionable event would be: “Download my CME certificate from the American Society of Anesthesiologist Meeting.” 
  • Projects are collections of two or more Actions. Projects can be defined as sequential (each task must be completed in order) or parallel (each task can be completed at any time). 
  • Contexts are where (or what) you need to complete the Action. My contexts include email, call, errands, Mac:Anywhere, Mac:Online, work, home, etc.

Omnifocus Basics-Items, Projects, Contexts, and the Inbox

Once a day (I typically do it in the evening), I sort through my inbox and assign each item a project (see below) and a context (where the item will be completed). In addition, I typically add a start date and projected time to each item. I only use a due date if the item is important AND has a hard stop.

Sample Project-Renewing my Medical License

I know each year on my birthday I have to renew my medical license and submit it to the Credentialing Office.There are numerous tasks I have to complete to make this happen. I have to submit documentation on my professional education, log the hours into the Medical Board’s web site, pay my annual license fee, download my updated license, and send the license to Credentialing.

Let’s assume I wasn’t vigilant in collecting all my CME certificates, and thus have to contact the organizing body of each meeting to obtain my credit hours.

The items in this hypothetical sequential Project called Annual License Renewal (with context in parenthesis) would be: (1) download CME certificates (Mac: Online) , (2) enter hours and dates into personal spreadsheet (Mac:Anywhere), (3) log on to Medical Board Web site, enter information and pay fee (Mac:Online), (4) Download renewed license (Mac:Online), (5) email license to hospital credentialing (email). The project has a hard stop (my birthday) past which I would not be able to practice.

You’ll notice I used only a few contexts in this example. All in all, I have about fifteen. My personal contexts include: Home, Work, email, phone call, Mac Anywhere, Mac Online, iPad, iPhone, or Tech–for any device.

Why Take the Time?

Once you have your tasks in OmniFocus, the fun begins. Omnifocus lets you sort your lists in really useful ways–called Perspectives. Instead of looking at my projects, I can sort my to-do’s by contexts–having it show me the emails I must send across all my projects, or, in another example, what I need to do on my Mac while online. If I have only a few minutes, I can ask OmniFocus to display items tagged as t 5 minutes or less.

Perspectives are very customizable–the customizbility is where the power of Omnifocus outshines other GTD managers such as Things. I personally have about a dozen different perspectives I use to slice and dice my Omnifocus data. During the day, I refer to my lists dozens of times, usually in a Context mode. At the end of the day, as I’m processing new to-dos, I work primarily in a Project view.

My data backs up to my Dropbox, and syncs to the cloud (there are several different sync methods available). My database is accessible with an iPad and/or iPhone client-always current and always with me. As I add new information in iOS, the item turns up in my Mac-based Omnifocus client. Synchronized, powerful, and simple-very Mac like.

In a single day I’ll usually add information to my Inbox in one of four ways: clipping, direct entry, email, or through Siri. Getting information into OmniFocus will be the topic of my next entry.

In conclusion–OmniFocus is an indispensable tool for personal and productivity. If you aren’t familiar with it you should run, (not walk) to your computer and download it immediately.