The Long Road back to Launchbar

After listening to the Mac Power Users episode 286: Launcher Smackdown, I decided to switch from Alfred to Launchbar 6. I used Launchbar for years then switched to Alfred for its more pleasing user-interface. To be honest I never learned the intricacies of Launchbar. Back then I used it primarily as an application launcher. Boy, was I missing out.

After listening to my heroes (Katie Floyd and David Sparks) talk about how good Launchbar 6 was, I decided to give it a another try. I’m really glad I did.

I downloaded Launchbar and was up and running in a few minutes. I had to remap Command-Space (in Launchbar’s Preference Menu) to invoke Launchbar (I moved Alfred to Control-Space). I also decided, if I was going to switch back, I was going to learn the power users tricks—so I downloaded Take Control of Launchbar by Kirk McElhearnI. The book was excellent. I was able to finish reading it in about an hour (experimenting with the features as I read along). Within a few minutes I put together a new customized search template for PubMed. I am using Launchbar extensively while reading, and writing scholarly information (more on this in a later posts). Launchbar 6 is loaded with features. In fact Launchbar's mantra is “1000+ features, 1 interface.” I use Launchbar to act on files, invoke Services or  Keyboard Maestro scripts, collect and annotate text, and a whole lot more. I am especially enamored with one of the newer features called “actions.” Actions allow me to act on text or files copied on the mac or dropped onto the app. Using actions I can append information to a note, search Pubmed, or a whole host of other activities directly from the Launcher. Actions are improving my  everyday tasks as well as my reading and writing workflows. 

A tip of the hat to Katie and David for continually upping my game. Now that I’ve taken a deep dive into Launchbar 6 I know it is once again destined to become an indispensable application in my wheelhouse.

Writing with my Voice

In my academic roles in the Duke University Human Simulation and Patient Safety Center I write a great deal. I write manuscripts, grants,white papers, and a whole host of other material. I’ve read the most efficient way to write a long document is to spew everything into a draft as quickly as possible, then go back and edit.Typing slows me down. The fastest way for me to “write” something is with my voice. I find it easier to adhere to this ‘draft first’ rule when I dictate using my voice rather than typing out a draft on my keyboard.Why is this? When I type, I tend to correct errors as they occur. Even worse, I try to polish each sentence on the fly (rather than powering through the entire document at one time). The constant editing interrupts my thoughts and makes slogging through an whole first draft extremely tedious.Lately, I've been using a workflow that takes advantage of the native iPhone’s dictation feature to “write.” This workflows has sped up my writing significantly by forcing me to keep moving forward while allowing me to write anywhere/anytime.This workflow is relatively easy to set up. Here is the software you’ll need.OmniOutlinerOmniOutliner is, you guessed it, an outlining program. Before I write anything, I use OmniOutliner on both on my iPad and on my Mac to plan my document. The Omni Group recently added the ability to sync to iCloud (currently a beta feature). Universal access to my outlines allows me to draft and rearrange my outline on the fly, regardless of location.ScrivenerThe next piece of software is Scrivener for Mac. Scrivener is an essential writing programs. That’s right, essential! If you don’t use Scrivener yet, stop reading and download the software right now.One of the advantages of Scrivener on Mac is it allows me to write in chunks. I can start writing in the middle of my project. When I sync the Scrivener project to Dropbox, I end up with a number of text files (each representing one ‘chunk’ of the Scrivener Project). Being able to write non-linearly from anywhere allows me to complete a draft very quickly. I am able to knock out sections of a document while in my car, walking between meetings, or anywhere else the urge to write hits me.Chunks of text in Scrivener may be moved around ad nauseum. I take advantage of the ability to move things around quite frequently. If I don’t like what I’ve changed, Scrivener has built in version control , so I can revert back to past drafts.Scrivener exports pieces of the project as individual files. Scrivener puts all these files in a “Drafts” folder inside the folder of your choice. These files can be txt, rtf, or other formats. I use text since I write in Markdown.DropBoxI set up a folder in my DropBox hierarchy called “Writing Sync.” It is here I synchronize my project between Scrivener and Editorial. Each new project gets its own folder.EditorialEditorial is a phenomenal text editor for iOS with a slew of built in features. Editorial allows me to edit documents written in Markdown and has a wholebunch of other features that makes it my go-to document editing software on iOS. Editorial, unsurprisingly, syncs with DropBox. I have Editorial point to my  “Writing Sync” in Dropbox.Now that I’ve discussed the software I use, let’s set everything up.The WorkflowThe first thing I do is draft my outline in OmniOutliner. I typically do this on my iPad or my Mac then rearrange the outline until I'm happy. Once my outline is complete I export it as an OPML file.I create a blank Scrivener project, then import the OPML file into Scrivener. Importing the OPML populates the Scrivener project, preserving the hierarchy of the outline. Each bullet of the outline receives its own individual chunk in Scrivener.The next step is to set up synchronization of the Scrivener with Dropbox. Under the File Menu, I go to Sync->With External Folder….I make sure the back up before export box is checked and make sure that the project is exported as text. I select the “Writing Sync” Folder as the text file destination. I hit okay and the entire Scrivener project is exported to "Writing Sync" as individual text documents (Scrivener assigns a number to the front of each text file to keep them in order).On my iPad or iPhone, I point Editorial to my “Writing Sync” Folder. Within Editorial I can edit each of the individual text files. I open the file I wish to write/edit and use the dictation (Siri must be enabled) on My iPhone. Editorial immediately synchronizes the new text back  into Dropbox.Once I return to my Mac I re-synchronize the project in Scrivener. All the files in Scrivener now reflect my writing from Editorial. One I've completed my first draft, I use this same back and forth method to edit.Once I'm happy with each of the chunks, I go back to Scrivener on my Mac and compile the whole document as a single Markdown file. I save this file a level above the “Drafts” Folder Scrivener created when syncing.I  can access the full document using Editorial (or any other text editor) on my Mac or iOS device (I use Byword or Ulysses on my Mac) . Finally, when I'm done polishing, I export the document to Microsoft Word (or to the web). Using this workflow, I can write something in about 1/10 the time it used to take me with a keyboard. Although this method works well, it is not without a few annoyances. iPhones limit dictation to 30 second chunks. In addition, Editorial tends to chop off the last few words of a sentence after those 30 seconds expire. Because I’m working on segments of the overall project and can dictate quite a bit in 30 seconds, this is not a huge deal for me. When drafting, the key is to keep pressing forward.This workflow has literally changed to way I write. The workflow allows me great deal of flexibility and saves me a great deal of time.

Duet Display-use your iPad as a second monitor

I have mentioned in the past how much writing I do for work. When I write I prefer having two monitors. Unfortunately, I only have second monitors at home and work. I prefer writing grants, white-papers, and manuscripts in local coffee shops or, my favorite spot, the public library. Previously, when writing in these alternate locations I had to make due with the 13" screen of my Macbook Air. I had tried two-screen solutions that used my iPad Air as a second monitor--but they had too much lag to be functional. Recently, I discovered a product called Duet Display. Instead of using a wireless connection, Duet uses a Thunderbolt cable to connect my computer and iPad. Duet was easy to set up and there is absolutely no lag. I can now, thanks to Duet, take my dual screen set-up to any location. My only complaint, the app's cost ($15.99). Still, for the problem Duet solves, I've found it well worth the money.

/Slash

Last week I came across a story about a new iOS product called /Slash. /Slash is an add-on keyboard for iOS. Over the past week I’ve been using /Slash extensively and in a short time it has earned its rightful place on both my iPhone and iPad.

/Slash allows me to perform functions without leaving the application I’m working in. For instance if I’m typing a text message to a friend I can share my current location, search the web, or search contact information without ever leaving the Messages app.

IMG_0481.jpg

IMG_0481.jpg

This functionality is great! I find myself using /Slash multiple times a day. My only complaint is that I'm unable to dictate using my voice when the /Slash keyboard is activated. In order to dictate I need to switch to the built-in iOS keyboard.

/Slash has quickly has become one of only three keyboards I use on a regular basis—the others being the built in keyboard and Sunrise Meet.

/Slash is a phenomenal addition to my productiviy arsenal. I look forward to seeing how the app continues to evolve. 

Sunrise Meet

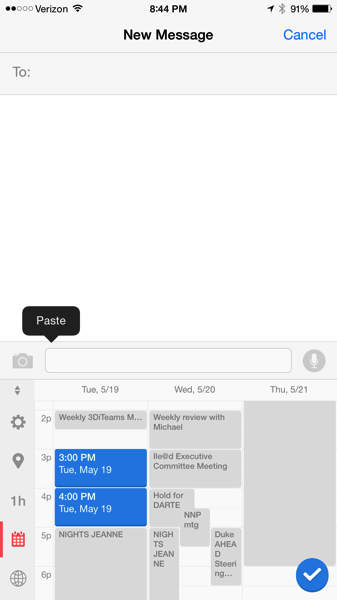
The war of the calendar apps continues. I’ve rotated between Tempo, Timeful (now part of Google), as well as the built in Calendar App on my iPhone. Although I like many of the features of Tempo and Timeful, my current app of choice is Sunrise (Sunrise was recently purchased by Microsoft). Today, Sunrise added a new “Meet” feature that helps plan meeting times.

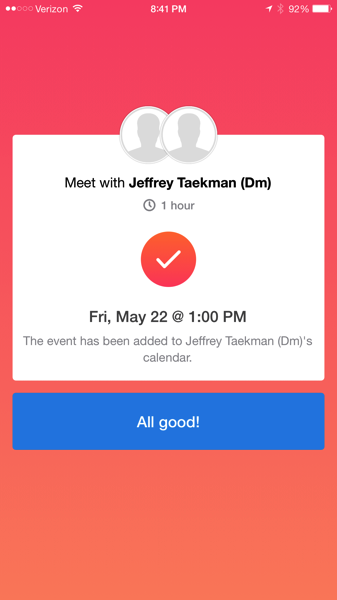
Meet works by installing a custom keyboard on your iPhone or iPad. Launch iMessage or Mail then enable the Meet keyboard and pick available times from your calendar. Your proposed times are sent to your friends or colleagues who see your choices overlayed on their own calendar (if they use Sunrise). Once your friend finalizes the meeting time, the entry is placed in their calendar and confirmed on your calendar. Although I’ve yet to use this new feature for scheduling a meeting, it seems like it will be very useful.


IMG 0056


IMG 0054 2

There are less polished alternatives such as “Share Availability” macro in the iOS Workflow App, but Meet sets a new standard for improving the experience of scheduling meetings.

Read about more of Meet’s features in today’s TechCrunch Article.

Automated Dictation and Task Delegation using Evernote and Workflow App

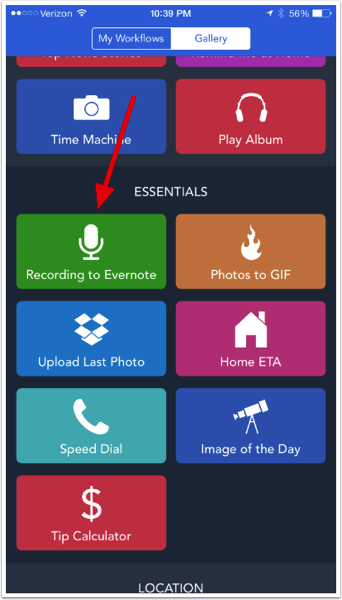
As usual, David Sparks (Macsparky) inspired me. After finishing the MacSparky Workflow Video Field Guide, I decided to try my chops at buidling something new. As I was exploring the Gallery (the pre-baked workflows that come with the app), one of the examples caught my eye; "Recording to Evernote."I have a twenty minute commute between my home and work. When not listening to audio books, I attempt to be productive. While driving, I'm frustrated by my inability to delegate tasks to my administrative assistant. Before Workflow, in order to send a request (or dictation), I'd have to ask Siri to transcribe an email and then hope for the best. As I'm sure you're aware, Siri makes many mistakes. It's both difficult and unsafe to proof while driving. Siri was not a viable option.That's where Workflow comes in. I built a Workflow that records my voice then, at the same time, sends a link to both my admin and to Omnifocus. Here's how I did it.

Add the "Recording to Evernote" from the Gallery

First, download Workflow. Once you've installed the app, click on the "Recording to Evernote" workflow in the Gallery. Select "Get Workflow." Your workflow will be added to your "My Workflows" Area. Now it’s time to edit.add-the-recording-to-evernote-from-the-gallery.png

Programming the workflow

I didn't change any of the programming at the beginning of the script, but you can.programming-the-workflow.png

Programming the workflow - screen 2

Here is where I altering and appended the built in script:

  • (1) I customized the name of the note and included the current date variable
  • (2) After the audio note is recorded, the file is saved to Evernote. "Get Note Link" retrieves the unique URL for this brand new note.
  • (3) "Copy to Clipboard" passes the URL of the audio to the clipboard.
  • (4) "Send email" command takes the clipboard and pastes it into my email
  • (5) I put my admin's email address is in the "To:" field
  • (6) I included my OmniFocus MailDrop email address in the "Bcc" field (so I can track what I've delegated in Omnifocus).
  • (7) I customized the Subject Field (and appended the current date)

programming-the-workflow-screen-2.png

Add to my Home Screen

Finally, when I was finished programming (and after I customized the color and icon of the button), I added the button to my HomeScreen. Now, when I touch the button a screen comes up that reminds me to "tap to record." I tap, record my message, and then tap again. Workflow automatically saves the recording to Evernote then sends two emails: one to my admin (with a link to the audio recording) and one to my Omnifocus Inbox (where I can keep track of the delegated task).As you can see, Workflow makes automation ridiculously easy. I hope you find this simple application useful.

Tomatoes for IPhone

I’ve written about the use of the Pomodoro Technique and how it enhances productivity. I’ve explored many pomodoro apps, but my current favorite is Tomatoes by Dollaropath SRL. I especially like Tomatoes’ clean interface and how information syncs across Macs (using iCloud). That is the good news. The bad news? When working on Pomodoros away from my computer I had to rely on a different pomodoro app (there was no version of Tomatoes available for iOS). Since I was using a different app, all the data from my “mobile” pomodoros were lost.

With the release of Tomatoes for iPhone, I can now capture my pomodoros in a single application, regardless of device. Tomatoes syncs across Macs and iOS using iCloud. When I’ve wrapped up my day, week, or month I can graphically view my aggregated pomodoros or export all the data to Numbers or Excel for further analysis.

Although Tomatoes is my favorite pomodoro app, it is not perfect. Tomatoes can import native iOS to-do items, but does not integrate with Things or Omnifocus 2. Personally, I’d love Omnifocus integration (e.g. having a flagged item or a whole perspective from Omnifocus show up in Tomatoes). I’ll keep my fingers crossed for a future release.

Ulysses for iPad: Writing Nirvana

I use a great deal of plaintext and markdown in my writing. I’ve cycled through minimalist applications like Byword, iA Writer (and iA Writer Pro). A few years ago, in search of the perfect writing app, I stumbled upon Ulysses. Ulysses has powerful features for writers, but like many of the best applications, it keeps power features out of the way until you really need them. I like the app’s clean interface, how it handles (and emphasizes) markdown in a file, and especially the ability to organize multiple files across devices and cloud services. The Achilles Heel of Ulyesses has historically been its mobile implementation. There was no Ulysses for mobile devices. That is, until this week.

On Thursday, the long awaited iPad version of Ulysses was released. Ulysses for iPad has all the features that make Ulysses for Mac great. Some of you may balk at the price ($19.99 USD), but I believe it is well worth it. Check out my friend, David Sparks' (Macsparky), overview for more information.

In a future entry, I’ll talk about how my writing process has evolved to use Ulysses (in tandem with Papers and Scrivener) to tackle my large academic writing projects.

Cooking up Productivity: Pomodoro Technique and OmniFocus 2

Over the last month I have been experimenting with extending the usefulness of Omnifocus 2 (OF2) on my Mac.  Of all the things I’ve tried, applying the Pomodoro Technique is by far the most effective.

The Pomodoro (Italian for tomato) Technique uses a timer to break down work into intervals. These intervals are traditionally 25 minutes in length, separated by short breaks. Four Pomodoros are followed by a longer break. To get a sense for the technique, watch this short video.

The original description of the Pomodoro Technique used a kitchen timer, but over the last several years Pomodoro Apps have become available. When I dabbled with Pomodoro in the past, my favorite app was Eggsellent. Eggsellent had a clean interface and, more importantly, would auto-populate flagged items from Omnifocus. Unfortunately, since the release of OF2, Eggsellent has been broken, forcing me to look for alternatives. The two applications I’ve spent the most time with are: Vitamin-R2 and Tomatoes.

Neither Vitamin-R2 or Tomatoes are completely right for me. Although both apps have quite a bit of flexibility in timer length and both have visual records of how I’ve spent my time, neither is automated enough for my taste.  Neither app can pull information directly from OmniFocus like Eggsellent could. Vitamin-R2  has limited capabilites to check off completed activities in OF2, but that is the extent of its integration.

Since neither app is just right, the deciding factor for me was aesthetics.  In this realm there is no comparison: Vitamin-R2 is clearly inferior to Tomatoes.

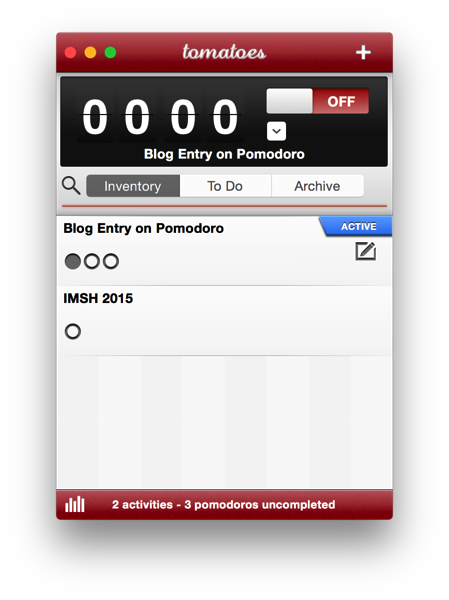
Tomatoes.png

Here’s how the workflow in Tomatoes takes place: I slide an OF2 task into Tomatoes and tell Tomatoes how many Pomodoros the task will take. I click the timer to start and then follow the countdown either in my menu bar or in the app itself. The app records how many Pomodoros have been completed. I’ve been amazed at how competing against a clock solidifies my focus (and helps me to get more stuff done).

That being said, I’d really like an app that is functional, visually pleasing, AND can autopopulate items from OmniFocus 2. The best situation would be for the app to pull a particular perspective out of OF2. If it’s too complicated to pull a whole perspective out of OF2, I would settle for flagged items. Other aspects of the perfect app would be sharing tasks and statistics across computers (and iOS devices) and logging the Pomodoros in my calendar.

Give the Pomodoro Technique a try and let me know how it goes. If you’re a coder and are interested in developing the perfect Pomodoro application, please give me a shout.

Papers 3 Overview

Papers 3 has been re-written from the ground up. There are changes in virtually every facet of the program, from importing to matching manuscripts to storage and synchronization. Before I explain my workflow, I thought it would be important to familiarize you with some of these changes.

You can download a 30 day trial of Papers 3 and follow along with me. Papers 2 and 3 can exist side-by-side without altering your data.

Go ahead and install Papers 3. Once that’s done, let’s take a look at some of the preferences.

Preferences General:

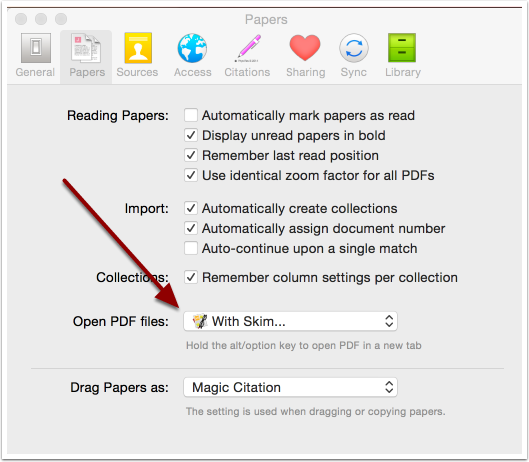
I choose to open (and annotate) my manuscripts in Skim (as I did with Papers 2). For a short time, I experimented with the built in highlighting features of Papers, but they didn’t meet my needs.

Preferences general

Preference: Sync

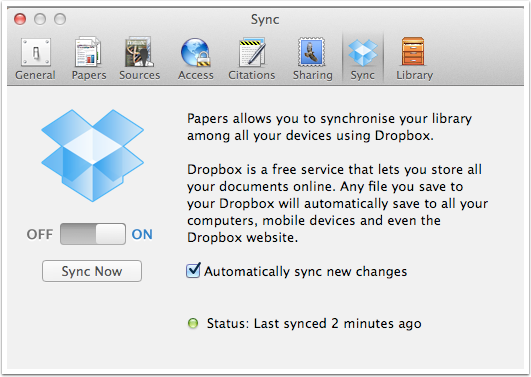
I want my library to sync across my computers and iOS devices. Here, I’ve turned on Dropbox Sync and checked automatically sync new changes.


Preference sync

Preferences: Library

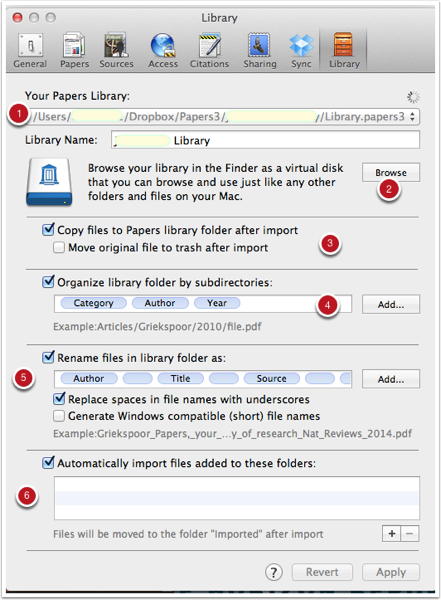
Here are my Library Preference Settings:

  • (1) denotes the location of my Papers Library in Dropbox
  • Hitting the Browse Button (2) places a virtual disk on your desktop that allows access to your entire Papers Library (via paper, author, year, etc)
  • I keep the Copy files to Paper Library folder after import (3) checked
  • I check Organize library folders by subdirectories (4). I use the convention Category Author Year
  • I check Rename Files in Library Folder (5): I use the convention Author Title Source Year

Preferences library

Main Screen

This is the main Papers 3 screen. The terminology I use here is primarily my own–may deviate from what the company calls a specific area.

  • The Library (1) organizes all the media in the program. My Collections includes both manually created folders and Smart Folders (folders created by metadata of the media. Shared Collections allows you to share selected folders with others.
  • The Search Bar (2) allows you limit your searches or change the presentation of your Library
  • The Filter Bar (3) lets you (from left to right) search for a document, view your library, view by Labels, view library by author, view by Type, and view previous database entries.
  • The Viewing Pane (4) is where you view your media. I typically use the “Column” view, but there are other choices as well.
  • Metadata (5) for the paper may be viewed (from left to right) by Overview, Information, Notes, or Activity
  • Metadata Inspector (6) is where you view Metadata and related information
  • PDF and Supplement Window (7) lets you visually see the first page of the actual paper as it exists in the library.
Main screen

Annotations and Highlights in Skim

When I double click on an entry in Papers, the manuscript opens in Skim.

Annotations in skim

My Move to Papers 3 (End of Endnote Redux)

I was a big fan of Papers 2 as my manuscript and citation management software. After reading the early reviews of Papers 3, I was hesitant to upgrade and trepidatious about the future of the software. I went back and took another look at Sente, Mendeley, Endnote, and Zotero. In the end, I decided to stick with Papers.

Fortunately for me, despite the rocky start, the folks at Mekentosj have continued to work on Papers 3. About a month ago, I decided to make the transition from Papers 2 to Papers 3. This was not an easy decision, as changes in Papers 3 have forced me to revise major portions of my writing workflow. Although the transition was painful, I’m convinced what I have now is more robust and flexible than my previous system.

Over the next few weeks, I’ll write about my transition to Papers 3 (both Mac and iOS). I’ll cover the Papers 3 new interface, how I continue to leverage my Papers 2 data (despite the interface and data storage changes), and how I continue to integrate Papers 3 with Devonthink.

I hope you find my experience useful.

Automating Full-Text Retrieval: KeyBoard Maestro Script for Google Scholar

I absolutely love KeyBoard Maestro. Keyboard Maestro lets me automate just about anything that happens on my computer. I save incredible amounts of time using it to take care of many of my repetitive tasks. It’s well worth $36. If you’re not a Mac user, you’re out of luck.

I’ve published Keyboard Maestro scripts I use in tracking down scholarly information. As an aside A few folks told me the script I published specifically for Duke users didn’t work for them. I’ve updated it again. You can download the modified script here (for Dukies only).  Once you’ve downloaded, import the script into KeyBoard Maestro (File:Import Macros…). It works for me, but let me know if you have trouble.

Unfortunately, I can’t always find full text articles at Duke. If not, my next goto site is Google Scholar. Since I do this so frequently, I decided to program a KeyBoard Maestro script.

Here is how it works:

  1. Highlight any text (web page, PDF, Word Document, etc.) and hit Command-Shift-S
  2. the script will copy the highlighted text
  3. then it will launch Google Scholar (in Safari)
  4. it will paste the copied text into the search field of the Google Scholar
  5. and then submit the search.

A single key stroke does it all—automagically. I put a 2-second delay on pasting the clipboard into the search field. If text isn’t pasted into the text field, the load time probably took too long. You can either: 1. Go back to the original document and reinvoke the script, or 2. Just click in the Google Scholar Search box and paste (the script already has copied your text to the clipboard).

This macro works with any text I’ve highlighted, be it on the web, in the bibliography of a manuscript, or somewhere else.

You can download my Google Scholar script here. When you download the macro and before you import, you’ll have to remove the .txt at the end of the file (so it will be recognized as a Keyboard Maestro file).

Enjoy.

Updated Keyboard Maestro Script for Obtaining Scholarly Information through Duke

In a previous entry, I published my Keyboard Maestro script that I often use to obtain scholarly literature. A few months ago, Duke’s Medical Center Library updated their website, which broke my script.

I finally had a chance to re-write the script today.

Here is how it works:

  1. Highlight any text (web page, PDF, Word Document, etc.) and hit Command-Shift R
  2. the script will copy the highlighted text
  3. then it will launch Duke’s Medical Center Library Web Page
  4. it will paste the copied text into the search field of the web page
  5. and then submit the search to Pubmed

All this with a single key stroke–saves me tons of time.

If you’re not a Duke, you will have to modify the URL and search boxes to conform to your library of choice.

Don’t have Keyboard Maestro? Get a demo!

Enjoy.

Addendum, May 17, 2014:  Several folks reported the script didn’t work for them. I’ve modified the script again. You can download the updated script here, and import it into Keyboard Maestro. When you download the macro and before you import, you’ll have to remove the .txt at the end of the file (so it will be recognized as a Keyboard Maestro file).

(Mynd + Fantastical2) = Calendar Control

IMG 2943

I continue the search for the perfect calendaring app on my iPhone. I wrote a few months ago about Tempo, from the makers of Siri. Although I used Tempo for several months, another contender, Mynd reached my radar screen.

I don’t find the Mynd interface (or colors) aesthetically pleasing, but the app has so many cool features it’s worth a look. Mynd connects to your calendars locally and then mines data for each appointment.

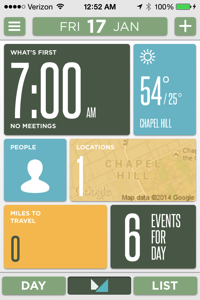
When I first opened the app, I noticed the Mynd View. This view includes the time of my next appointment, the current weather conditions, the people I’ll meet with that day, the locations of my meetings, and the total number of events for the day. I can click on any of these boxes to drill down further. I can connect Mynd to Evernote (appending relevant notes to each meeting) and to LinkedIn (appending further information to each meeting attendee).

Mynd is also location aware. It estimates how long it will take to drive to my next meeting and tells me when to leave my current location. If I’m running late, I can text, email, or call any one (or all) of the meeting attendees from within the app.

In addition, Mynd has a new feature called the Scheduler, that facilitates scheduling of meetings. The Scheduler scans my calendar and suggests free times that might work for a proposed meeting. Mynd aggregates all the potential times I choose and formats an email to my prospective meeting attendees.

Although I’m a big fan of Mynd, I still find making calendar entries clunky. For this, I often turn to Fantastical2. Fantastical is able to make appointments from english sentences (e.g. Meet with Sir Ken Robinson at Weaver Street Market in Durham, NC for lunch tomorrow at noon). I’ll often type (or dictate) my appointment details into Fantastical2. The dictated appointment is instantly translated into a calendar entry that quickly becomes available in Mynd.

Oh…and Mynd is free. Get Mynd in the App Store

Addendum: a reader asked if I was truly meeting with Sir Ken Robinson. Sadly, the answer is no. I admire the hell out of the man and do hope that someday.....

Addendum 2: Although I was very high on Mynd at one point, I’ve gone back to Tempo. Many of the features that were free in the original version of Mynd, are now premium (paid) add-ons. In the end, the change in feature set and the ugly interface scared me off.  Life is too short to live with an ugly interface (especially on a frequently used calendaring app)!

Ripping Pages 5.0 - One Step Forward, Two Steps Backward

It is with great excitement and trepidation I view new versions of core software. So it was with Pages 5.0 for my Mac. Although I was excited to see some of the new features (e.g. enhanced iCloud synchronization), the program took a major step backwards in productivity enhancement. In fact, the whole suite of products (Numbers, Pages, and Keynote) are sad remnants of their former selves. Most of the articles I’ve read tout the fact the iWork Suite was rebuilt from the ground up, setting the foundation for the future. I, personally, was surprised and saddened at how feature-poor the original release truly was.

For the time being, I’m moving back to Microsoft Word, until the features I’m dependent upon get fixed. Before I made this decision, I spent quite a bit of time trying to figure out how to stay with Pages–here are some of the workarounds I came up with.

Some of the problems I’ve encountered:

  1. Zipping Files-Writing for me is usually a collaborative activity. I send versions of software back and forth with collaborators (sometimes by email). Unfortunately, Pages zips any file I decide to transfer. Google intercepts these zipped files, refusing to transmit them (because of their potential for containing malicious content). Solution: I tried using DropBox to transfer information back and forth with collaborators. Word allows me to transfer the files as needed.
  2. Papers / Pages interplay- With the previous version of Pages I could wait until my paper was in its final state before formatting my bibliography. No more. The new version of Pages does not play well with Papers 2 (side-note, Papers 3 has been released, but I’m avoiding upgrading for the time being). Solution: If I wanted to stay with Pages, I would now have to format my bibliography in plain text, then import the file with the bibliography into Pages for final formatting. By using Word, I can keep my old workflow (formatting my bibliography as the very last step of my writing process).
  3. Comments - Writing includes sending comments back and forth between collaborators. The implementation of comments and reviewing is sorely lacking in Pages 5.0. Even worse, if one attempts to export the Pages document into Pages’09, the majority of the comments are lost. I haven’t found an acceptable work-around in Pages. Microsoft Word’s commenting features are intact.

As much as I hate to say it, for the foreseeable future, I’m moving back to Microsoft Word for my manuscript and grant writing. I hope Apple focuses significant resources on bringing back productivity enhancing features of Pages and Keynote. Until then, they’ve lost me.

Tempo: The Smart Calendar for your Smart Phone

I have slowly been putting together a narrative of my iPhone home screen for MacSparky (David Sparks). One of the questions he asked me was what app was still missing from iOS. Before last week, I would have answered a decent calendar. That was before I discovered Tempo.

Tempo, is a new app by the makers of Siri (Stanford Research Institute). I’ve been testing it for about a week and have been incredibly impressed.

First, I had to link my personal email account, Facebook and LinkedIn. I was able to set this up in 2 minutes (I avoided linking my work address, due to concerns over corporate privacy). Once this was done, Tempo went to work.

What does Tempo do? All the following and more:

  • Scans email for documents and attachments relevant to my upcoming meetings.
  • Imports key information about attendees into my Tempo calendar entry (things like contact information, phone number, email addresses)
  • Allows me to quickly reach any or all attendees via phone, email or text from within Tempo.
  • Dials conference call numbers, including passcodes! Hallelujah!
  • Sends a pre-configured "running-late" email or text.
  • Reminds me to wish my contacts “Happy Birthday!”
  • Let’s me browse meeting attendees LinkedIn Profiles.
  • Integrates with Siri
  • Prompts me to send a pre-configured text if my phone rings during a meeting.

Tempo’s motto is “Your smartphone deserves a smart calendar – you’ll love the difference.” And I do! Download your free copy in the App Store.

Glass, Omnifocus, and prospective memory errors

It’s been almost a week since I picked up my Glass. I’ve been experimenting with its built-in functions.

One of my colleagues in the Duke University Human Simulation and Patient Safety Center, Noa Segall, is working on research related to prospective memory errors–fascinating stuff.

I personally believe if we're able to capture our clinical to-dos quickly, we could mitigate many of these errors. One possible solution might be using the Getting Things Done (GTD) method clinically. Using voice to capture is key–especially for those of us procedurally based physicians and nurses that use our hands. Along these lines, I tried Siri, but it didn’t work well (since I had to pull my phone out of my pocket and activate the device each time I wanted to capture).

Glass changes everything! I can now capture my clinical to-dos using only my voice. Here’s how I set it up.

I added my personalized Omni Sync Server email address as one of my Glass Contacts (I named the contact OmniFocus). When I want to capture on the move, I activate Glass by tilting my head back, then saying “OK Glass, send a message to…Omnifocus.” An icon with a mic shows up in Glass indicating it’s recording. When I finish speaking, Glass automatically sends my message to the Omni Server.

When I get to my computer or iphone–my to-do is waiting for me, dutifully synced by Omni Server. I am careful NOT to include any identfiable patient information. Instead, I use operating room numbers or post-anesthesia care unit bed numbers to indicate the location of the action. Very handy and hands-free.

Glass Rocks!