Ulysses just keeps getting better. With the latest Ulysses release, you can publish directly to Wordpress (either wordpress.com or your own custom Wordpress site).
Writing Morning Pages with an iPad Pro
A couple of months ago, I was feeling the age of my first generation iPad Air and decided I needed to upgrade to an iPad Pro. I was torn between the larger 12.9 inch model and the smaller 9.2 inch model. Although I was attracted to the portability of the 9.2 inch version, in the end I bought the larger model. I decided to go with the larger model for a variety of reasons: 1. When reflecting on how I used my technology, I found when I had a task to do, I'd often forgo the iPad Air and just use my iPhone 6 Plus, 2. I wanted the best support for my extensive use of the Duet App (the larger screen giving me more portable dual screen real estate), 3. It was becoming increasingly difficult for me to read and annotate PDFs on the smaller screen.I purchased the iPad Pro (along with a Logitech keyboard and Apple Pencil) and have not looked back. One of my favorite unexpected uses of the iPad Pro is the ability to write with the Apple Pencil. In addition to Mindfulness and meditation, I am a true believer in the process of Morning Pages, a journaling technique that espouses the power of long-hand writing in the creative process. Up until the time I bought my iPad Pro, I was using a LiveScribe Pen to do my daily writing. No more!I have been experimenting with various writing apps including: GoodNotes, Penultimate, and Notability. Despite the more feature-rich environment of GoodNotes and the versatility of Notability, I find myself favoring Penultimate, primarily for its ease-of-use and automatic Evernote synchronization. I'd love to hear what your favorite handwriting app might be, and how you're using the handwriting capabilities of the new iPads.If you are not yet writing your own Morning Pages, I hope you'll give it a serious try.
New NIH Grant Requirements - Critical Evaluation of Existing Literature
For those of you that write NIH grants for a living, you are well aware of the changes required for new grant applications in 2016. In an effort to improve rigor and transparency as well as to increase reproducibility, The NIH now requires the grants to be written in a whole new way. A major part of these changes has to do with critical evaluation of existing literature.In light of these changes I have been formally appending my manuscripts a new way. In previous entries I’ve written how I take notes while reading, then extract these highlights and notes to their own individual files. Now, as I'm reading, I make and effort to record perceived strengths weaknesses of each study appending my comments with the text “StrengthX” or “WeaknessX.” I then extract each comment as its own text file. When writing grants or manuscripts, using Devonthink, I’m able to find similar notes to the one I’m reading. By appending StrengthX or WeaknessX, I’m able to single out my own comments instead of a seeing every instance of each word.In a future entry, I’ll talk more about the ways I’ve updated finding extracted information using Devonthink (and Tinderbox). A good portion of my writing workflow from 2015 has changed. I will write an updated writing workflow after the official release of Scrivener iOS.I'd be interested to hear how other academics are dealing with the changes at the NIH. Please leave a note in the comments below.
Free Time 2 - scheduling made easy!
Meetings are unavoidable in academics. For busy professionals, finding a time to meet can be a daunting task. Although apps like Outlook have built in scheduling features, few use them. One major limitation; Outlook's scheduling features only work for individuals using the same corporate domain.Previously, I wrote about my love of Sunrise Meet--a fabulous add on to Sunrise that smoothed the task of scheduling meetings. Sunrise was purchased by Microsoft and, unfortunately, the app will soon be shuttered. Thus, I went on a quest to find a Sunrise Meet replacement. I'm happy to report I found great alternative: Free Time 2Free Time 2 is a standalone app for iOS. The interface is clean and intuitive. If I receive a meeting request, I merely open the app and surf to the potential day(s) of interest. Each day displays a list of appointments along with my free time. I select as many potential meeting times on as many days as I’d like to propose.
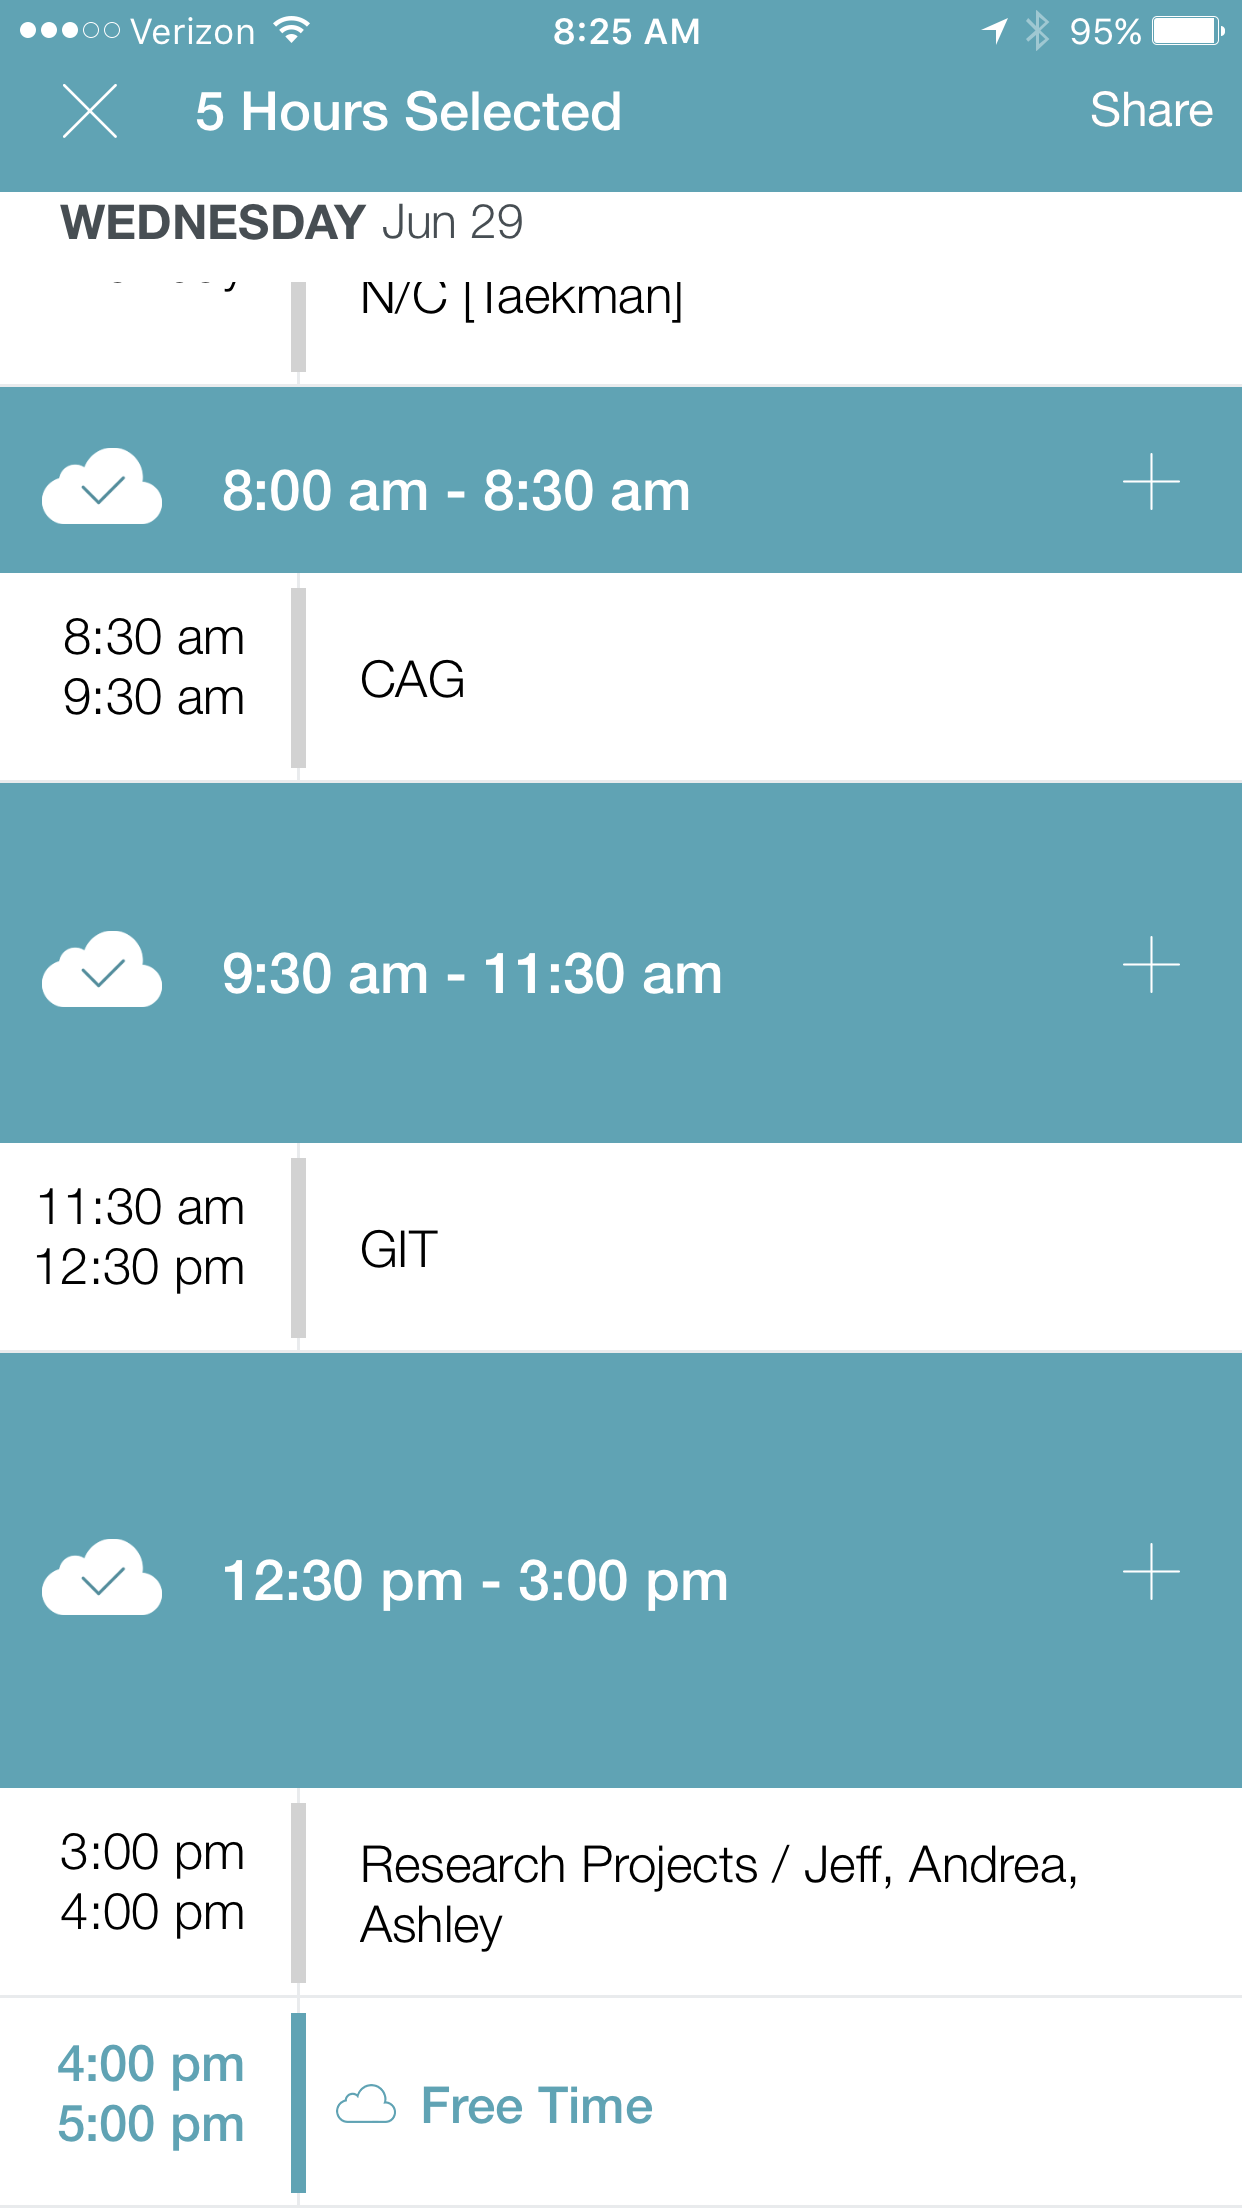 I then hit “Share,” opening the Action Menu.
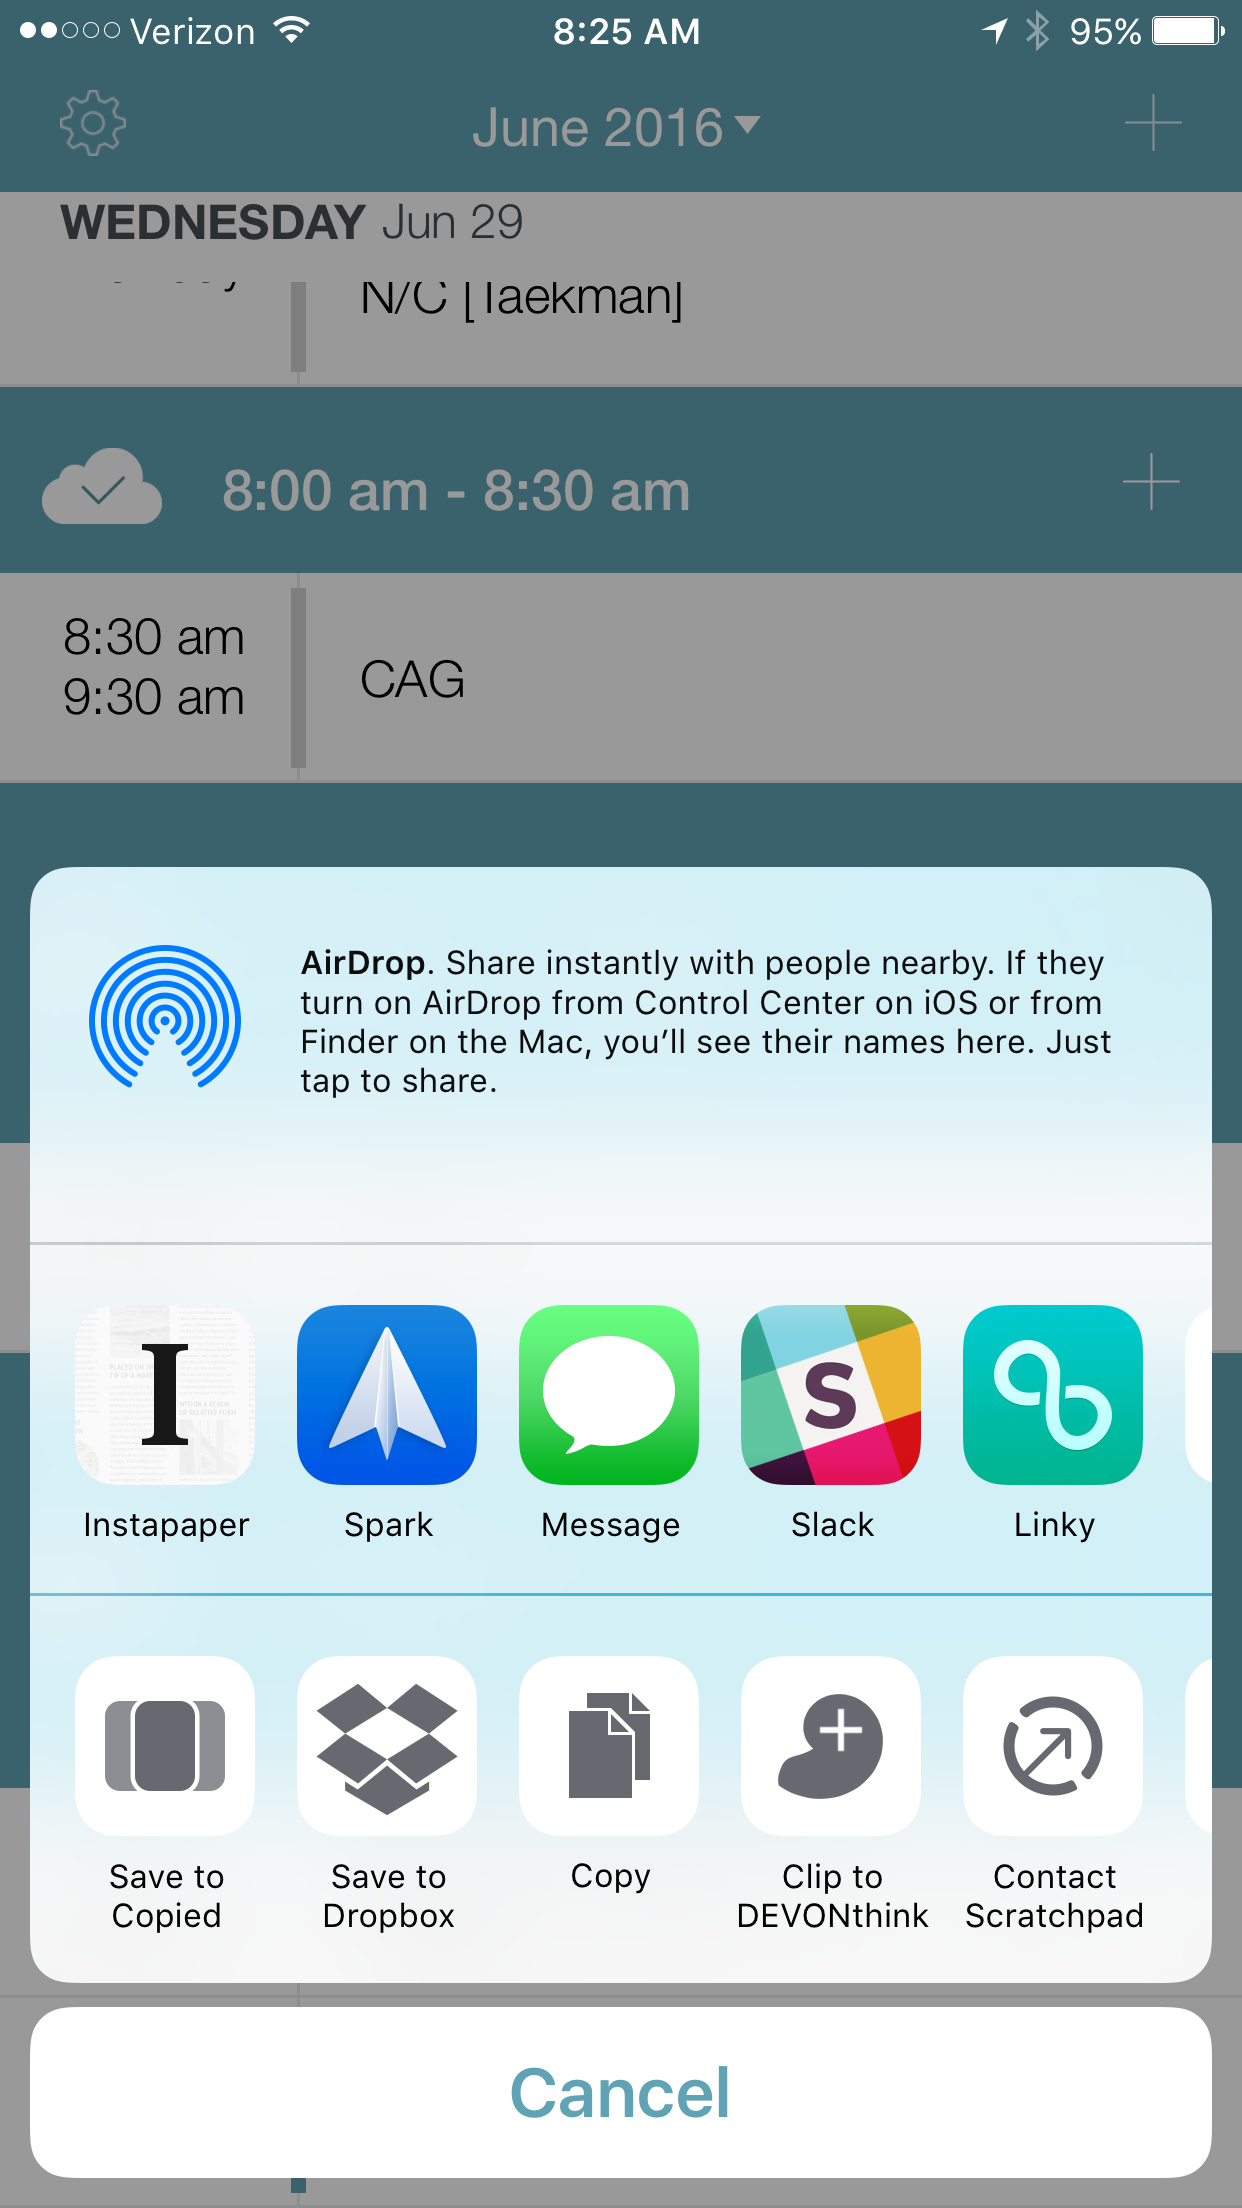 I choose what app I’d like to share my availability. Free Time formats the list of the potential dates for me. Here is an example in Spark.
 Free Time 2, in many ways, outshines Sunrise Meet. I use Free Time several times each day to schedule 1:1 meetings. Now if only there was an app that could seemlessly handle multi-person scheduling. Enjoy!
Spark by Readdle - my new email app
eMail is the bane of everyone's existence. Although I’ve been pretty diligent about reading email on the go, a problem I frequently faced was the issue of “skimmed emails”-those emails I read on the go but failed to immediately process. Later, when I returned to my Mac, I often missed the skimmed email because each appeared "read." Unfortunately, until recently, I had not found a suitable solution to this recurrent problem.I am a big fan of Macsparky. One of my favorite features on David Spark’s Web Site is the sharing of user’s home screens. In a recent post, I saw Brett Kelly (Website)(Twitter) mention Spark by Readdle and decided to give it a try. I have to say I’ve been incredibly impressed. Spark has completely replaced Mail.app on my phone and iPad. I can’t imagine going back.Spark is one of those apps that is a delight to use. The developers paid a great deal of attention to user-interface design. Even now, several weeks into my exploration, I continue to find subtle features that really do live up to Readdle's promise to have me “Like Your email Again."Spark has almost completely eliminated the Skimming problem on my phone. I now process 98% of my emails as I read them on the go. My Inbox has remained essentially empty since I started using the App.A few minor suggestions that could make the program even better: 1. the ability to add actions to swipes (ala Drafts) and 2. the addition of other gestures (taps?) that would further enhance the number of customizable processing options.Spark is now my iOS email client of choice. I hope you give it a try too.
Macsparky Video Field Guide on Hazel 4
My friend David Sparks has released a new video field guide--this time on Hazel. In true Macsparky fashion, he's delivered yet another outstanding resource. Even though I'm a seasoned Hazel user, I learned quite a few new tips and tricks--especially pertaining to the recently released Hazel 4. Pick up your copy of this and other excellent resources on the Macsparky website...and Hazel-on!
My OmniFocus Set-up (Part 2)
As i've mentioned numerous times before, I'm a huge fan of OmniFocus. In my last entry on OmniFocus, I offered a peek into the way I organize my folders. If you haven't read that post, please do so now. In this entry, I’ll answer some of the questions about triaging, prioritizing, and adding time to actions.Weekly ReviewI am not strictly adherent to GTD methodology, but I do use many of the practices. My practice includes both daily and weekly reviews. My weekly review normally takes about an hour. During the hour, I review existing projects and actions, clean up remaining items in my Inbox, and set up new projects. I look at each new and existing project through two main lenses—a hard due date (e.g. tax filing-Covey Quadrant 1-CQ1), and the strategic importance of the project to my personal or professional life (Covey Quadrant 2-CQ2).As you saw in my last entry, all my projects are organized into folders by my personal and professional roles. During my weekly review I decide on the CQ1 and CQ2 projects with greatest strategic value, or with the most urgent deadlines. These are the projects that go into my “Weekly Priorities” Folder. My next most important strategic projects go into my “On-Deck” Folder. I try to have no more than three projects in each the weekly priority and the on deck folders. Those projects that are lower priority at the end of the week, but still active, go back into my personal or professional “Role” Folders. I spend about 80% of my time working on items in my Weekly Priority and On Deck folders. I have a custom perspective that filters all my projects down to my priorities grouped by project or context.
 Another perspective shows all my flagged or due items even if they are not in my Weekly Priority or On Deck Folder.
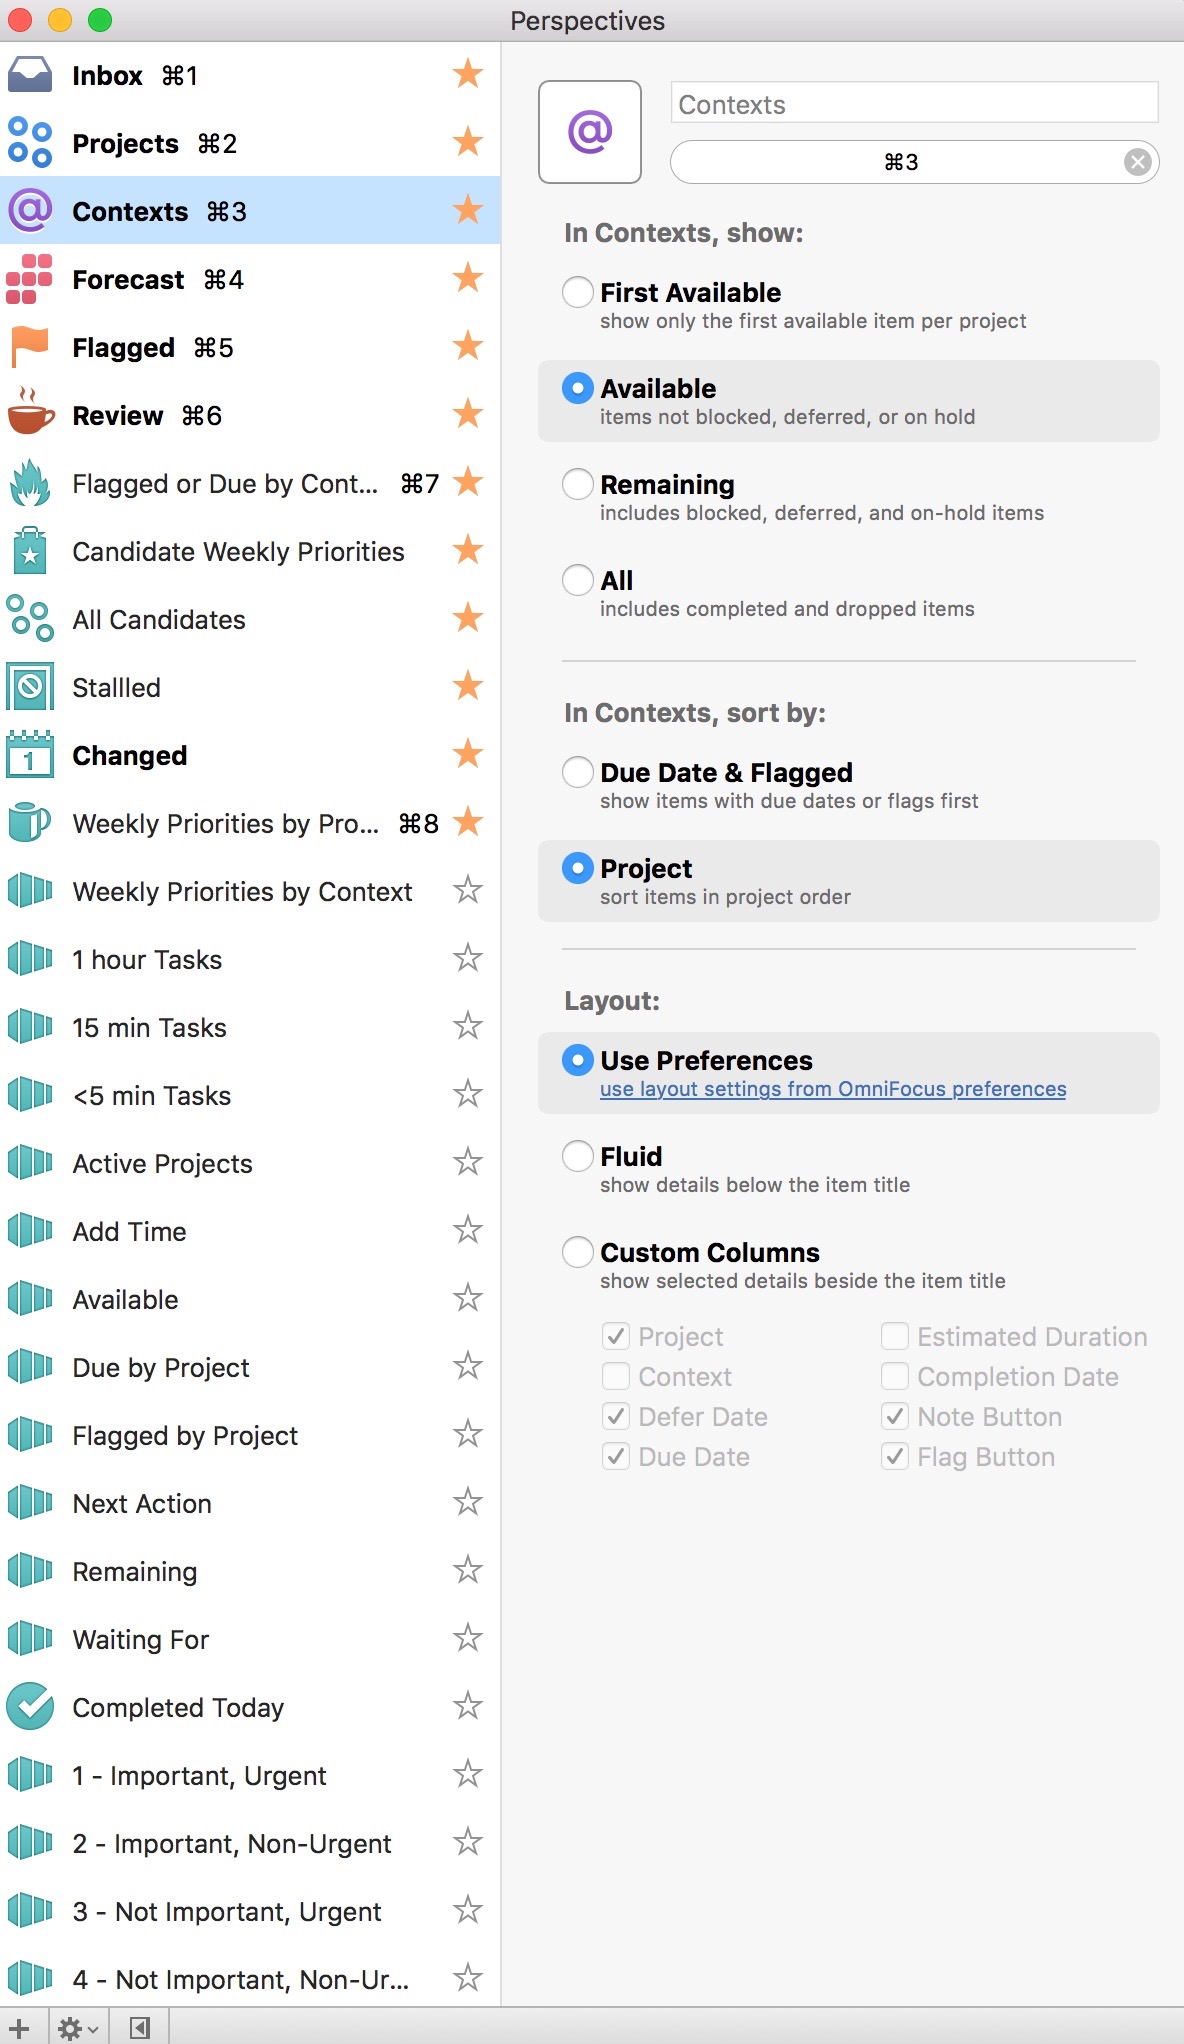
 As I add new projects, or make new projects from items in my Inbox, I am cognizant of any hard EXTERNAL deadline—only items with EXTERNAL deadlines get a due date. I have a custom perspective that shows all due or flagged items regardless of whether they are in my priorities folder. This bubbles up items that are due allows me to stay on top of deadlines regardless of whether the item is strategic or not.The last part of my weekly review strays from GTD methodology—I try to roughly plot out my week, placing actions from my highest priority projects in my calendar. I try to leave free time to allow for interruptions and other inevitable delays.I’ve found time-based perspectives to be helpful in two ways…during my weekly review , when I am trying to sketch out my week, or on-the-fly when I have unexpected time (e.g. a meeting that finished early). When defining the time for actions, I try to keep each to an hour or less. If an action item looks like it will take longer than an hour, I break it down further.My weekly review is complete after I’ve sketched out my week in my calendar. Although having a plan is great, I don’t get stressed when things change. I often need to adjust my plan. This takes place in my Daily Review.Daily ReviewEach day I open OF next to my calendar and review my achievements of the day. I like to record my my major achievements (e.g. completion of a major project) in a journal app (I use Day One). Often, during my daily review, I need to adjust my plans for the upcoming day. I have a perspective actions associated only with my highest priority items. I look at this list first. Next, I look at a complementary perspective that shows me my entire list of actions, grouped by context. Anything that I have not formally placed in my calendar, but want to achieve on a particular day gets flagged in OF. When I get to the office, I use my my “Flagged or Due by Context” Perspective constantly.
 I hope it's helpful to see how I'm using OF.I'd love to hear what you think...and would love hear the ways you use the software in your life.Addendum:In response to Owen's request....
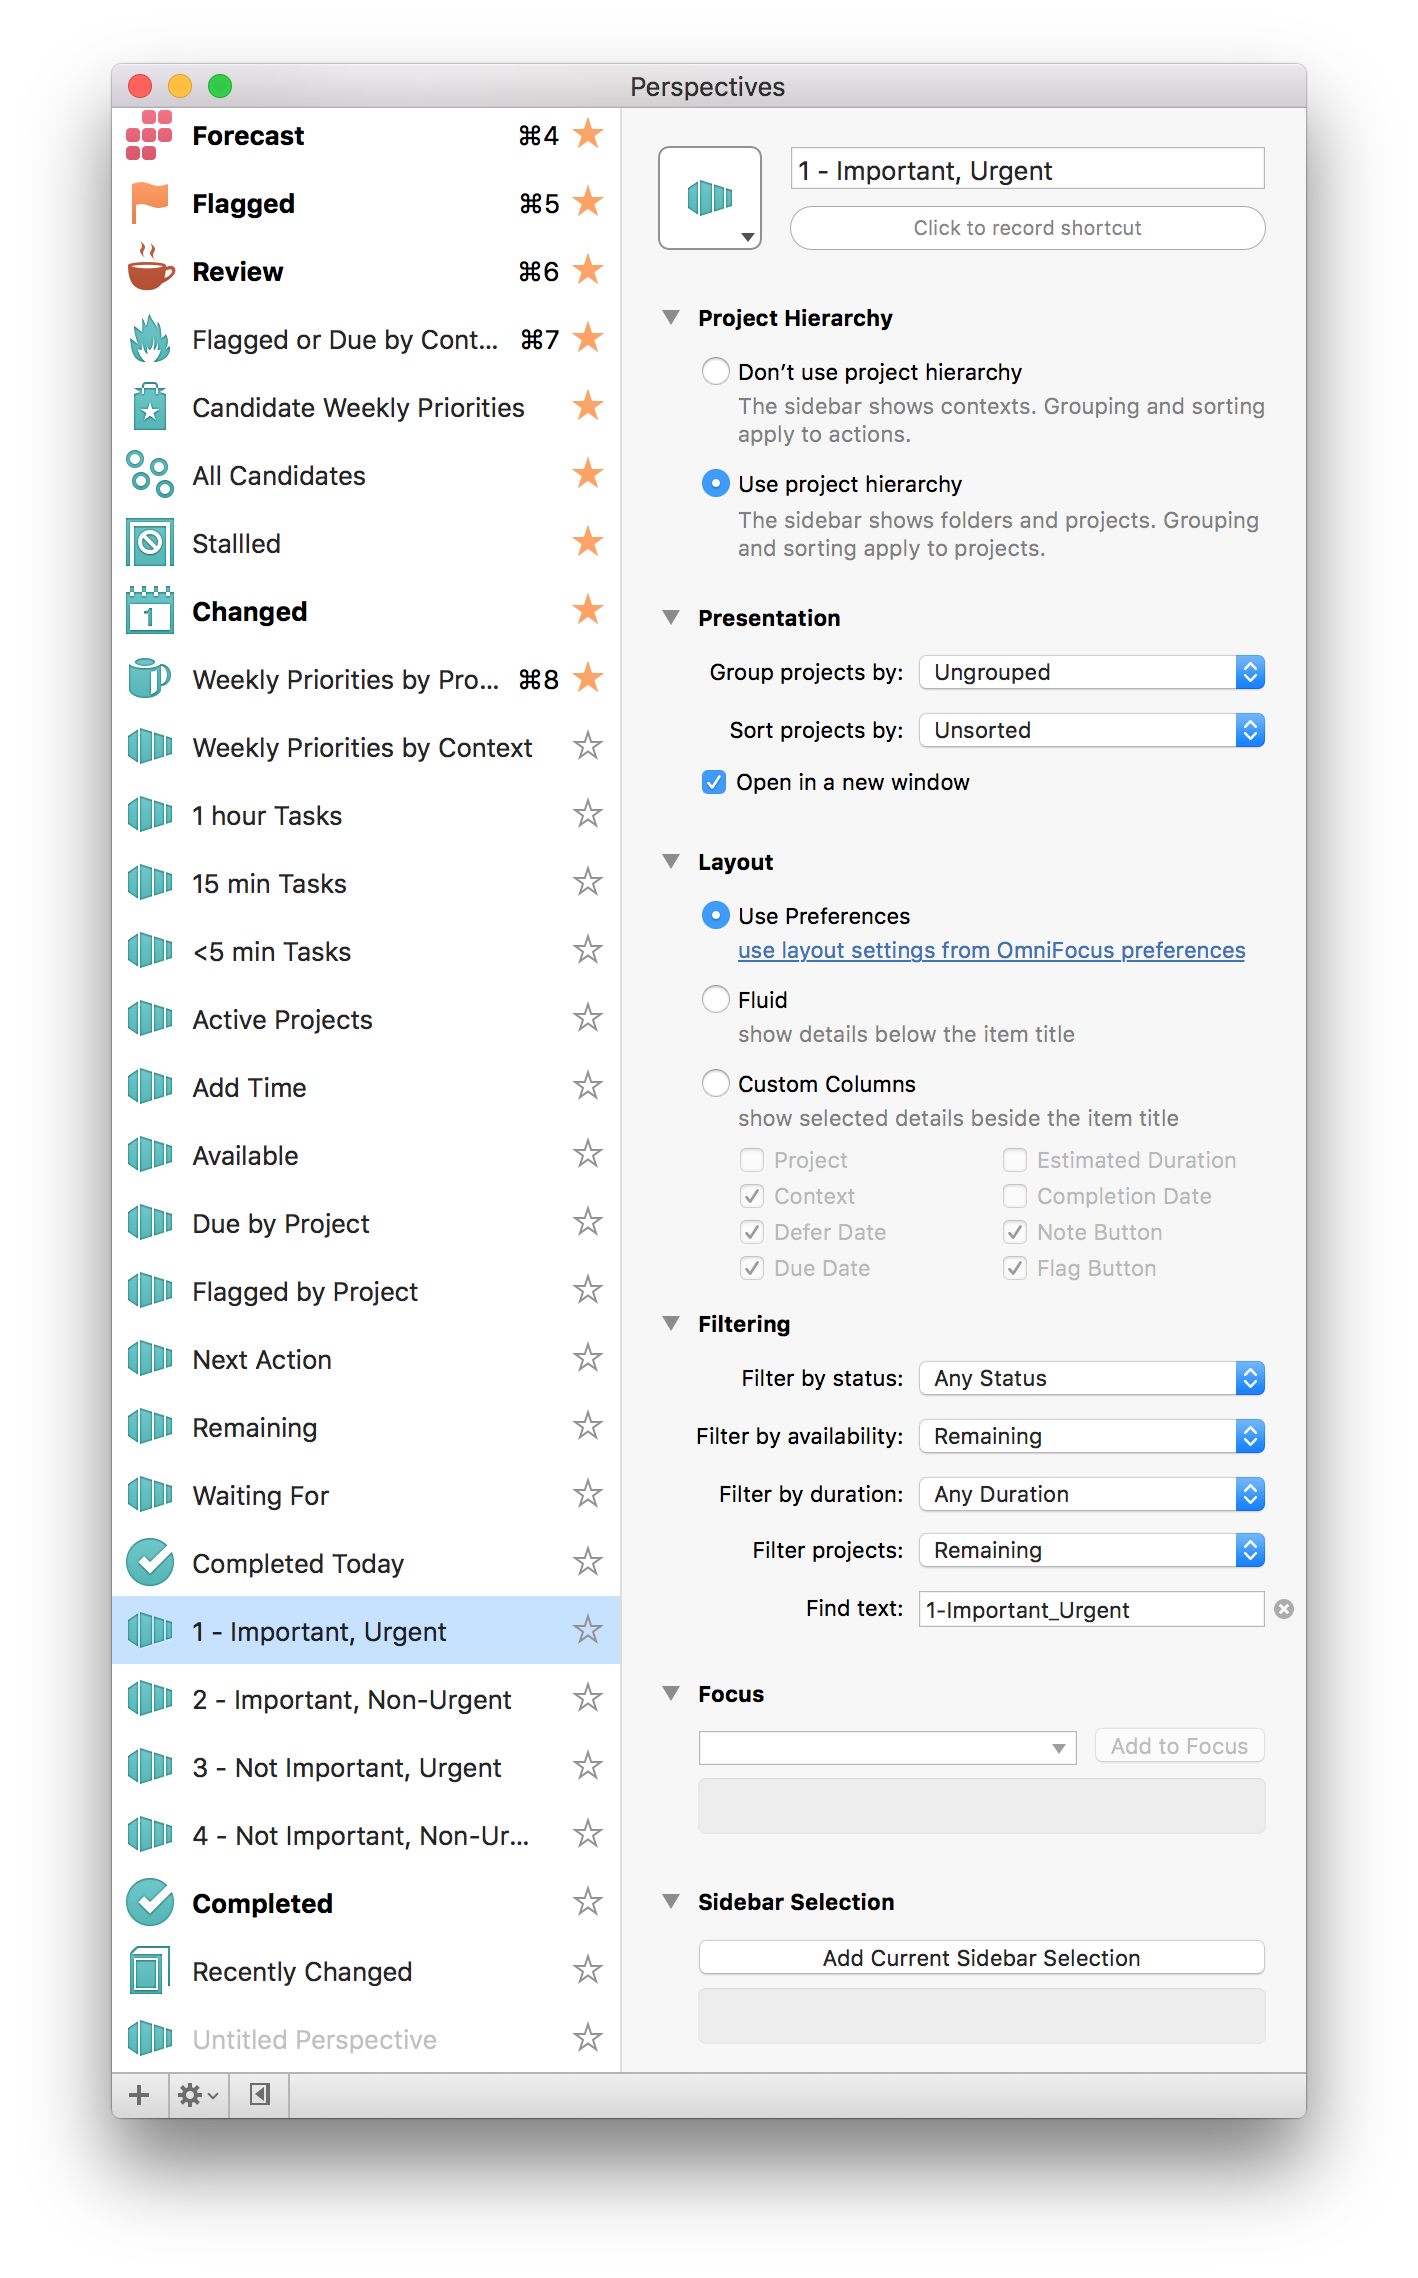
Scrivener iOS: From Alpha to Beta
It looks like our long wait may be over. A post on the Literature and Latte blog this week said the iOS version of Scrivener will move from in-house Alpha testing to wider spread Beta testing. From the article, looks like they will choose a small number of primary Beta testers to kick the tires....once the egregious bugs have been found they will move to more wide-spread testing. Regardless, I can hardly wait. Scrivener iOS is going to simplify my writing workflow quite significantly.
Ulysses for iPhone
Storyist and Scrivener? Nope.
As I wrote in my last entry, I was excited when I read Ricardo Sanchez’s article on the integration of Storyist and Scrivener. Full of anticipation, I plunked down my $15 and downloaded Storyist. I was disappointed.First i tried to enable DropBox sync in Storyist, but then realized Storyist requires the native Scrivener file to be saved on iCloud Drive. I followed the instructions in Storyist to set up iCloud Drive—the Storyist Folder showed up on my iPhone, but not on my Mac. I consulted the forums and saw that iCloud sync can take some time—up to several minutes. I waited-no sync. I cold-booted my phone-no sync. I reinstalled Storyist—still no sync. Finally, I connected my phone to my Mac and iTunes.Lo and behold, a Storyist Folder appeared on the iCloud Drive on my Mac. On my Mac, I set up an alias for a current Scrivener project and moved the native file to the Storyist Folder on ICloud Drive. The file appear on my phone. The folder hierarchy appeared identical on the phone as on Scrivener on my Mac. Many of the features of the Storyist software don’t work with native Scrivener files.I navigated down into the Drafts folder on my iPhone and typed some text. I waited for what seemed like several minutes for the file on my Mac to update. I opened the Scrivener project on my Mac and opened the section I had edited on my phone—the edited text did not show up on my Mac. Instead, I saw file conflict notifications between the Mac and iPhone version of the section. No matter how I tried, I was unable to resolve these conflicts.To make a long story short, I feel like I wasted $15. The lack of usable features and the unreliable sync of Storyist are deal killers for me. In fact, the only advantage I can see in using Storyist is the ability to read native Scrivener files. In every other aspect, I found Storyist inferior to the Dropbox text sync method I discussed in this entry. I’m going to continue to hold out for the real deal: Scrivener iOS.
Ulysses iOS, Storyist, and Scrivener
I’ve had the pleasure of working with the Ulysses Beta iOS App for iPhone over the last few weeks. As with the Desktop version, everything is very well thought out. The iCloud synchronization works seamlessly. I’m a fan!In a few short weeks, Ulysses iOS app has changed the way I write. For my shorter writing projects (e.g. blog entries, letters, memos, etc.), I no longer need to sync individual text files to a DropBox Folder (as I discussed in this entry). Instead, I dictate my text directly into Ulysses. I can mark up the text on my phone, or wait to return to my desktop. All my text and markdown is synchronized between all my devices.For longer writing projects (e.g. manuscripts and grants), I will continue to use Scrivener with DropBox sync. I impatiently waiting for the iOS version of the app so I can ditch syncing text files. As I was looking to see if there was a projected timeline for release of iOS Scrivener, I found this article by Ricardo Sanchez discussing the integration between Storyist and Scrivener. Storyist sounds like what I’ve been waiting for in a mobile solution for Scrivener. I’ll check Storyist out and report back.
My Omnifocus Set-up (Part 1)
I am a huge fan of OmniFocus (OF). I am so dependent on the software, I’m not sure I could function without it. Although there has been much written about the use of OmniFocus, I have yet to see anyone else that uses the software quite the way I do. In this entry, I’ll introduce you to my OmniFocus set-up. In future entires I’ll demonstrate how I use this set-up to maximize the impact of my work in my personal and professional life.My set-up is an amalgamation of many different things I’ve read online. I’m sure, after seeing what I do, others will continue to build on my ideas.The struggle to keep on top of one’s commitments is not new. Before Getting Things Done and OmniFocus, the go to resource for productivity was Stephen Covey’s First Things First (amazon link). This book suggested breaking down your personal and professional lives into various roles (e.g. Researcher, Clinician, Mentor). Each week, within each role, you were to decide up to three important tasks to accomplish (based on both urgency and importance). Each task could be added to one of 4 quadrants: The fact that not all urgent tasks are important, nor are all important tasks urgent was a complete revelation for me. Once I understood this, it was much easier to prioritize my personal and professional life. Per Covey, in order to maximize productivity, one is to spend the majority of their time in Quadrant 2 (Not Urgent, Important). Rather than working on projects haphazardly, Covey recommended spending the vast majority of time focused on Quadrant 2 projects. I choose to define Importance as the project’s impact on my long-term goals.I have blended Omnifocus and First Things First (and a little bit of Agile Programming—but that’s an entry for another time) to develop a system that’s truly my own. In the image below, you can see how I organize Omnifocus. I have four high-level folders: Weekly Priorities, Single Tasks, Projects, and Meta.
 My Weekly Priorities Folder contains three folders: Maintenance, Weekly Priority, and On Deck. The Maintenance Folder contains all the projects to keep my system running—reminders for my daily, weekly, and monthly reviews. The Weekly Priority Folder contains my weekly highest priority level projects (both personal and professional) I chose during my weekly review. The On Deck Folder contains other important projects—if I’m ultra productive and blast through my priority projects, I look in the On Deck Folder for next tasks to accomplish.The Single Tasks High Folder is self-explanatory.The Projects Folder contains two subfolders: Professional and Personal. Within each of these subfolders I have folders that define each of my professional and personal roles. For instance, my Professional Folder contains the following role folders: Administrator, Clinician, Communicator, Consultant, Fundraiser, Innovator/Entrepreneur, Mentor/Teacher, Researcher, Society Member. Each new professional project is placed within the folder of one of my roles.The Meta Folder Contains my Someday/Maybe project folders (things I’m interested in, but have not yet committed to doing). I also store my completed and dropped projects here.After defining a new project, I place the project into one of my personal or professional subfolders. In the Notes Field of OmniFocus, I use Text Expander scripts to label each project by Covey Quadrant. I then may use OmniFocus Perspectives to quickly locate ALL my projects of a particular quadrant.
 Using these methods, I am able to juggle a huge number of concurrent projects, each week prioritizing those most important to my personal and professional life. In case you’re wondering, I do most of my heavy lifting / organizing on my Mac. I primarily use OF on my iOS device as reference.In a future entry, I’ll explain how I use this set-up in my daily, weekly, monthly, and annual reviews.
Using Hazel to Organize Grant and Manuscript Files
It is almost the beginning of February and thus I am in the throes of writing another grant (2 actually). I thought I'd take a quick break to tell you how I keep my grant information organized using Hazel.I have a folder that has a template for all the subfolders I use during the preparation of the grant. When starting my project I make a copy of this template and name the parent folder including the funding agency, the year, and the type of grant. Hazel can rename files and subfolders. I take advantage of this feature to keep the names of my files consistent.I navigate to the folder I am working on and set up new Hazel rule to rename the file and subfolders. The rule looks like this:
 Anytime I put a file into a subfolder, it is automatically renamed appending the name of the grant to the end of the file. This appended name is hugely helpful when I go back to search using program such Houdah Spot or Foxtrot.
 I use the same method when I'm preparing manuscripts or working on other projects. Using Hazel I never have to think twice-every file I put into the parent folder or subfolder is appended with the name of the project.Try it out.
Ulysses for iPhone coming soon
I’ve been patiently awaiting the iPhone version of Ulysses. As the Soulmen blog states, they hoped to have the app released by Christmas, but ran into some delays.I’m a big fan of Ulysses—the Soulmen keep adding features—and they have a sense of humor. The iCloud native version is feature-rich without getting in the way. I lose a bit of app functionality when editing files from DropBox, but it is still pleasant to write in the Ulysses interface.Ulysses is, hands down, the best writing environment for web content. In fact, if it wasn’t for Scrivener, I would say Ulysses is the the best writing environment, period.Until the Ulysses iPhone app is released, as I noted in this blog entry, I’m currently forced to interject Editorial into my workflow. Editorial allows me to dictate and edit files on my iPhone, then share that work with Dropbox. In the future, after Ulysses for iPhone is released, Editorial will remain part of my writing arsenal, since I’ve figured out a way to share files back and forth with Scrivener. I’ll use Editorial at least until Scrivener comes out with their mobile app.In some ways, I’m glad Ulysses did not release their app for Christmas. The anticipation gives those of us that love writing something to look forward to. I just hope it doesn’t take Soulmen too long!
MacID-unlock your Mac with TouchID
When asleep, my Mac is configured to require a password to unlock. I often have to type my password dozens of times each day.This am, while reading My Must-Have iOS Apps, 2015 Edition (by Federico Viticci), I found MacID, an app that uses the TouchID on your phone to unlock/lock your Mac.Setup was incredibly easy. I installed the app on my phone and my Mac. Connecting the two was a snap. I installed the unlock bookmark on the main screen of my iPhone. Now, I merely click the app on my iPhone, use the TouchID, and my Mac unlocks. If I have the lid of my Mac closed, when opened, MacID sends a notification to my phone asking if I’d like to unlock—awesome!Not only is the app incredibly functional, but it is very aesthetically pleasing. Check it out!
Tripit and Flightview - Automating Itinerary Building and Flight Tracking
I often travel for business. I previously blogged about my love of TripIt-a website with an app that extracts flight and travel information from my email. I merely send my airline, hotel, and car rental confirmations to plans@tripit.com and the site builds a peronalized itinerary. The Pro version has all sorts of other great features, like finding and booking alternative flights.A while ago, I discovered another site called FlightView. Flightview publishes up-to-the minute, detailed information on flights and airport traffic. It works great in tandem with TripIt. And just like TripIT Flightview is able to extract the salient details from an email itinerary, then activate tracking the day you travel.Now whenever I reserve a flight, I kill two birds with one stone by simply forwarding my flight itinerary to both Tripit and Flightview at the same time. I use this simple trick literally every time I reserve a flight.
Searching PubMed, Google Scholar, and Research Gate with Launchbar
I have blogged about the custom Keyboard Maestro (KM)scripts I wrote to grab journal articles while reading scholarly information. Using these scripts, I merely highlight text in a PDF (usually a reference), invoke my KM script, and the PubMed or Google ScholarI now do the same thing using Launchbar Action Scripts. I set up three custom search templates in Launchbar’s Search Template Index:PubMedhttp://www.ncbi.nlm.nih.gov/pubmed/?term=*Google Scholarhttps://scholar.google.com/scholar?hl=en&q=*&btnG=&as_sdt=1%2C34&as_sdtp=Research Gatehttps://www.researchgate.net/search.Search.html?type=publication&query=*Now, when I want to retrieve a reference, I merely highlight the reference in the PDF I’m reading and hit the Shift Key twice–this tells Launchbar that I want to do something with the highlighted text–by hitting tab and then typing the first few letters of Pubmed, Google Scholar, or Research Gate, then hitting Return, I tell Launchbar to pass the search string on to the publication web site. In order to find PDFs, I often have to repeat a search on more than one site. Launchbar makes retrieving PDFs fast and efficient. Check it out.
Using Drafts to journal in Day One
Last entry, I mentioned how I use Drafts to dump information from my brain, then, only after capturing, do I decide where to send what I wrote. I showed you how to save information from Drafts to Evernote. Today, I will show you how I capture moments in my journaling app, Day One.
Although I love Day One, I was not entering information often enough. Action URLs are a powerful feature of Drafts. Action URLs-open other applications, then perform functions. In order to increase my capture rate, I decided to make an Action URL that transfers text from Drafts to Day One.
Here is how simple it is…..
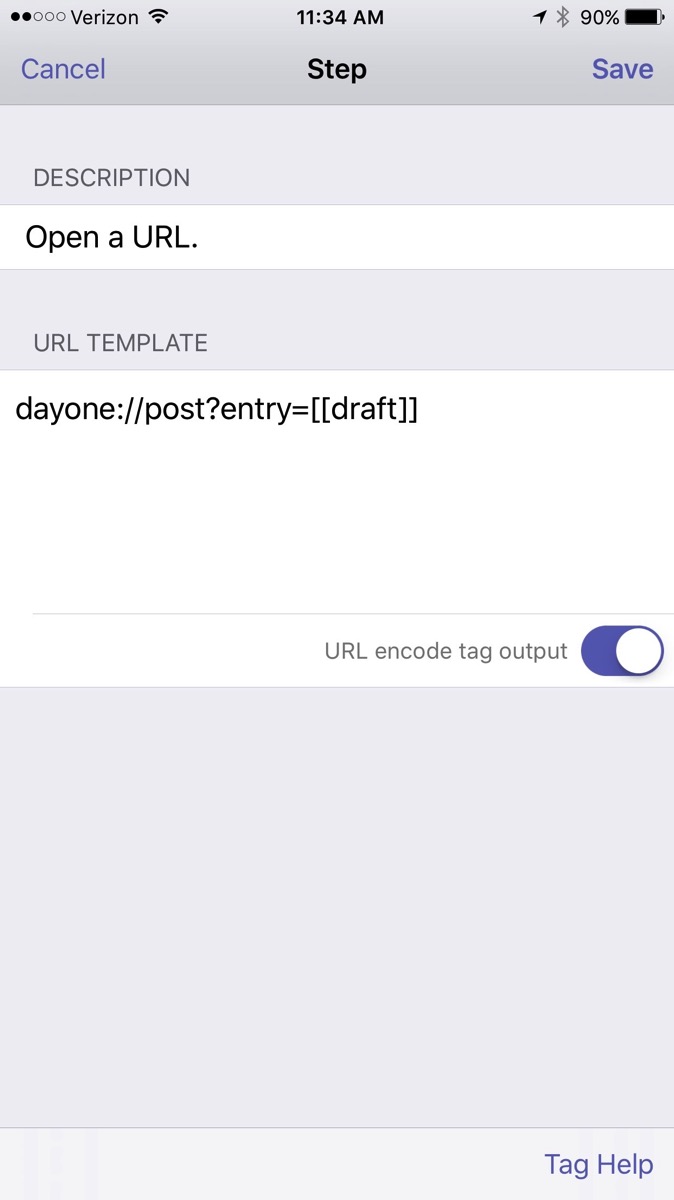
I have configured Day One on my Mac and iOS devices to sync. I also enabled the #hashtag feature in Day One. Hashtags are translated into keywords in Day One.
Since enabling this script, I find myself capturing both personal and professional snippets each day. Give it a try!
Scrivener is Half Off (this weekend only)
Embracing Evernote
Workflows evolve. A few years ago I was hesitant to use Evernote because of its proprietary nature. I was using plaintext to capture everything, but had to work out a complex syncing system to be efficient. Over the last year, I’ve overcome my fear and have increasingly built Evernote into my life. I started using it in so many ways, I finally subscribed to thePremium service. I’ve found Evernote to be a flexible and reliable tool readily available on all my devices — both for capture and to find information when I need it.
Here are a few ways I’m using Evernote:
Clipping Service
The first thing I installed when I started using Evernote was the Mac Clipping Tool. Using the clipping tool I easily capture, attach keywords, and annotate pages from the web. Using the “Share” menu in the web clipper, I copy a link to the note directly as a reference in OmniFocus or Calendar entries. When I’m on my iPhone or iPad I use the Action Button (the square with the arrow emerging from the top) to get items into Evernote.
Emailing notes directly into an Evernote NoteBook (premium feature)
I have transitioned my personal email client to Postbox. Postbox, unlike Mail.app, has an Evernote clipping tool embedded into the interface. Sometimes, I’m unable to use either of these methods and will choose to email a note into Evernote. To learn more about this premium feature, read the excellent overview of Evernote email features (including naming the file, placing the file directly into a specific notebook, or tagging the file with a keyword or reminder time).
I most commonly use this method when I’m answering an email, placing my unique Evernote email address and Omnifocus MailDrop Address in the bcc field of my email. Using this method, I can kill 3 birds with one stone (responding to the email, keeping the reference material, making an Omnifocus entry to keep up with the item).
Linking to reference material for Omnifocus or Calendar
Once information is captured Evernote, each note has its own unique URL. I use this feature extensively to link reference material to OmniFocus and my Calendar. I have different ways of linking depending on the situation.
By control-clicking on a note in Evernote and then selecting “More Sharing” I copy the web-based URL to my clipboard. I then paste the URL into the note field of Omnifocus or into the appropriate field of my Calendar. Then, even when I change devices, I have access to my reference material.
Another method of grabbing URLs is with Launchbar. As I mentioned, I now use Launchbar extensively. I can select a note in Evernote and then invoke Launchbar, then I select “Evernote – Copy Link of Selected Note.” This copies the URL of the slected note to my clipboard to be pasted into any other app.
Capturing Ideas in Evernote using Drafts
Evernote extends its great power by linking to many other applications. I’ve found capturing snippets of text into Evernote is even easier than the method I described a few years ago using plaintext.
I use Drafts on my iphone and iPad to capture / brain dump just about everything. Drafts is an essential program on my iPhone. Drafts allows me to capture without thinking about what app I need to open. Once the text is captured, Drafts routes the information wherever I choose. I wrote about one way I use Drafts to capture and process meeting notes.
When I want to capture an idea, I merely open Drafts and type or dictate my idea into the app. When I’m done, I route the information to Evernote using the following custom action:
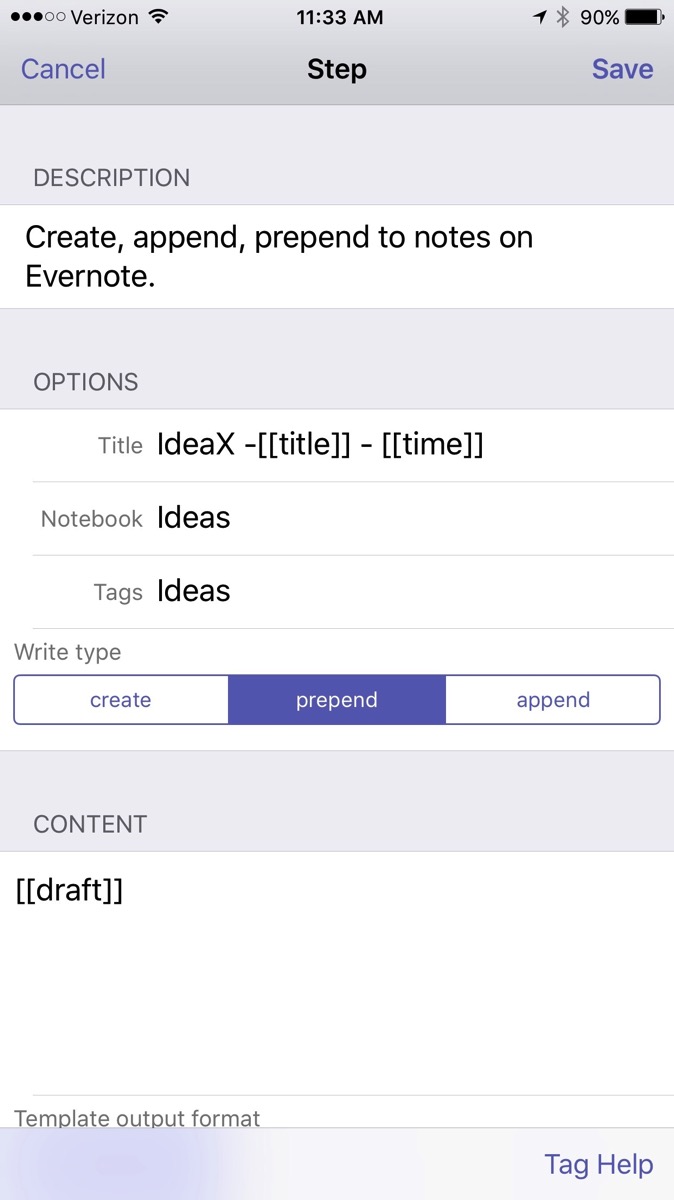
The action automatically derives a title from the first line of the text and appends the date and time. Furthermore, it files the note in my “Ideas” Notebook in Evernote and tags the note with the keyword “Ideas."
The note ends up in Evernote looking like this:
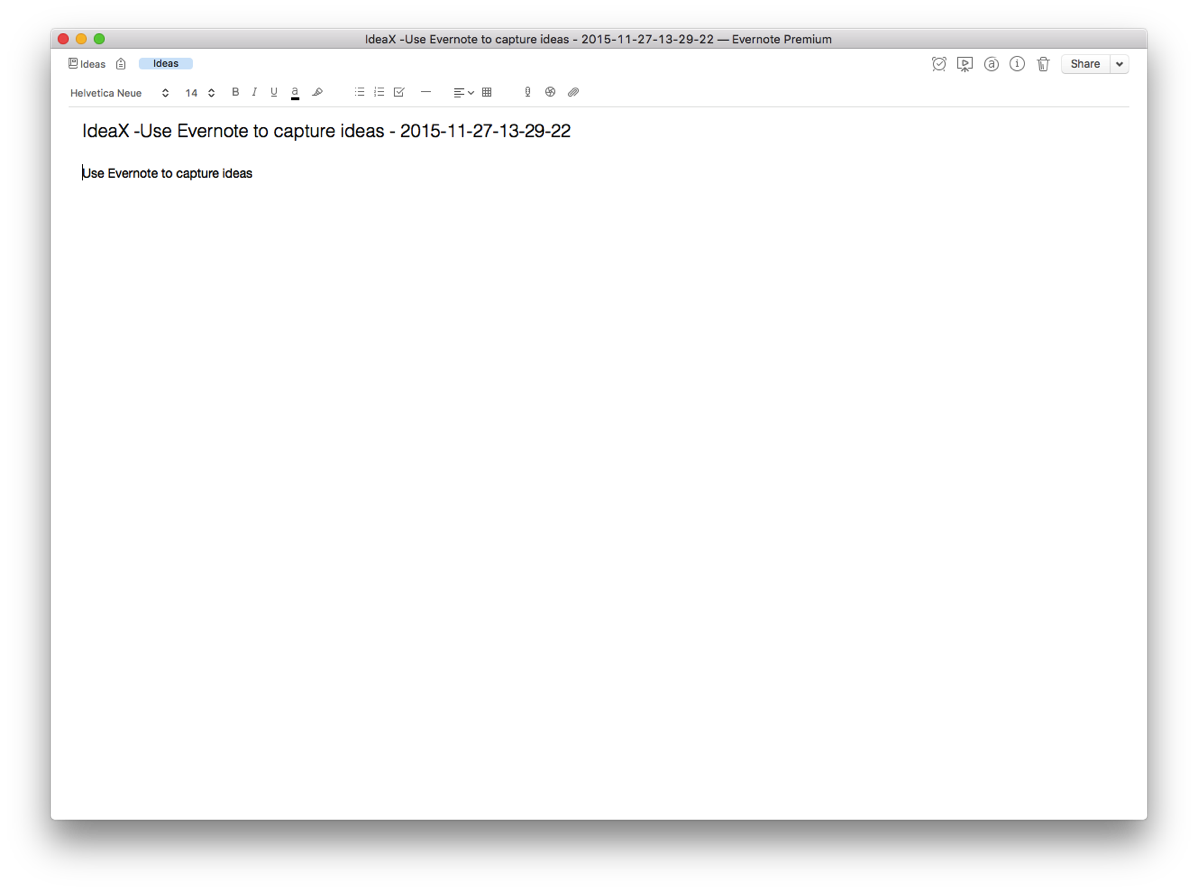
When I get to Evernote, I append further information in the note as needed. I use IdeaX in the header so when I search for a list of my ideas, they are not mixed together with information I’ve gathered from other sources. If I search for a keyword(s), I not only see my ideas, but all the information I’ve gathered in Evernote—very useful.
Capturing Blog Ideas, Lyric Ideas, Quotes, and other Snippets in Evernote using Drafts
I use a similar scripts in Drafts to capture a whole host of other information on the go. Each class of information is filed into it’s own Notebook in Evernote. For example, here is the action I use to capture information for my blog:
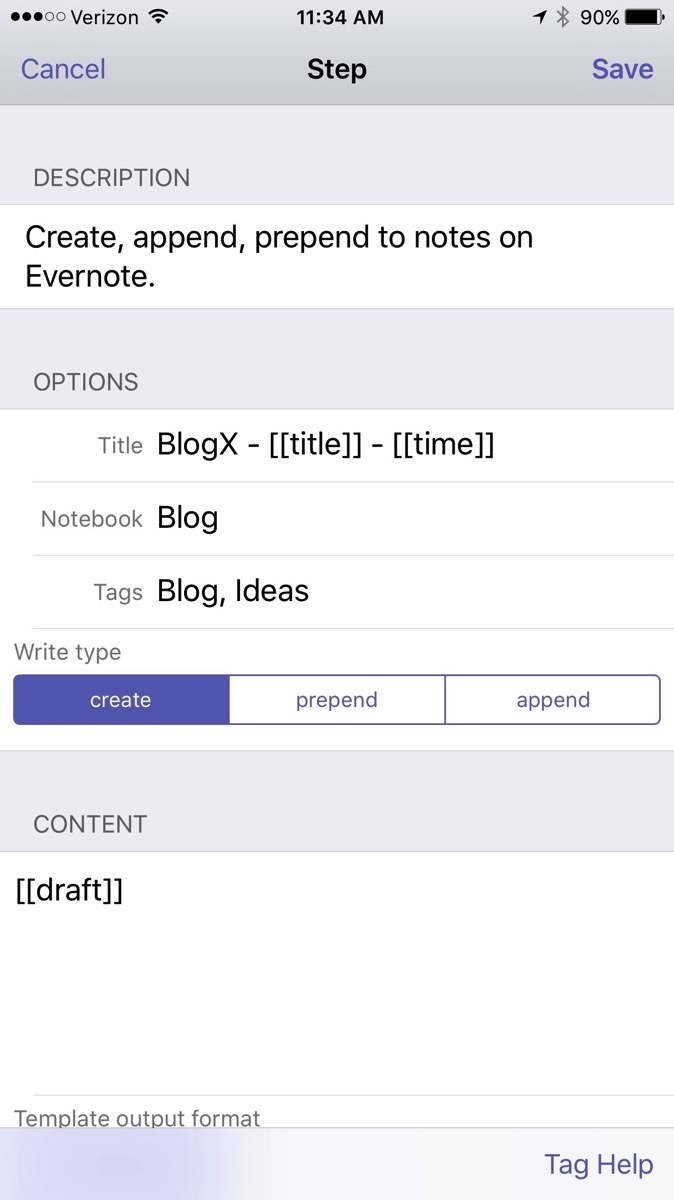
By incorporating Evernote, I’ve greatly simplified many of my capture processes. I highly recommend giving Evernote Premium a whirl and trying out a few of these workflows on your own. You won’t be disapointed.
