

It's been a while since I posted my original entry and my workflow on Zettelkasten. Since then, my methods have evolved into a system that's working incredibly well for me. So, I thought I'd write about what I'm doing so others may use (and improve) my methods. This entry is an update to Zettelkasten Management 2022 using Obsidian, Drafts, and Devonthink — Workflows in Personal and Professional Productivity.
Read moreTaekman Academic Writing Workflow 2020

One of the most popular entries on WIPPP has been my 2015 Writing Workflow. My workflow has changed substantially over the last several years. I thought I'd share what I'm currently doing.
Read moreIdea Capture and Generation using Drafts and The Archive - Zettelkasten Workflow

I have been consuming a massive amount of information from books, podcasts, manuscripts, and other sources. What can I say? I love learning. I especially love learning about the microbiome, functional foods, integrative medicine, technology, and science.
Read moreUnlock the Power of RSS feeds with Devonthink
I’ve written often about my love of Devonthink. Over the years, it has become an indispensable part of my digital life. Only recently, I discovered the power of Devonthink’s RSS capabilities. Devonthink RSS is the topic of today’s entry.
RSS (Rich Site Summary) is a format for delivering changing web content. Many news-related sites, blogs, and publishers syndicate their content as RSS feeds. Many of my colleagues use freestanding RSS readers like Feedly to collect their content. I’ve tried many of the stand-alone readers, but Devonthink is clearly superior because of its search and AI capabilities.
Here how I use Devonthink RSS.
Read moreModification to Reading, Extracting And Storing Scholarly Information To Supercharge The Writing Process
In Reading, Extracting And Storing Scholarly Information To Supercharge The Writing Process, I wrote about how I extracted both highlights and full-text of entire manuscripts in order to give me granular access to information. Although I’ve continued my extraction of highlights, the extraction of full text (by highlighting the entire document) proved much too time consuming. Instead, I’ve been experimenting with an alternative that is much quicker (as suggested by Andrew in the comments of the entry)—saving the entire manuscript as single-page PDF documents. Here is what I’ve been doing.
After highlighting a manuscript in Highlights.app, I extract my highlights (along with color tags) to Devonthink Pro using the built in export function. By default, Highlights.app saves my extracted highlights files to the DTP Inbox. I move the folder from the DTP Inbox to my Desktop. Within the moved folder I make two new sub-folders: 1. HighlightsX and 2. PDFx. I then move the extracted markdown files to the HighlightsX sub-folder.Within Bookends, I export the annotated pdf to my desktop. There, I open the file with Adobe Acrobat (any app able to add headers and split documents will work).
Read moreAutomating the Organization and Accessibility of Academic Literature: Bookends and Devonthink Pro

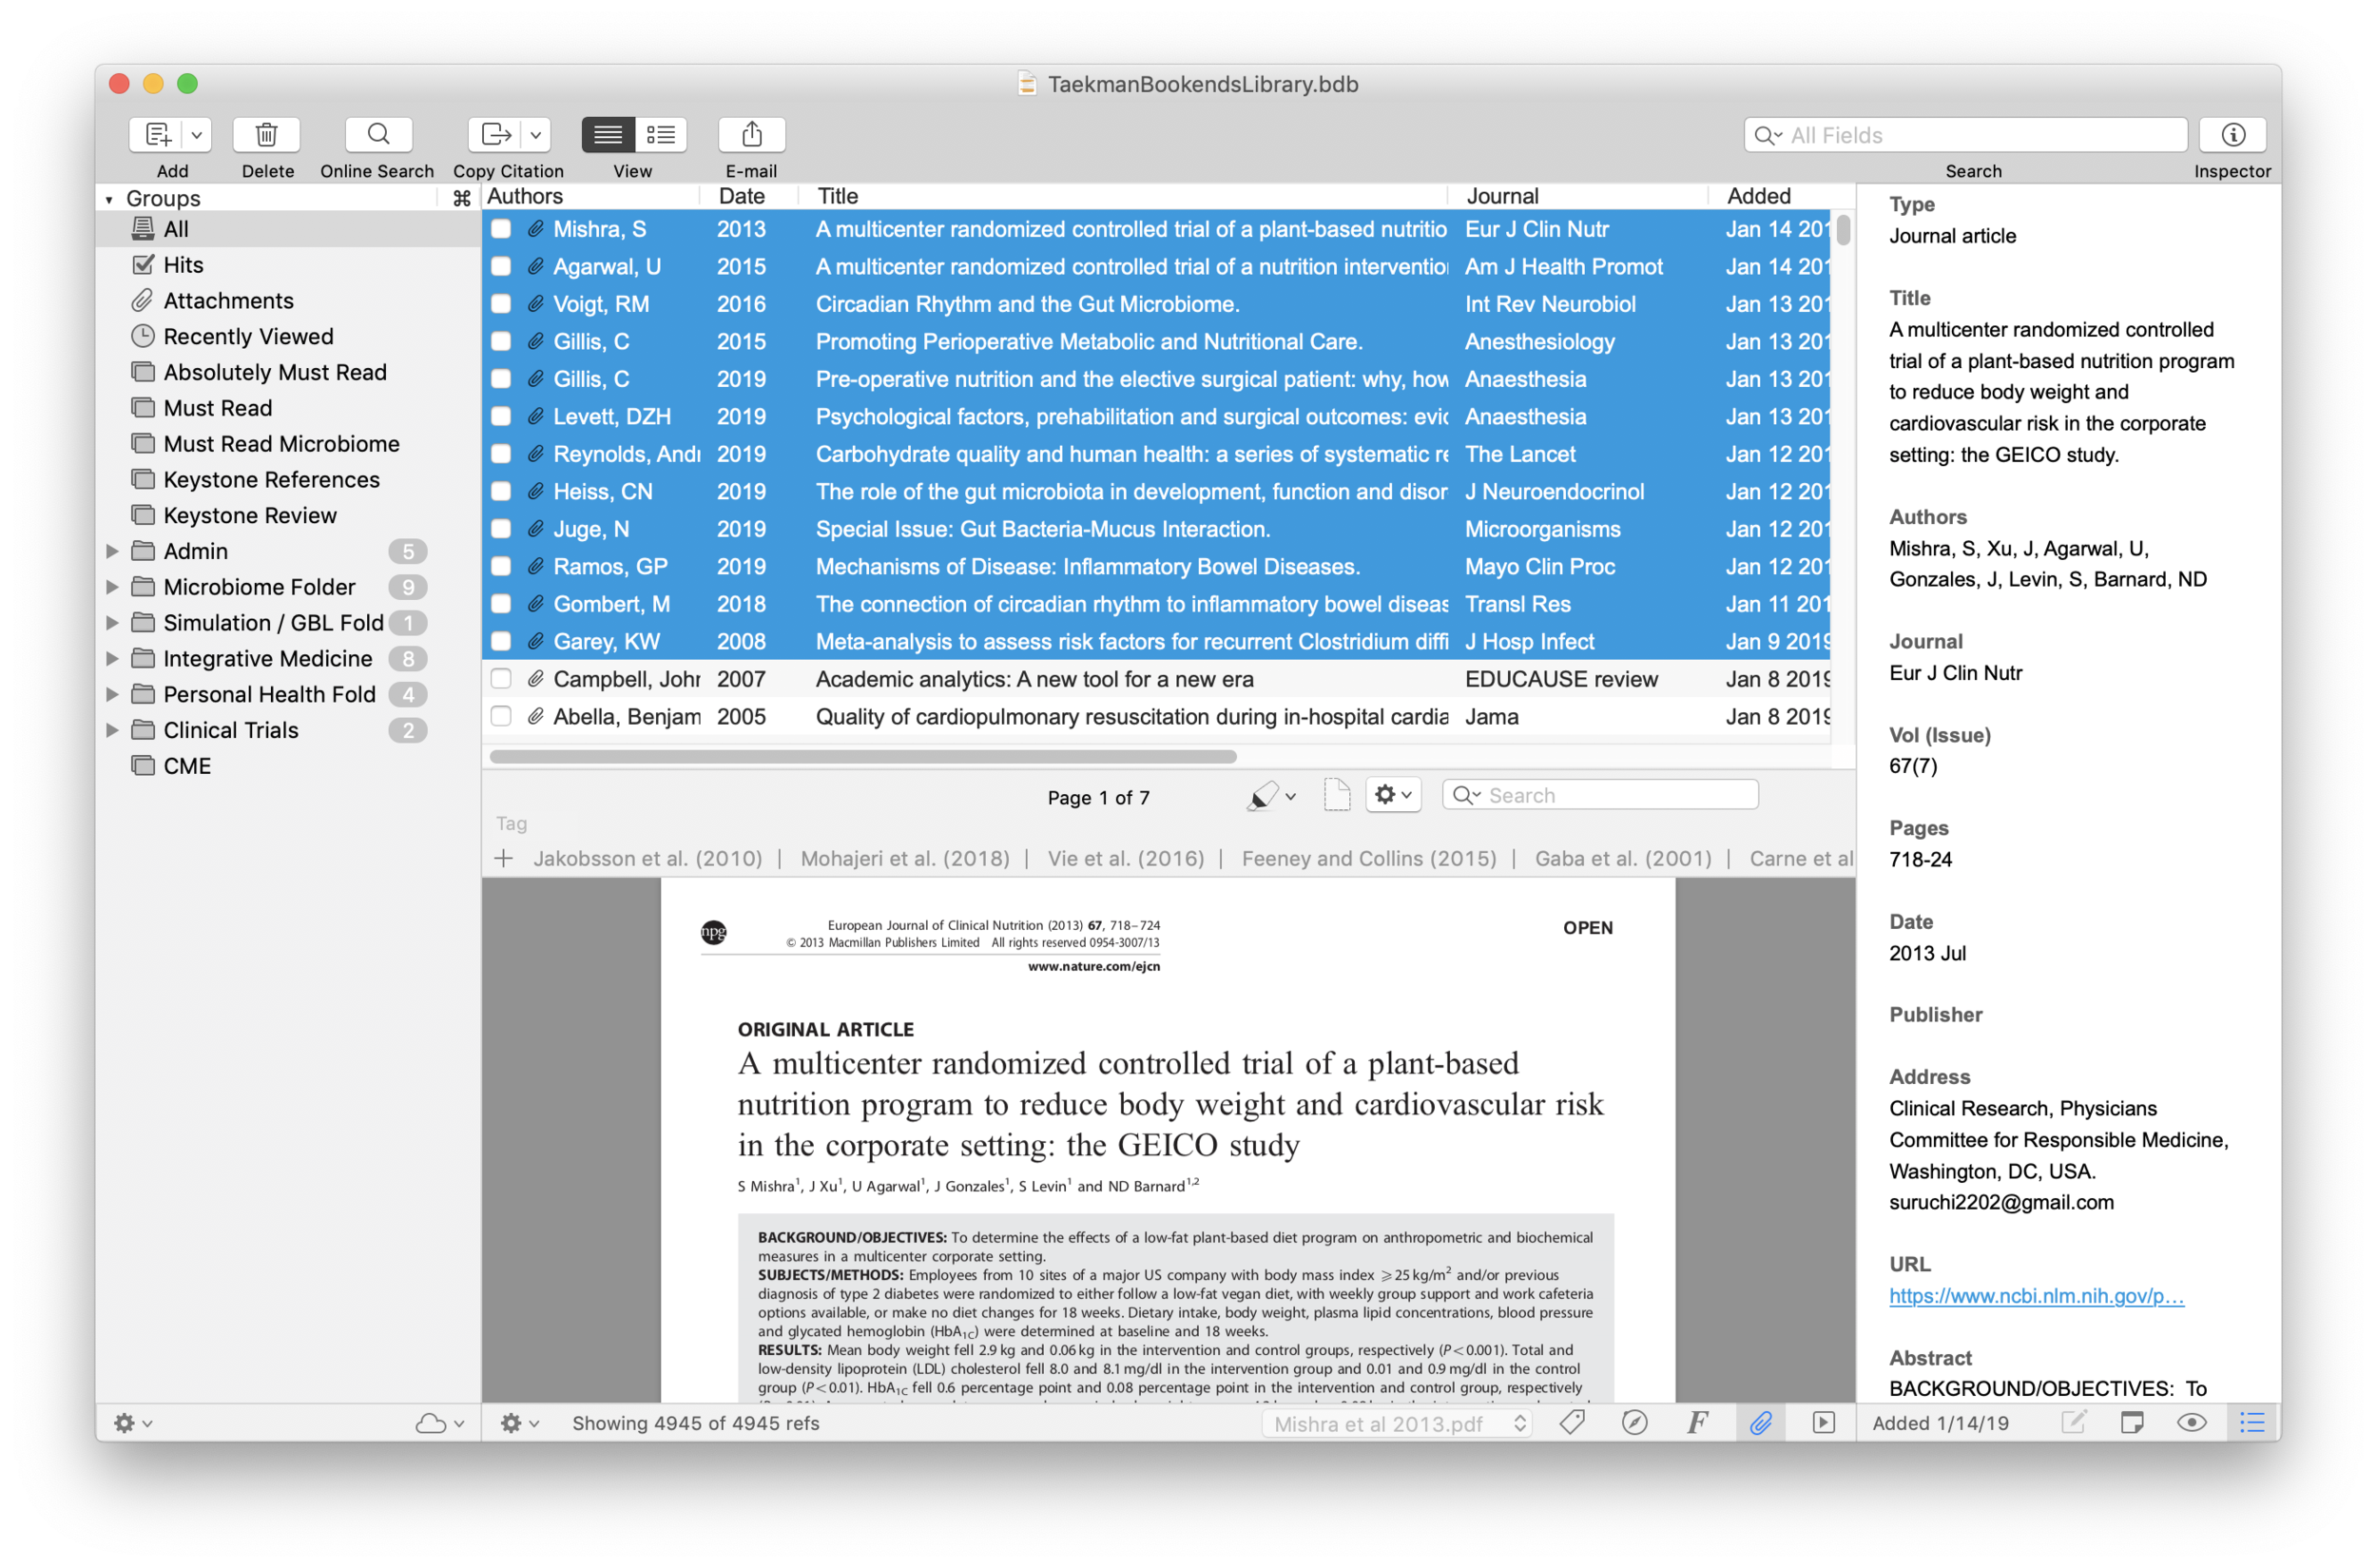


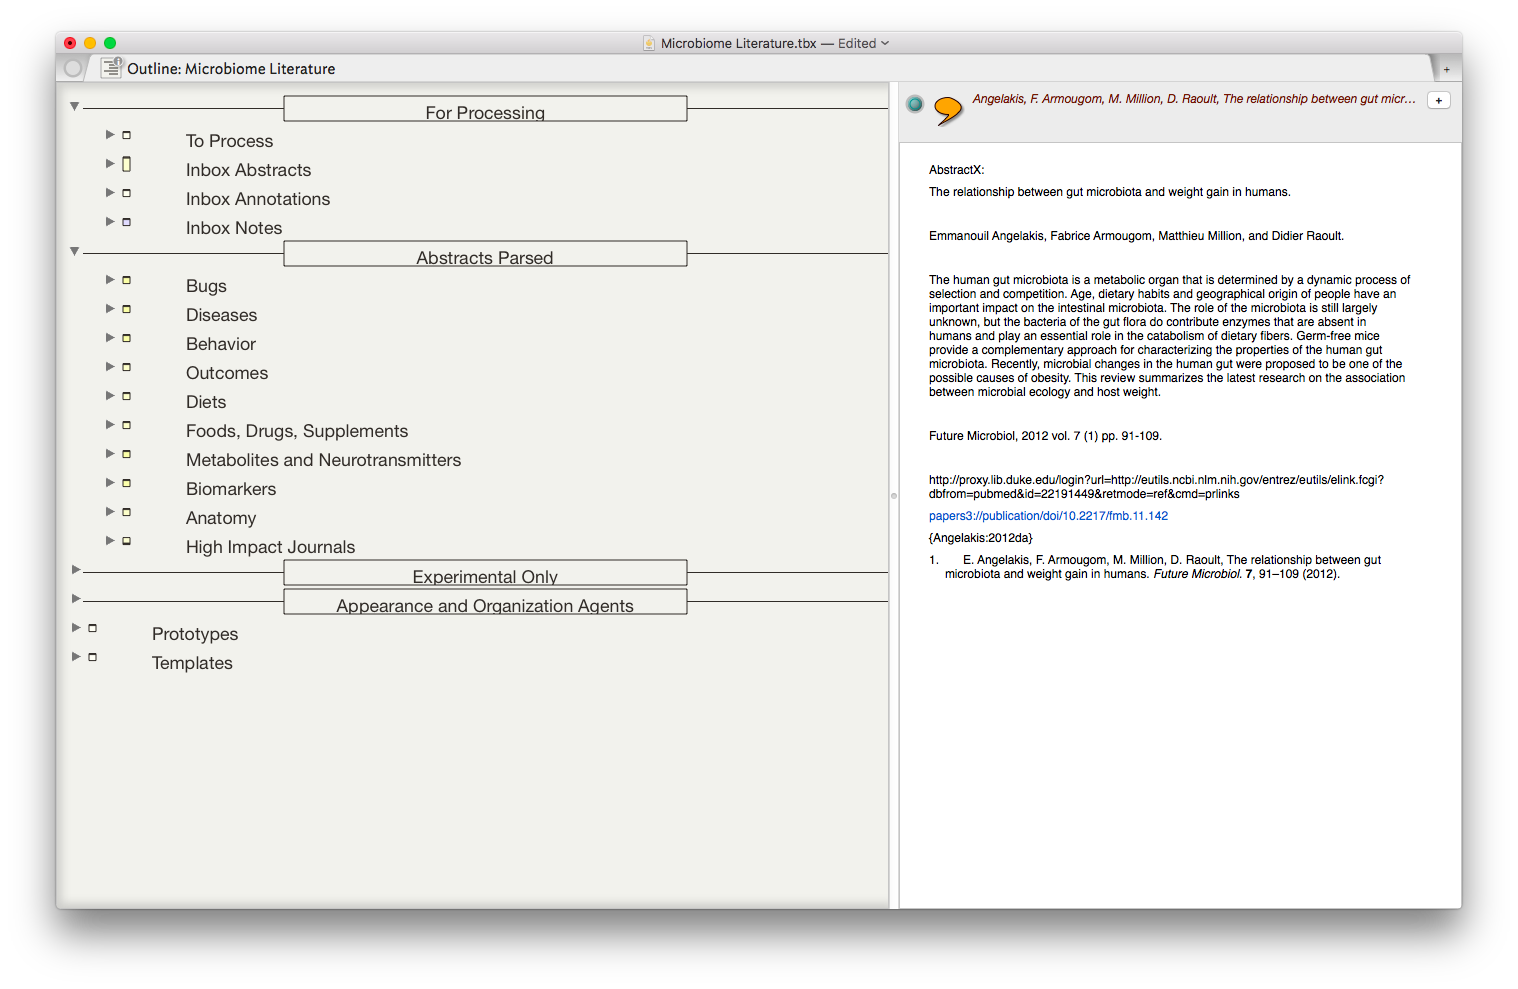
I wrote about Sense-making of the Academic Literature back when I was using Papers. My old workflow required Keyboard Maestro to extract abstract information to Tinderbox. Although Tinderbox is great for visually organizing your notes, it can’t compare to the search capabilities of DevonThink Pro.Since switching to Bookends, I’ve found myself spending less time in Tinderbox and even more time in Devonthink. I’ve made heavy use of a particular built-in Devonthink Template that automates the migration of abstracts from Bookends to DTP (with a link back to Bookends). Once imported into DTP, these abstracts can be parsed using smart folders (enduring searches) that make your literature library a dynamic resource for writing.I have a single DTP database that has indexed the various folders critical in my writing process (e.g. PDFs, extracted notes). In DTP, I’ve organized these folders into a “zz-Inputs Folder”. As you can see below, a sub-folders of zz-Inputs is an “Abstracts Inbox.” When I set up this folder in DTP, I made sure the folder WAS NOT excluded from tagging (this is done by option-clicking on the folder and making sure “exclude from tagging is UNCHECKED).When it’s time to transfer abstracts from Bookends, I first click to select the Abstracts Inbox folder in DTP.I then open up Bookends and sort the fields by the “Added” Column. I like reverse chronological order so I can see the last date I imported abstracts. I highlight all the new manuscripts in Bookends.I then move over to DTP and select the Data:New From Template: Education: Reference (from Bookends) menu item. DTP grabs all the highlighted abstracts from Bookends.The imported information includes Author, Title, Year, Abstract, and Keywords. The template also includes a link back to the publication in Bookends. Finally, there is a field for me to add my own comments to the new DTP file.Once the abstracts are imported into DTP, I make sure to index the folder so the new information is included in search. Now that the information is in DTP I am able to take full advantage of its search functionality and artificial intelligence.I make extensive use of Smart Searches in DTP. Using Smart Searches, The abstracts are automatically sorted into folders.For most topics I have two Smart Searches:
as shown below that includes the search criteria AND searching for the tag “Abstracts Inbox” we talked about earlier—this finds only abstracts relevant to the search,
only the search criteria—this returns ALL information in the database (including abstracts, PDFs, and extracted text as described in this entry).


In DTP, I bring up the Search Interface (Tools: Search….) and type in my search criteria. By default, in the Search Interface, DTP will search across all databases. Notice on the left hand side I have limited the search to my Writing Database. This returns ALL matching information ONLY in my Writing Database. I’ve color coded information extracted from articles using Highlights (for instance, a blue highlight is a direct quote). I can further limit the search by clicking on the “Advanced…” Button and adding additional criteria (e.g. tags, file types, words such as “blue,” etc.).Once I’ve found an abstract that interests me, I locate semantically similar information by highlighting the abstract in DTP and then clicking on the “See Also” button (the Magic Hat).Using this method, all the information I’ve collected (both read and unread) is easily accessible. I use this method extensively when writing. Please let me know if you find it useful too.
Bookends Adds Floating Citation Window
I’d like to bring the latest update of BookEnds to your attention.This update fixed an error that would crash the Bookends when trying to obtain a reference (or link back to a reference in Bookends using a DOI link) from Highlights.app. The latest update fixes this error. Clicking on the reference link in Highlights now selects the reference in Bookends without having to modify the Highlights markdown file. This obviates the need to modify the Highlights markdown file as mentioned in this entry.The latest update also added a floating citation window to Bookends. Like Papers, the floating citation window is invoked using customizable key combinations. So far, I’ve cited using the floating window in Scrivener, Ulysses, and Highlights.app. It works flawlessly.Well done Jon and Sonny Software!
Reading, extracting and storing scholarly information to supercharge the writing process


Bookends has completely replaced Papers.app as my citation manager. Despite this change, my method of information gathering has changed little since I covered the topic, except for one major addition. I am now finding the majority of information through qxMD Read.My workflow for extraction of annotations differs a bit from when I was using Papers. I now use the combination of Bookends and Highlights.app to extract each of my annotations and notes as separate files. In addition, after highlighting, I’ve been extracting the entire manuscripts in 1-4 paragraph pieces.The whole purpose of extracting annotations and full text from each manuscript is to gain granular access to the information I’ve read. Through its "see also" feature, Devonthink can identify information I’m looking for. But more importantly Devonthink finds related content based on the context of my original query.After importing a manuscript into Bookends, the document becomes available on all my devices. Bookends outshines Papers in its built-in annotation tools as well as its seamless syncing between iOS and Mac.
My current preference is reading PDFs on a 12.9" iPad Pro along with an Apple Pencil. In a pinch, I’ll annotate on my iPhone. On my first pass through an article, using Bookend's built-in tools, I highlight annotations and jot notes in green. I use blue to highlight quotes I wish to use verbatim. When I’m finished annotating, I add the keyword RFP (ready for processing) to the manuscript in the Bookend database.
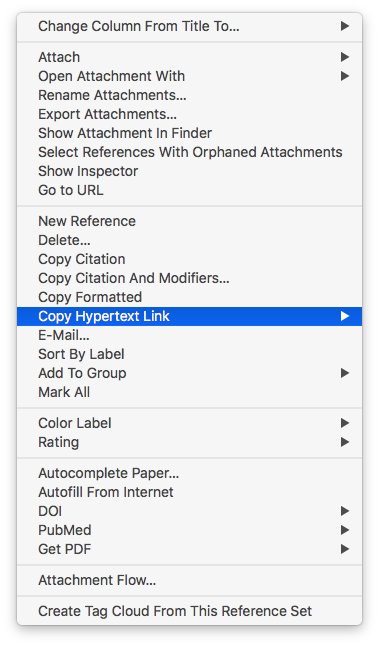
I have a Smart Folder set up in Bookends that finds the Keyword RFP. Uzsing this method, I can batch process multiple PDFs when I get to my Mac.When I'm ready to extract the information from the PDF into my Devonthink writing database, I export the PDF to my desktop and append the exported file’s name with FT (for fulltext).On my desktop, I open the file with Highlights. I use Copy Hypertext Link:Copy as Text from Bookends, and then open the “Edit” Tab in Highlights. Using use the text URL copied from Bookends to make a markdown link back to the Bookends Reference.When I export my annotations to Devonthink, the URL link will be appended to each file. Clicking the link within any extracted file takes me directly back to the reference in Bookends.I then turn my attention to Highlights.app. I make sure the annotations color preference is checked in Highlights.app. When checked, this preference will append the color of the highlight in each note.
Within Highlights, I use yellow to mark up the entire document over the top of my previous annotations. I highlight in 1-4 paragraph chunks. I also highlight the text of each table and figure.Once I'm done highlighting the entire paper, from within Highlights.app, I export my annotations to Devonthink from the Highlights.app menu. The annotations are saved as individual files to my Devonthink Inbox. I move the folder from the Devonthink Inbox to my desktop and then use Launchbar to move file from my desktop to my annotations folder. I put the desktop PDF in the trash, replace the RFP keyword in Bookends with DTx to remind me I've extracted the paper.
Since I’ve set up my Devonthink database to index this folder,the next time I launch Devonthink, the new information is catalogued and available for writing. The new information is also transferred to Devonthink ToGo to use while writing on my iPad.Using the Artificial Intelligence of Devonthink. I can quickly find related information. When I find an item in my database I want to include in my paper, clicking the link in the annotation takes me directly to the paper in Bookends.app.Using this method, I'm able to take full advantage of the Devonthink AI. Queries within Devonthink simultaneously find annotations, chunks of text and full manuscripts related to my search. I find this workflow invaluable when writing scholarly information.
***This workflow has been modified from here to the end-Please see Modification to Reading, Extracting And Storing Scholarly Information To Supercharge The Writing Process to see what I do instead.***
My Migration from Papers to Bookends
I have dedicated a lot of time and energy squeaking every ounce of productivity from the Papers app. I’ve used Papers for more than a decade. Over the years, I built many scripts and work-arounds to address the shortcomings of the application.ReadCube purchased Papers in 2016. Because of the time I’ve spent in Papers, I started having angst when I read of certain changes to the software: a subscription model, the loss of Magic Citations, and the loss of integration with Scrivener.I started exploring alternatives to Papers. When I wrote about my interest in migrating away from Papers, several Wippp Readers suggested I check out Bookends. Several folks raved about the tight integration between Bookends and Devonthink as well as Bookends and Tinderbox—two other programs I use heavily in my academic life. Several people also mentioned the LEGENDARY support of SonnySoft, the company behind Bookends.My initial evaluation of Bookends was far too cursory. Following publication of the blog entry, I received a very nice email from SonnySoft asking me to take a closer look at Bookends. After digging deep into the software, I decided to migrate from Papers to Bookends. I haven’t looked back. It’s been several months now and the more I use Bookends, the more I like it.Things I like about Bookends:
The interface, although not as modern as Papers, is cleaner and more organized.
The iOS and Desktop version are better integrated than Papers.
A PDF on my phone is drop-dead easy to import into Bookends. The PDF and the metadata I choose is automatically synced with the Mac app (although I have to rename the pdf when I get to my Mac).
All PDFs are saved to a single folder in iCloud, making them easy to access and for Devonthink to index.
Bookends integrates well with Scrivener (and many other writing clients)
Dragging and dropping citations into Tinderbox and Devonthink are both seamless. Tinderbox maintains metadata from Bookends. This obviates the need for the KM script I built to move citations from Papers to Tinderbox.
Things I don’t like:
It was difficult to import Papers library with PDF into Bookends (Bookends only imported about 1/3 of my PDFs).
I can't export or customize the format of the exported metadata.
My smart collections don’t transfer to iOS.
Although I can designate a “watch” folder to import new PDFs into Bookends, this only works with PDFs that are saved to the folder AFTER Bookends is open. This didn't work well with how I collect information so I decided to modify my Hazel script, changing it to launch Bookends instead of Papers.
I don't like the way duplicate references and / or PDFs are handled.
Over the next few months, I plan to write several entries about my migration and how Bookends has become a critical part of my augmented writing workflow.
Folder Structure to Maximize Writing with Devonthink Pro
On several occasions I have written about how I use Devonthink Pro (DTP) for scholarly writing. Although at one point I had all my information on manuscripts in a single DTP database, over the last year I have maintained separate databases; one for PDFs, another for my annotations.I accomplish this by having separate folders in Dropbox. After extracting my annotations from Highlights.app, I place the exported files in their own folder. Once a month, I export all the PDFs in my Paper’s Library to their own Dropbox folder. I use a Hazel script to throw away any duplicate PDFs in the Dropbox folder. I index (not import) the annotations folder into one DTP database, and index my PDFs into another.This setup allows a fair amount of flexibility. Not only is this setup advantageous for writing with DTP (as I will cover in my next entry), it allows easy access to my PDFs for reading with Liquidtext or listening with Voice Dream.
Highlighting PDFs from Within Scrivener
Here is a quick trick to use with Scrivener.I’ve been working on some short executive summaries. For longer projects I tend to keep my research in Devonthink. For these shorter reports, I’ve been importing all the supporting information into Scrivener. On several occasions, I’ve wanted to highlight PDFs within Scrivener.It’s very easy to do. In Scrivener, just click on the button indicated in the picture to launch the imported PDF in your default reader.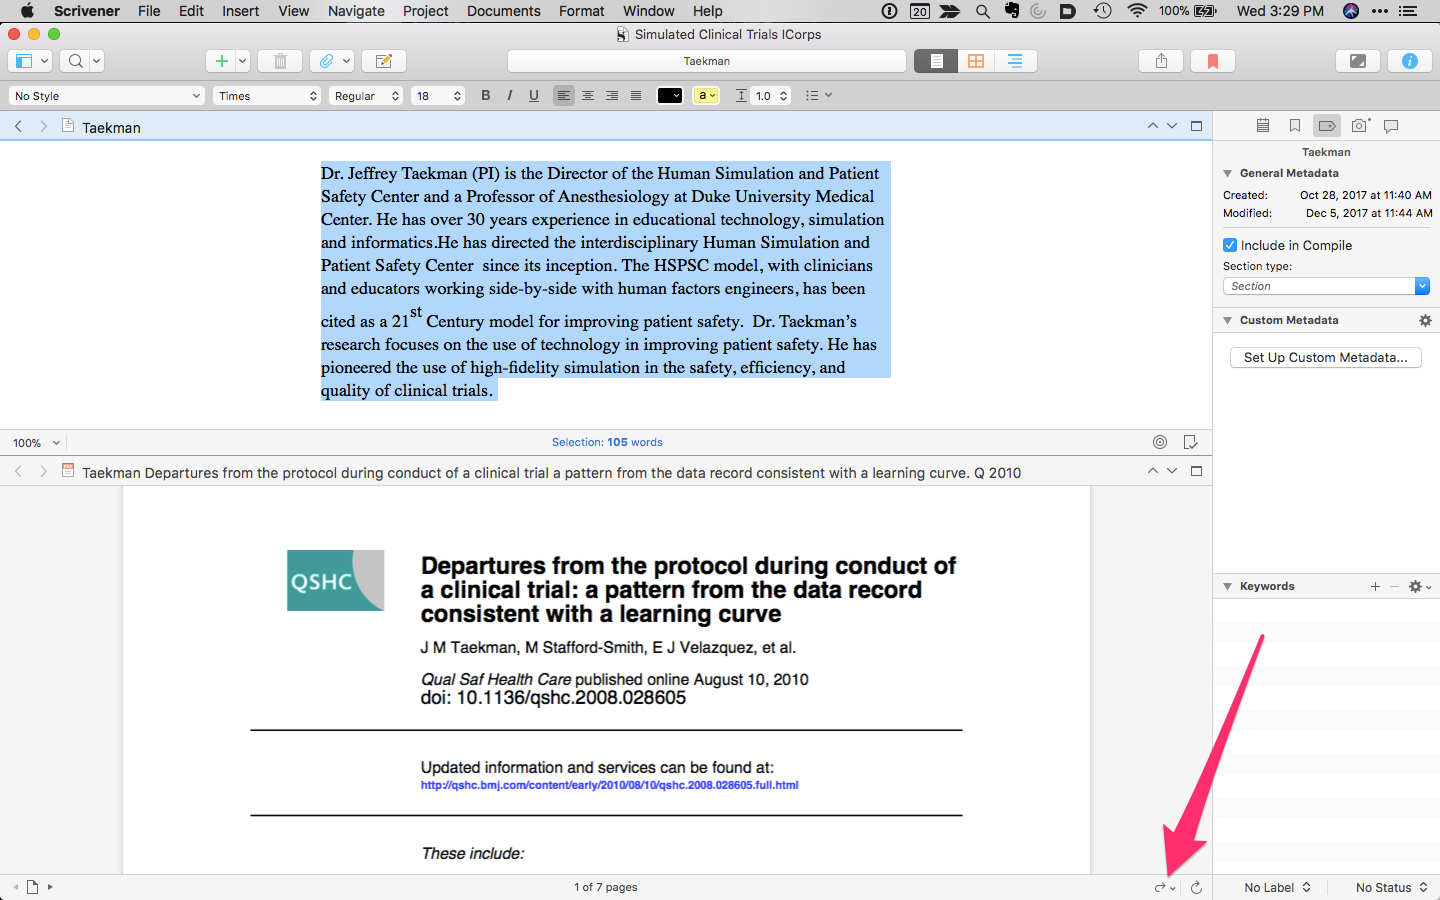 Holding the button down lets you select a different PDF Reader (and lets you choose to make it your default application). Any highlighting changes are saved back to the PDF in Scrivener. I've used this trick numerous times over the past few weeks. I hope you find it useful too.
Highlights.app Redux
I was too quick to judge the program Highlights. I gave Highlights a second chance, and although not perfect, the app is slowly winning me over. Highlights has greatly sped up the extraction of information from my reading.First a little background. I use Papers for my PDF and bibliographic management. I’ve written about how I extract highlights and annotations into individual files along with their relevant references. The reason to go to this trouble is to enable Devonthink’s artificial intelligence. The Devonthink AI uses word count to find related information in other files. I use this method extensively in my writing of grants and manuscripts. With my previous method, I found by adding references to each annotation (thus similar words) I was interfering with Devonthink’s ability to find relevant information. In order to improve Devonthink’s accuracy, I stopped adding references to each individual annotation. Instead, I merely include a Papers Link back to the original file.Highlights shows the annotations you make in the app's right-hand column. A pop-up interface within Highlights allows you to make comments, underline , change colors, etc. The killer feature of Highlights is single-command extraction of each annotation / comment to its own file. This feature allows me to extract highlights (and metadata) without having to invoke my Keyboard Maestro macros. When the data is extracted into Devonthink, the individual files are in Markdown. This makes the extracted information easy to view and edit.Although I’m more enthusiastic about Highlights, there are several quirks you should understand:
When Highlights explodes your annotations into individual files, it prepends the original file’s name. If you use Highlights from within Papers (e.g. selecting Highlights as your PDF reader of choice from within Papers) you will end up with a ridiculous, machine based title in your metadata. This is not Highlights fault. The use of non-intuitive file names is one of my pet peeves about Papers. The workaround is to export a copy of the PDF to your Desktop and then launch the exported file using Highlights. Using this method, the author’s name and the title of the manuscript along with the year of publication are all prepended to each markdown file.
After reading and highlighting, I edit the markdown headers in Highlights (choosing the edit tab in the annotations window). I erase all but the primary author’s name and then add the Paper’s Citation and a Papers Link back to original file (copied from Paper’s Edit Menu). There is another quirk here. In Highlights Edit Mode, if you don’t leave a space between the markdown coding and the information you add, your file will be reset back to its original state, erasing your modifications.
Highlights has the ability to automatically look up DOI numbers. When it works, it’s great. It takes a single click to import a reference from the bibliography into your Paper’s Database. Unfortunately, this feature is flaky, especially with longer manuscripts. I often have to revert to my Launchbar scripts to capture the bibliographic information I need.
Once I’ve added the metadata I want to the master annotation file (and collected the references of interest), from within Highlights, I choose Export >> Devonthink. Highlights creates individual markdown files for each of the annotations. Each individual file contains the master file’s metadata. The data is copied to my Devonthink Global Inbox. I move the folder from the Devonthink Inbox to my Desktop and from there to my Annotations Folder using Launchbar.Highlights has significantly sped up the time it takes to process a manuscript. Using this method, I’m also having greater success with the “See Also” feature of Devonthink. I hope it works for you too.
Sense-making of Academic Literature using Tinderbox

I began using a program called Tinderbox many years ago. Although I understood the program was very powerful, I never took the time to dig into its many features. Over the last six months I've been incorporating Tinderbox into my Writing and have been extremely impressed at the depth of features and the incredible capabilities it adds to my workflow.Don’t feel badly if you haven’t heard of Tinderbox—It's a bit hard to explain. One might call it a hypertext personal information management tool—but that description really doesn’t do it justice. If you’re interested and would like to orient yourself to what Tinderbox is, try this Macworld review of Tinderbox 5 (the current version is 7).An increasing amount of my time is now spent thinking about the rapidly evolving information on the human microbiome. I have read hundreds of papers in this domain, but, like most academicians, I struggle to keep track of the things I’ve Taken in, and how it connects to past and future information. I decided microbiome information was the perfect use case for Tinderbox and finally bit the bullet. To say I've been impressed would be an understatement.The first step was getting the abstracts and metadata from Papers into Tinderbox. I used Keyboard Maestro to build a script to automate the process. The script uses TextEdit to build a document that includes the title, authors, abstract, Pubmed link, Papers link, and Papers citation.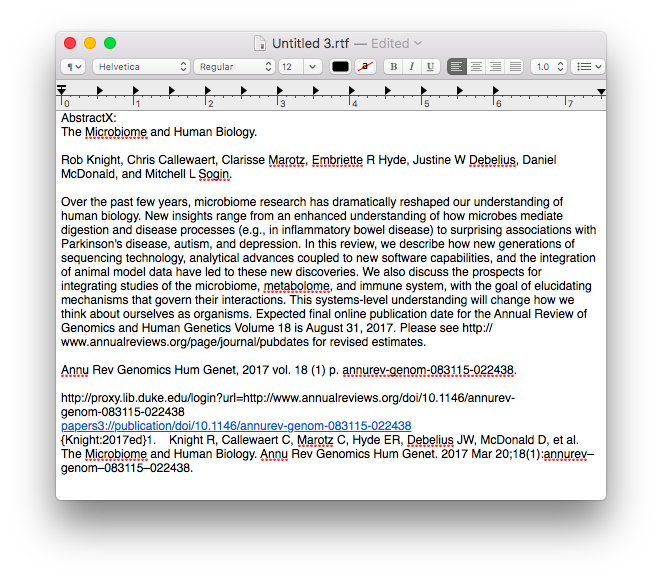 Once the information is assembled in Textedit, the whole note is copied to Tinderbox.
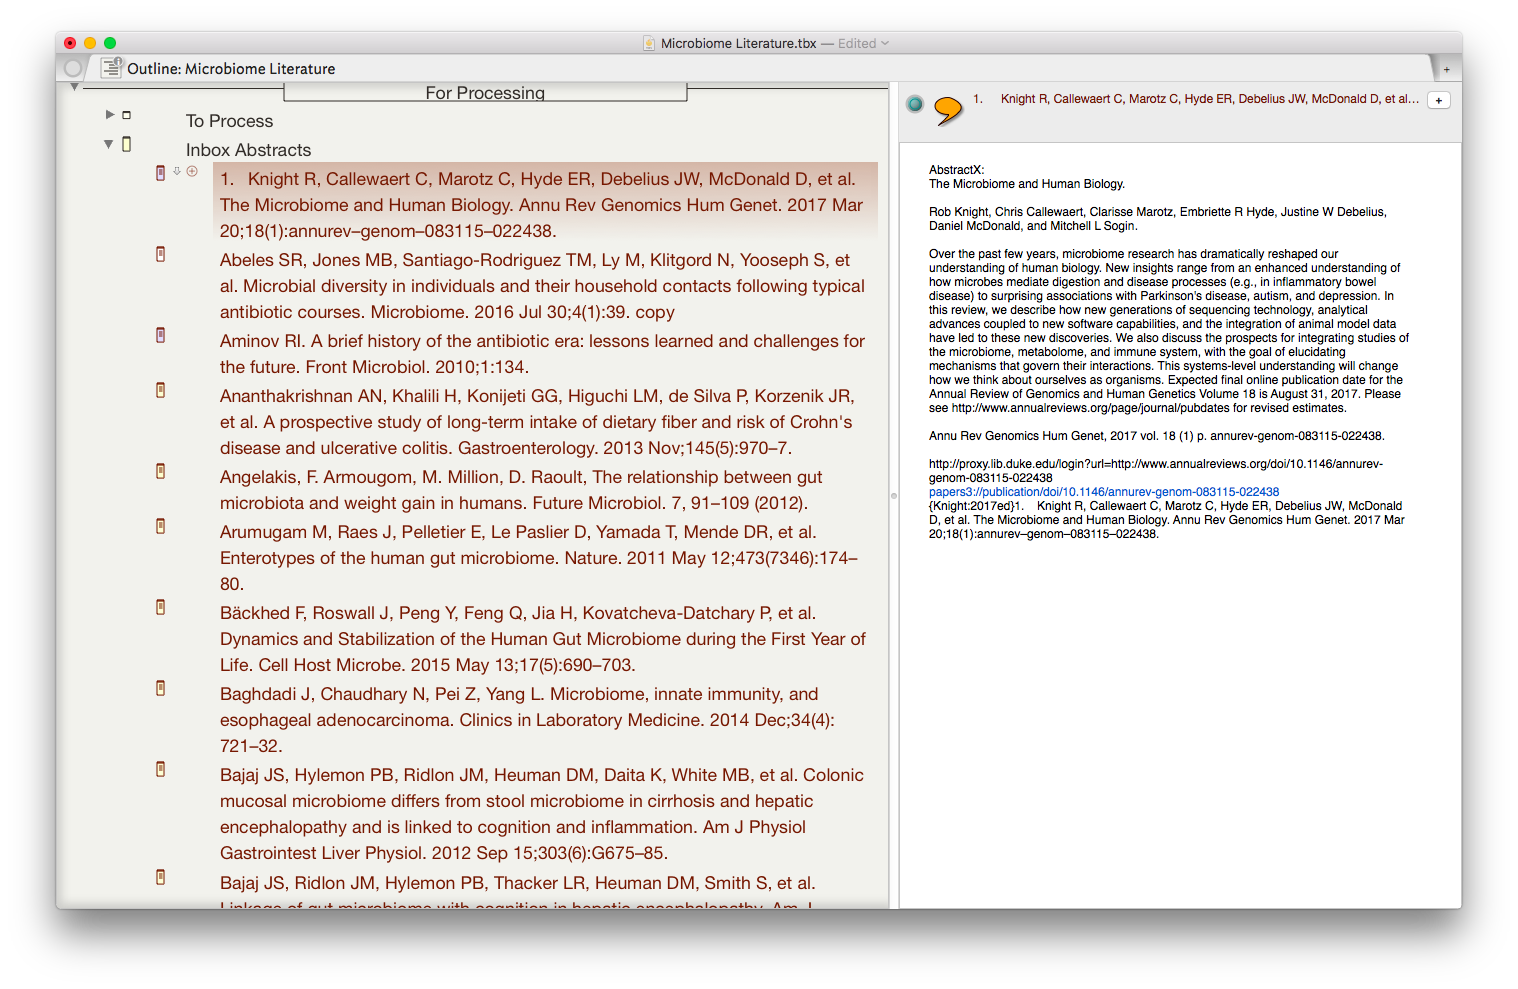 I then put together an assortment of agents that search across the entirety of the imported information and aggregate information similar information under a single heading.
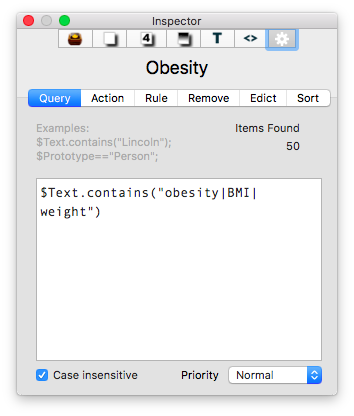
 The result is the ability to rapidly find related Information, in an organized fashion, on virtually any topic I’ve read. As I digest new information, I add the abstract and metadata to my Tinderbox Inbox and the agents do the rest—duplicating the abstract into the relevent topics throughout my outline.
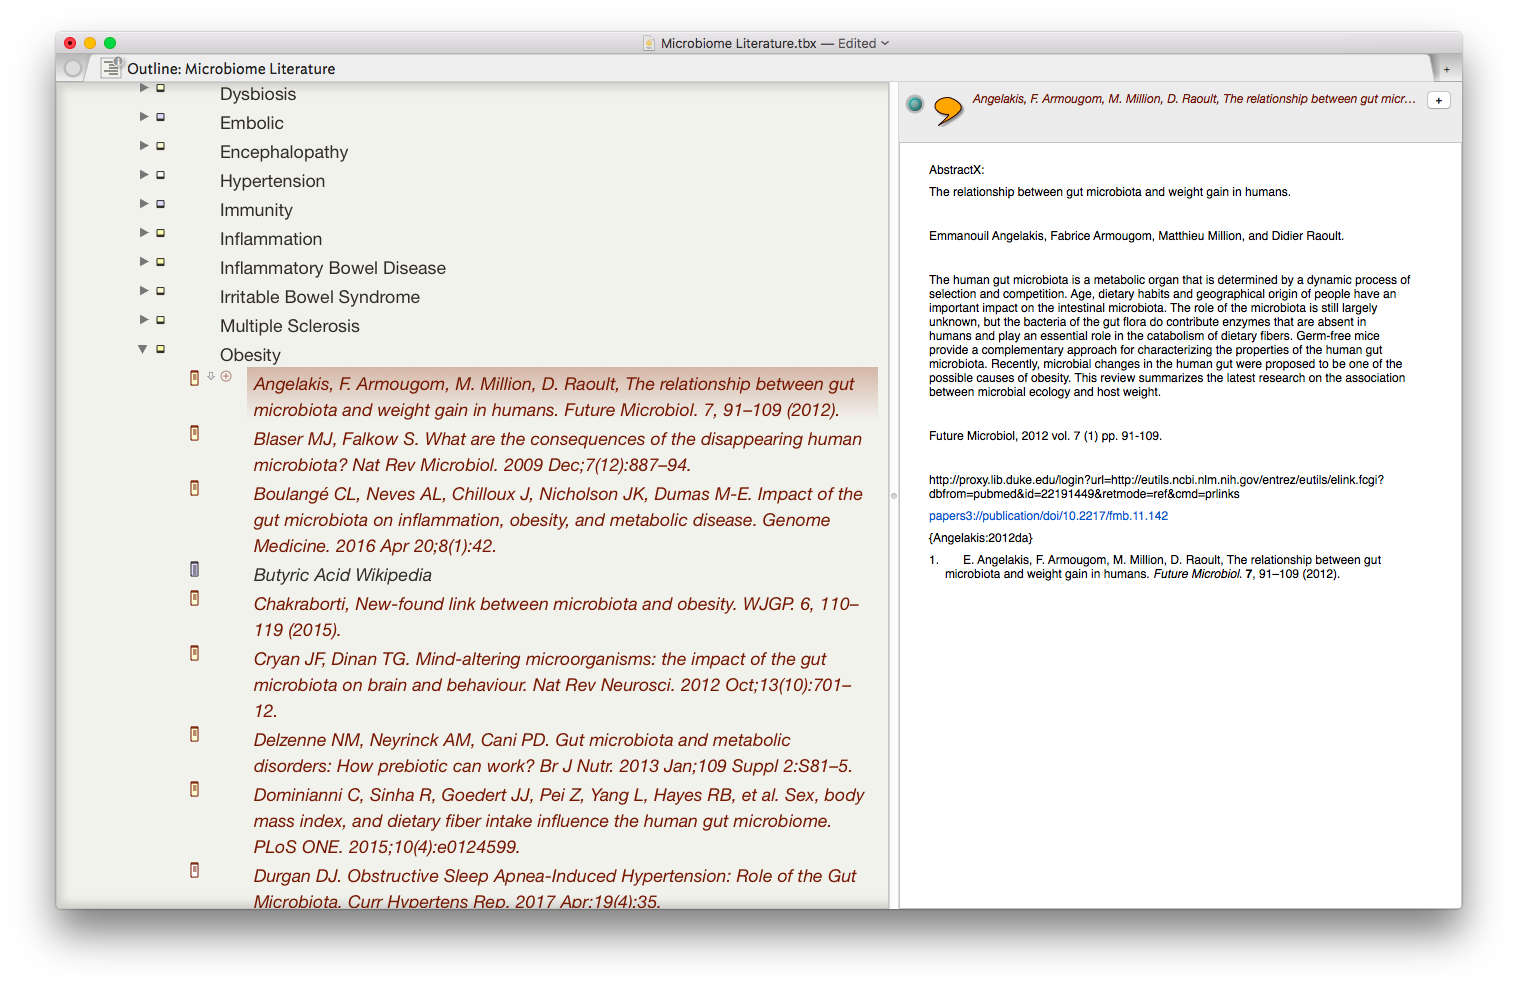 I have been using the collection of abstracts as the starting place for writing manuscripts and grants. Tinderbox can export Individual items, or the entire document outline as OPML—making it easy to import into OmniOutliner, or more commonly for me, Scrivener. I’ve found myself starting with Tinderbox, then making queries in Devonthink as the idea evolves.Although it has taken a significant amount of time inputting the abstracts into Tinderbox, I am already reaping rewards. It worked so well with the microbiome, I’m using the same method (and scripts) with each of the major areas of my academic life: simulation, integrative medicine, and the microbiome.Tinderbox has an incredible feature set, but it has a very steep learning curve. That is where the User Forums come in. There is an active and friendly group of Tinderbox experts more than willing to answer even the most basic question. I have found digging through both the new and old forums incredibly useful while learning to use this incredible piece of software.Although I spend the majority of my time in the outline mode, Tinderbox offers the opportunity to visualize information in a variety of different ways including basic maps, tree maps, and a whole host of other methods. These options add many other possibilities,. There are hundreds of features I have not covered in this entry but will in future entries. The program is so feature-rich, I've only begun to wrap my mind around the many ways Tinderbox can be used.A few caveats with my Keyboard Maestro script:
- The item you wish to extract must be highlighted within Papers
- TextEdit must be running.
- Keyboard Maestro is wonky when it comes to adding carriage returns—when typing the metadata I have to manually place carriage returns to separate information. I deliberately put a two second delay between each paste to give me time to press the return key.
- Do not interrupt the macro-interruption may result in data-overwrite or loss.
- The script gets the reference information from Papers—and prepends a “1. “ before the actual reference. This is both a bug and a feature—because of this, the new reference bubbles up to the top of the information (sorted by title name), but has to be manually removed.
Overall I have been incredibly impressed with Tinderbox and wished I had learned more about it years ago. My investment of time is already paying dividends. I’m currently using Tinderbox to draft a manuscript and a grant proposal. I will continue to blog about features as I learn more about the program. Enjoy.
New NIH Grant Requirements - Critical Evaluation of Existing Literature
For those of you that write NIH grants for a living, you are well aware of the changes required for new grant applications in 2016. In an effort to improve rigor and transparency as well as to increase reproducibility, The NIH now requires the grants to be written in a whole new way. A major part of these changes has to do with critical evaluation of existing literature.In light of these changes I have been formally appending my manuscripts a new way. In previous entries I’ve written how I take notes while reading, then extract these highlights and notes to their own individual files. Now, as I'm reading, I make and effort to record perceived strengths weaknesses of each study appending my comments with the text “StrengthX” or “WeaknessX.” I then extract each comment as its own text file. When writing grants or manuscripts, using Devonthink, I’m able to find similar notes to the one I’m reading. By appending StrengthX or WeaknessX, I’m able to single out my own comments instead of a seeing every instance of each word.In a future entry, I’ll talk more about the ways I’ve updated finding extracted information using Devonthink (and Tinderbox). A good portion of my writing workflow from 2015 has changed. I will write an updated writing workflow after the official release of Scrivener iOS.I'd be interested to hear how other academics are dealing with the changes at the NIH. Please leave a note in the comments below.
Retrieval, Annotation, and Capture of Highlights (2016)
I have a unique way of processing scholarly information, I am convinced it gives me an advantage when writing grants and manuscripts--allowing me to find specific notes and related information very quickly and efficiently without having to rely purely on memory. I’ve written a bit about this before, but the process has evolved, so I am dedicating an entry to my updated workflow. The software and utlities integral to this workflow are:
- Papers 3
- Keyboard Maestro
- Launchbar
- Ulysses (or any text editor)
- DropBox
- Devonthink
Highlighting in Papers 3Despite lacking the outstanding features of Skim, I am back to reading/highlighting in Papers. I switched back to Papers primarily for synchronization. I do a fair amount of reading on my iPad. Any highlights I make on my Mac become immediately available on iOS. Anyhing I highlight on my iPad shows up on my Mac. Although I prefer Skim, the simplification afforded by doing everything in Papers was irresistable. Here is the manuscript we’ll be working with, highlighted in Papers. Export NotesOnce I’m finished highlighting, it's time to process. Within Papers I go to File->Export->Notes and am provided with the following menu box. (1) I usually choose to save the file to my Desktop, as it needs to be easily accessible for processing. (2) I choose "Selected Papers Only" or you I export notes from my whole collection. (3) I choose Plain Text.
 First Stage of Processing the Untitled Notes File on DesktopHere is the untitled notes file saved to my desktop.
 Contents of the unprocessed notes File
 Keyboard Maestro Script to Add Citation + Link and Save FileI have written two Keyboard Maestro scripts to help process my exported notes. The first script adds metadata to the text of the notes file we just exported, then renames the file using the unique Papers Citation. In order to use my script, in Papers, I make sure the correct paper is highlighted. Next, in the Finder, I select the exported note file. I invoke the script and it prepends the unique Papers Citation followed by a Papers Link to the top of the file.
 Keyboard Maestro Script to Add Citation + Link and Save File ContinuedThe script continues on to a save dialogue box where it replaces "Untitled" with the unique Papers Citation. I have to manually remove the curly brackets (as they are disallowed in file naming). I save the file to the Desktop.Download the script here…. You'll have to remove the .txt from the end of the file to use.
 Uniquely named Notes File Saved to Desktop.This note I just saved contains ALL of the exported highlights from the manuscript in a single file. As I've talked about in previous entries, I find it more efficient to access a single concept rather than having to dig through an entire papers worth of notes. I developed (along with a few others) a second KM script that copies the Metadata at the top of the note file, parses the single note file into a collection of notes files--one highlight per file, and appends the metadata to each file.Processing highlights in this way has revolutionized my grant and manuscript writing efficiency.Keyboard Maestro Script to Parse Highlights and Append metadata to each note
 Download the script here…. You'll have to remove the .txt from the end of the file to use.Moving the FolderI highlight the folder on my Desktop, then double click my Shift Key--this invokes a Launchbar action.
 Launchbar Moves FolderUsing Launchbar I move the text notes to the folder where I keep all the extracted highlights from all the manuscripts I'v read.
 Ulysses to finish the processAs I've mentioned previously, i use Ulysses extensively in my personal and professional life. I use Ulysses to finish the processing of my highlights, but any text editor will do. (1) Ulysses is pointed to read all the files in my Notes folder--here you see all the individual files extracted from this manuscript. (2) is the text of a single highlight, (3) is the metada added to each file by the KM script. With some notes I will add my own comments, other times, not. (4) are the references that support the statement....these are added manually by reading through the statement and copying each of the corresponding references from the original PDF. I don't go back and forth between the text file and the PDF...instead, I take advantage of Launchbar's Clipboard History.
 Launchbar Clipboard HistoryI merely highlight each reference mentioned, then in bulk I paste each of the references into the note.
 Appearance of NoteI showed you what this file looked like in Ulysses. Here is its appearance as a free standing text file. Depending on my mood (and time) I may or may not append refernces to each note file.
 Copy PDF to Indexed FolderAfter I've processed everything, the last step is to export a copy of my PDF to a location Devonthink can access.
 Using Devonthink to Find Concepts and Related InformationYou may aak yourself why I go to such lengths processing the information I read. The answer is Devonthink. I use the "Artificial Intelligence" of Devonthink quite extensively in my writing. As I mentioned, all the processed highlights, copies of PDFs go into a set of folders on Dropbox. I then Index (not import) the information in these folders (1) so they are "seen" by Devonthink. Why is that important? When I conduct a search (2), I can find the idea I'm looking for (3). By clicking on the "See also" function (4) in Devonthink I can see every piece of related information in my scholarly library (5), including things I have previously written. This ability has revolutionized the way I write.
 ConclusionIn this entry, I have shown you how I read and process scholarly my annotations from manuscripts. Although the process requires an extra ten minutes or so per manuscript, the payoff is immense.Please comment below.
Taekman Writing Workflow 2015
The early release of Papers 3 got a bad rap, and rightly so. My negative experience began as I imported my Papers 2 library into Papers 3. I had about 2500 papers, but only a fraction of these PDFs were imported properly. I am still recovering from these import problems--having to add each missing PDF by hand. Although importing was a issue early on, The makers of Papers, MekentosJ, now part of Springer Science+Business Media, worked hard to fix problems. I assume, with all the work on Papers, that importing has been fixed. My advice? Back-up your data before trying to import to Papers 3!
Although I had early problems, I can tell you that Papers 3 is pretty robust now. I recently used it to write and submit a full grant. I’ll say the app should be strongly considered if you’re looking for a reference manager / bibliography builder. If you’re interested in some of the changes in Papers 3, check out this entry.
With the release of Papers 3, all files and PDFs are bundled into a single container. Bundling makes syncing across computers more reliable, but indexing of individual files much more difficult. Unfortunatly, my Papers 2 workflow was dependent on indexing of single files. And thus, with the release of Papers 3, I had to revamp my writing workflow. That’s what I’m going to cover in this entry.
My current workflow has three parts: 1.organizing, 2. creating, and 3. writing/formatting
The software I use includes:
Papers3
DropBox
Hazel
Skim
Keyboard Maestro
Ulysses
Devonthink
Tinderbox
OmniOutliner
Scrivener
Pages or Word
Part 1: Organizing
Papers 3
Papers is used as my storehouse for all academic literature. I use Keywords and Smart Folders (akin to Smart Playlists in iTunes) to keep my literature sorted. In addition to the topic of each manuscript or book chapter, I use keywords such as "MustRead" that fuel my prioritized reading list. I tend to keep my library sorted by the date in the main window, but can easily search or sort my library in numerous other ways. My library is synchronized using Dropbox.
KeyBoard Maestro
Most people, while reading academic literature, find additional manuscripts they’d like to download. I’ve developed a series of KeyBoard Maestro scripts that simplify the download of these additional articles from Duke’s Library, Pubmed, and Google Scholar. As I’m reading a manuscript, I highlight the article I want to download and invoke my KM script. The macro copies the text string I’ve highlighted, goes to the appropriate web page (e.g. Duke’s Library), pastes the search string into the appropriate box, and hits submit. Thus with two keystrokes, I can find and download new PDFs I’d like to read. The new PDFs are sent to my “Downloads” folder. Then Hazel takes over.
Hazel
Hazel is a program that watches folders on my computer. When a file matches defined criteria, Hazel performs a script. I have a Hazel script watch for PDFs that contain the word “Reference.” When Hazel sees a file that matches, it launches Papers and imports the file into my library.
Skim
Despite the pleasing new main interface, Papers 3 highlighting leaves much to be desired. For reading and annotating scientific literature I use Skim (Skim can designated as the primary PDF reader in the Papers Prefernce menu). Skim has a robust feature set and is customized for academic literature. Oh, and it’s free! When I’m done reading and annotating, I export the Skim annotations to a PlainText file. I then use a KM script to name the the Skim Notes file to my convention.
Using another KM script, I parse the single notes file into separate text files (one for each highlight or annotation). Each file is named to convention and contains the text I highlighted in the manuscript, my own comments, and the full reference. All the individual notes are aggragated into a folder. I move this folder from my Desktop to the cloud so I can access it from anywhere. I call this my Literature Comments Folder. Now I move to Ulysses.
Ulysses
Ulysses is able to read files anywhere on my computer. I’ve configured Ulysses to point to my Literature Comments Folder so all my comments are available in an organized fashion. At this point I can add additional comments to my individual highlight files. The next step is to index the files in Devonthink.
Devonthink
Finally, I open Devonthink. This workflow has matured from what I discussed in this entry. I have a database that is solely used to index my scholarly reading. From the File Menu, I update the index (NOT import) of my Literature Comments Folder. Indexing this folder allows me to take advantage of the “Artificial Intelligence” of Devonthink, finding relevant information throughout my reading.
Part 2: Creating
Tinderbox
At this point I’m ready to start developing my scholarly work. I use Tinderbox (in Outline View) to generate a high-level preliminary outline. Tinderbox is a power-user’s application. I’ve only scratched the surface of its capabilities, but find it extremely useful early on to organize thoughts and find connections between what I’ve read and what I hope to write.
From within Devonthink, I review each of my comments. If I find something I want to include, I drag and drop the file (comment, reference, and highlighted text) into Tinderbox. Then, using Devonthink’s “See Also & Classify” command, I see related notes in my Literature Comments Folder . I drag and drop the additional comments into Tinderbox too. As I think of new ideas, it’s not uncommon for me to conduct a freeform search from within Devonthink to see which comments bubble to the top.
Once I have several dozen comments in Tinderbox, I find myself entertaining new thoughts, and often adjusting (or add to) my outline.
Another way I approach the creative process is to surf through interesting comments and move them one by one into Tinderbox without organizing them (usually in the Map View). Once I have a few dozen of these interesting quotes and highlights, I start to see connections between them, letting me further refine and organize my thoughts (and begin to develop and outline).
Once I’m satisfied with my outline, I’ll sometimes export to OmniOutliner for additional organization. But most times, I’ll export my outline directly from Tinderbox to Scrivener.
Part 3: Writing and Formatting
Scrivener
Scrivener is the place where the early versions of my manuscript are built. Scrivener imports OPML files from Tinderbox or OmniOutliner—each bullet of the outline gets its own content field. I do the majority of my early writing in Scrivener, attacking whatever section I feel like writing at the time. I use the Magic Citations of Papers 3 to insert my references as I write. Once I get words down on the screen, I often find myself tweaking the outline in Scrivener. This early phase, when I’m writing on the go, is when I yearn for the iPad version of Scrivener. Until that’s available, I’ll continue to use Scrivener’s synchronization with SimpleNote when I plan to write on my iPad.
When I’ve completed all the sections in my Scrivener outline, I’ll export everything I’ve written to Ulysses. I use Ulysses to edit and rewrite (in Markdown) until I think the work is ready for submission. As I’m importing and editing my paper in Ulysses, I make sure to have the document type set to Markdown (not MarkdownXL). MarkdownXL uses the curly brackets as an internal mark for annotations. If I use MarkdownXL in Ulysses, all of my Papers citations are formatted as footnotes—very annoying.
Word or Pages
I write and edit for several rounds in Ulysses. Ulysses for iPad makes this process more seamless and enjoyable. Unfortunately, when I’m done writing, I cannot format my bibliography in Ulysses. I have to export my file to Word or Pages. That’s okay though, I still have to format my paper. I use an old version of Pages (the new version of Pages still doesn’t allow bibliography formatting). Microsoft Word also works. To do this, I highlight all my text and from the Ulysses Edit Menu I select Copy as RTF (Word), then paste it in the word processing application. After my bibliography is formatted, I format the rest of the paper.
Finally, as the final check of my writing, I use a KM script to read back the text to me. I often find errors, even in this late phase of writing. Finally, I double check everything conforms to required format of the journal (or funding agency) and hit submit.
And there you have it: my writing workflow. As with most of my workflows it is continuously subject to improvement. For the time being this workflow has streamlined my writing. I hope it works for you too.
My Move to Papers 3 (End of Endnote Redux)
I was a big fan of Papers 2 as my manuscript and citation management software. After reading the early reviews of Papers 3, I was hesitant to upgrade and trepidatious about the future of the software. I went back and took another look at Sente, Mendeley, Endnote, and Zotero. In the end, I decided to stick with Papers.
Fortunately for me, despite the rocky start, the folks at Mekentosj have continued to work on Papers 3. About a month ago, I decided to make the transition from Papers 2 to Papers 3. This was not an easy decision, as changes in Papers 3 have forced me to revise major portions of my writing workflow. Although the transition was painful, I’m convinced what I have now is more robust and flexible than my previous system.
Over the next few weeks, I’ll write about my transition to Papers 3 (both Mac and iOS). I’ll cover the Papers 3 new interface, how I continue to leverage my Papers 2 data (despite the interface and data storage changes), and how I continue to integrate Papers 3 with Devonthink.
I hope you find my experience useful.
Meeting Workflows: Processing Meeting Notes and Discovering Linkages
It was a great deal of fun to join my friends, David Sparks - MacSparky, Katie Floyd, and Brett Terpstra (hosted by Dan Miller) on stage at MacWorld Live to discuss my Meeting Workflow. The session was webcast live from the MacWorld site. Following the session, I received many questions as to how I process my notes once they’ve been collected. Here is what I do…..
As I mentioned, I write and capture all my notes in Plaintext (using Drafts on my iPad and iPhone and nvALT on my Mac). I covered the way I capture ideas (IdeaX) using TextExpander. I use a similar method for capturing meeting notes (MeetX), chunks of writing (ScribbleX), quotations (QuoteX), and random thoughts (ThoughtX). Using Simplenote Notesy, I’m able to keep my notes on my iPad and iPhone in sync with my Mac. A single folder indexed by nvALT serves as the repository for everything, regardless of their content. In a pinch, I can search my notes on my iPad or iPhone using SimpleNote Notesy, but the true power of this workflow is realized when I return to my Mac.
I have alluded to my love of Devonthink Pro Office. I’m especially fond of DT's ability to find related notes using its artificial intelligence. For the purpose of this workflow, I have a single database that indexes three things: (1) my collection of manuscripts (from Papers2), (2) my web clippings, and (3) my nvALT notes. My web clippings are added directly to my DT database, but my Papers folder and nvALT folder are INDEXED, not imported into the same database. Indexing in DT is done by choosing File:Index… and navigating to the folder of interest on your computer (this is only during the initial set-up). You will have to manually update the index your folders each time you add new information. This is quick and simple– done by choosing the appropriate folder in DT and choosing File:Update Indexed Items.
When I’m writing (or searching for information), I can select a particular note and find all related information in my library-whether it’s a scholarly article, a newspaper clipping, a web site, or a note I’ve taken. Often times, DT finds linkages for me that weren’t readily apparent. This speeds my writing process immensely and makes me look like a magician to my peers. I hope it works for you too.
Appended March 2, 2013: Read this entry on why I switched from SimpleNote to Notesy.
Writing Workflows: Processing Annotations (All Roads Lead to Skim)
One of the great things about the internet is its ability to enable collaboration--workflows are never static, each of us builds on the work of others to enhance our own productivity. After my last post, Writing Workflows: Capturing Annotations to Enhance Scientific Writing and Knowledge Retrieval, I received a boat-load of comments, suggestions, and links. Thanks!I suggest you take a look at an entry in Aleh Cherp's excellent Macademic blog. In a recent entry, a guest author discussed limitations with the built-in annotation tools of Papers, Sente, and Mendelay. His preference for annotating manuscripts is the open-source Skim. I've been playing with Skim recently (especially some of the post-annotation processing tools). I used Skim in the past, but curtailed my use in order to simplify my workflow (doing everything within Papers2). Despite the rich annotation tools in Skim, I set it aside because of the extra steps needed to make Skim highlights visible in Papers (and visa versa).As pointed out in the comments section of my last entry, the Achilles Heel of my annotation workflow is the need to separate my highlights / notes file by hand (Papers puts out a single aggregate file with all highlights and notes batched together). Although there are scripts available to send Papers2 notes to DevonThink Pro, I could never get them to work properly. I'm experimenting with a modification to my previous workflow--one that will significantly speed up the process:
- I highlight and make notes in Papers2 on my Mac or iPad as I discussed in my last entry.
- When I've finished annotating, I make sure the most current version of the paper is synchronized back to my Mac. I then "Export PDF File and Media" from the File Menu in Papers2 and save to a convenient location (I use my Desktop).
- I then open the document saved to the Desktop in Skim and choose "Convert Notes" from the File Menu in Skim (this results in all the embedded notes being converted to Skim Notes).
- I open and select the "Inbox" of my Literature Database in Devonthink (this is the location the script will save my comments).
- With Skim still open, I run the following SKIM PDF Notes to DEVONthink script I downloaded here.
- I return to my Inbox in Devonthink where I now have individual RTFs for each highlight or note.
- I insert my own comments (if I have any) in each RTF file and save each file. I ignore the link the script generates.
- If I have a comment I plan to cut and paste directly into a future project, I append my comment with the Papers Citation Index.
- In DevonThink, I highlight then drag and drop all the RTFs (but not the duplicate PDF of the paper) to the "Supplemental" Tab of the manuscript in Papers (this copies each RTF into the Paper folder hierarchy).
- Finally, in Devonthink, I Index (the first time) or Update the Index (all subsequent times) - NOT IMPORT - the folder.
The SKIM PDF Notes to DEVONthink script saves me quite a bit of time--I no longer have to parse my comments by hand. Happy writing!
Writing Workflows: Capturing Annotations to Enhance Scientific Writing and Knowledge Retrieval
As I mentioned in a previous post, reading and writing are central to my academic career. I am a voracious reader. I not only have to keep current in my clinical specialty, Anesthesiology, but also in my research areas, Simulation and Games Based Learning. Because of this, I’ve developed multiple workflows that make reading and annotating more enjoyable, efficient, and useful.I’ve mentioned my preference for Papers2 app to keep track of scientific publications. What I didn’t mention is that I’m a prodigious highlighter-it is not uncommon for me to mark up a single manuscript with dozens of highlights and notes. Keeping track of the information in manuscripts AND my thoughts about what I read used to be a real chore. Before Papers included highlighting, I had a complex workflow to accomplish this feat. Now it’s relatively simple.As I mentioned, when working with scientific literature, I like to batch operations. I go on paper collecting binges where I do little (if any) reading. Only after I’ve completed my collecting, is it time to read. I actually schedule time on my calendar to read, annotate, and synthesize ideas.This entry is about my annotation workflow–and how I use technology to speed up the process of retrieving concepts when writing and citing.I do most of my reading (and annotating) on one of two devices: my Mac or my iPad. I read so much, it’s hard to keep track of all the ideas. There are few things more frustrating than knowing I’ve read something, but being unable to find the source. This workflow alleviates the stress of finding relevant information in my library. But even more than that, using artificial intelligence in a tool called Devonthink, I can find links between concepts that were not initially apparent to me.This workflow has been a personal success. Before implementing this workflow, I could spend hours trying to track down an appropriate reference. Since implementing this workflow the same task takes seconds.I also wanted to thank Derek Van Ittersum (Kent State | blog) for inspiring me to polish this workflow–I had a chance to collaborate with Derek on the Mac Power Users 100 show.Programs needed:
- Papers2 Mac
- Papers2 iOS
- DropBox Mac
- DropBox iPad
- Devonthink Pro Office Mac
- Scrivener Mac
- Tinderbox Mac
- Scapple Mac
Setting Things Up
I’m assuming you’ve already installed DropBox on both your Mac and you iPad. As I discussed in a previous entry, I configure Papers save PDFs to a designated folder Dropbox. I set this up by navigating to the preference menu in Papers and designated my preferred folder you in Dropbox. I do this to have the PDFs in my Papers collection accessible from anywhere and by any tool. Within the Papers preferences, I’ve configured Papers to launch a PDF in a new tab (using Papers itself, NOT an external PDF reader).
Annotating
Papers on the Mac and iPad have built in highlighting tools (on the Mac, invoked by hitting the control key over highlighted text, or on the iPad by holding a finger down and dragging). As I highlight or make notes in Papers , a separate layer is created in the PDF that keeps track of annotation information. As I annotate, each highlight and note appears under the “Notes” tab in Papers. If I find a paper I’d like to read that’s not in my library I copy and paste the title and author to my OmniFocus Inbox-to be gathered during a future collecting binge. This way I don’t interrupt what I’m doing.After I’m done highlighting and note taking, I write a single summary note that captures the essence of the paper. At this point I also tag the paper Papers Keywords. Once I’ve completed my summary, if I’ve been reading on my iPad, I synchronize the PDF back to Papers on my Mac. After syncing, the annotations I made on the iPad are available on the Mac (and visa versa). If I’ve been reading on my Mac, I don’t need to synchronize to perform the next step.Once the annotated PDF is in the Papers collection on my Mac, I go to File:Export:Notes within Papers (make sure the “export selected paper” is highlighted and RTF is selected) to export a Notes file to a folder on my Desktop. RTF format is important–Devonthink relies on it.
 A limitation of Papers is that it can’t export each note or highlight separately–it dumps all my annotations into a single file. I open the file and cut and paste each individual note (that represents a single highlight) into its own file. I then comment on the highlighted passage. Finally, I use the “Magic Manuscript” feature of Papers (invoked by hitting my Option Key twice) to append the citation reference to each statement.
 Finally, I drag each RTF into to the “Supplemental Files” tab of the Papers. This saves each comment in a supplemental folder residing side-by-side with the manuscript in the Papers Dropbox hierarchy.
 The next step of the workflow uses the “Indexing” feature of Devonthink Pro Office. Using Devonthink, it is possible to index (or reference) any folder on your hard drive. This makes the contents of PDFs and RTFs available to Devonthinks Artificial Intelligence without directly importing the information into a Devonthink Database.I created a Devonthink Literature Database that indexes (does not import) my Papers2 Folder. I did this the first time by opening the File:Index… Menu item in Devonthink and navigating to the Papers Folder in Dropbox. All subsequent updates are done by opening my Literature Database, highlighting the indexed “Papers2” Folder, and navigating to File:Update Indexed Items. Indexing can takes quite some time–be patient.
 This all sounds complicated, but trust me, it’s worth it. What this allows me to do is open Devonthink and find any statement, concept, or related item quickly. I can then cherry pick comments related to my search and paste them into a draft document with little modification.When I’m writing, I take all related concepts and paste all of them into a single card in Scrivener. This allows me to arrange, and rearrange information to help support my argument. Because I took the time up front to include the Magic Manuscript Index from Papers, no further searching or citation work is needed, until I’m ready to format my bibliography.Scrivener for iOS is under development–it is likely my workflow will change when it is released. Instead of using Scrivener, one might consider using Tinderbox –Derek’s tool of choice or the newly announced Scapple (by the makers of Scrivener). I will cover the next step of the writing process using these tools in an upcoming entry.
Closing
In this entry I’ve covered my annotation workflow and how I make use of my annotations when writing. Using Dropbox, I can access my highlighted manuscripts from anywhere. Using a combination of Papers and Devonthink I can make use of my annotations saving me countless hours of time when writing.