
Being a physician means a commitment to lifelong learning. In a busy clinical practice, two-thirds of clinical encounters generate at least one clinical question. In an average day the typical physician has at least 11 unanswered clinical questions. Only 40% of those questions ever get answered. Most of the questions are forgotten in the hustle and bustle of clinical care.In an attempt to improve my ability to capture (and answer) these questions, I've developed a new script for Drafts. This script uses the same concept as the technique I've mentioned to capture ideas, quotes, etc. This particular script saves information to Evernote but you could use Ulysses, DayOne, Wunderlist, or any other app you can program with an action. I chose Evernote since Evernote has the ability to find related notes anywhere in my collection. When researcing answers my question I capture those to Evernote as well-linking the question and answers in my Evernote database in perpetuity. Since Evernote is ubiquitous, the answer is available on my computer iPhone, and iPad.Here is how I approached this. First, I set up a new notebook in Evernote. I called this notebook "Clinical Questions." I then developed the following script in Drafts. Using this script it is now possible for me to quickly capture questions investigate later. I merely open Drafts and type or dictate my question, then hit the script. The question is logged to my Clinical Questions Notebook (along with date and prepended with tag ClinicalQuestionX).I’ve found myself using this script many times each day. I hope it helps you as well.Stats found on UptoDate: http://goo.gl/BDBqmH
Ulysses Now Publishes Directly to Wordpress
Ulysses just keeps getting better. With the latest Ulysses release, you can publish directly to Wordpress (either wordpress.com or your own custom Wordpress site).
Scrivener iOS coming on July 20!
I have been quite impressed with the Scriver iOS Beta--it's capabilities far exceeded my expectations both on my iPhone and iPad. It has already simplified my Writing Workflow. I'm not alone in my exuberance. Check out this glowing review. The wait for The official release is almost over....the official date Is July 20 at a price of $19.99. There will be a simultaneous release of a new version of Scrivener for Mac.
Using Skitch and Papers to Capture Figures and Tables
Few would argue that the most important point of a scholarly manuscript is made in its figures and tables. I am going to share with you how I capture figures while reading scholarly information on my Mac. This workflow uses:SkitchPapersInstall Skitch and make sure, in Skitch Preferences, to enable the “keep Skitch Helper running in background when I quit,” and “Start Skitch Helper when I log in to my computer.” As I’m reading scholarly literature and come across a table or figure I want to save I do the following. I make the figure as big as possible on my screen. Then, from the Skitch menu in my menubar, I select the Crosshair Snapshot. I then select the figure (and sometimes the caption) trying to balance the white space surrounding the figure.Next, I go to Papers, select the reference in my Papers Library, and then from the Edit Menu:Copy As:Reference.I return to Skitch and double-click at the bottom of the figure then paste the reference text. I then balance the text. The height of the Skitch figure will expand to accomodate the new text.
 When I want to refer to or use the table or figure I view it directly in Skitch or find it in Evernote. Using this method, I can also search for words in the reference (e.g. the author’s name or the title of the manuscript) and sometimes even the words in the figure itself.If I want to use the figure in a presentation or to send it to a colleague or trainee I can export the figure from the Skitch File Menu.Using this method I’ve captured hundreds of figures. I hope this workflow helps you too.
Macsparky Video Field Guide on Hazel 4
My friend David Sparks has released a new video field guide--this time on Hazel. In true Macsparky fashion, he's delivered yet another outstanding resource. Even though I'm a seasoned Hazel user, I learned quite a few new tips and tricks--especially pertaining to the recently released Hazel 4. Pick up your copy of this and other excellent resources on the Macsparky website...and Hazel-on!
Lifehacker Review of Ulysses.app
Thorin Klosowski wrote a great review of Ulysses App on Lifehacker. Check it out.
My OmniFocus Set-up (Part 2)
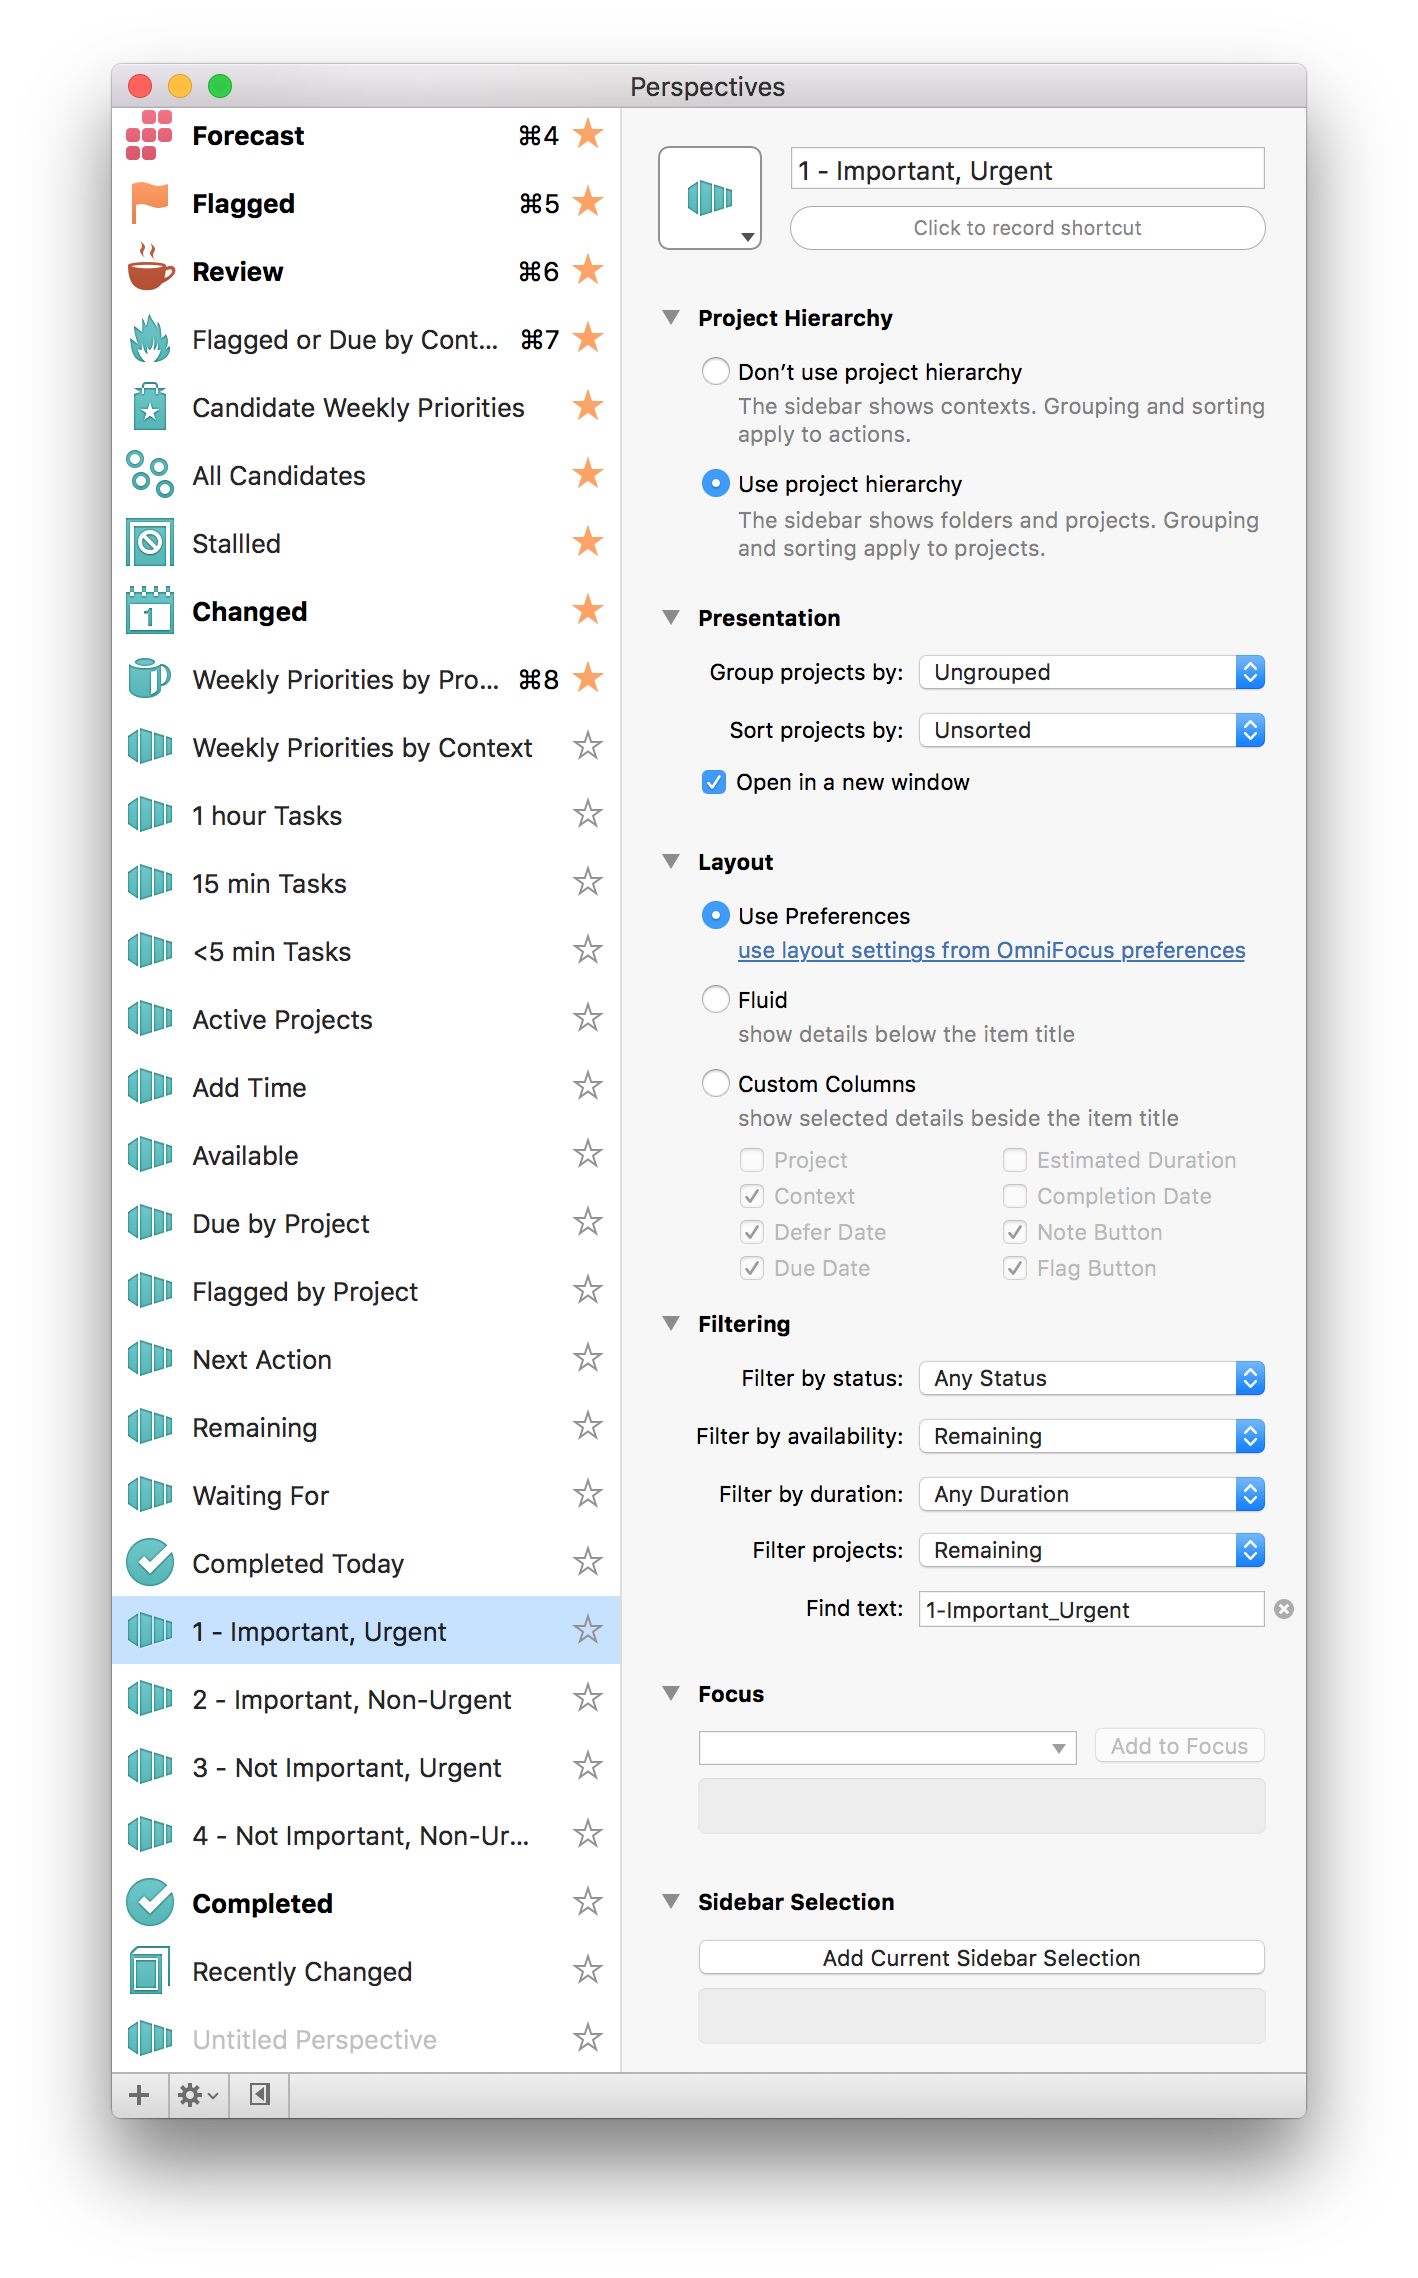
As i've mentioned numerous times before, I'm a huge fan of OmniFocus. In my last entry on OmniFocus, I offered a peek into the way I organize my folders. If you haven't read that post, please do so now. In this entry, I’ll answer some of the questions about triaging, prioritizing, and adding time to actions.Weekly ReviewI am not strictly adherent to GTD methodology, but I do use many of the practices. My practice includes both daily and weekly reviews. My weekly review normally takes about an hour. During the hour, I review existing projects and actions, clean up remaining items in my Inbox, and set up new projects. I look at each new and existing project through two main lenses—a hard due date (e.g. tax filing-Covey Quadrant 1-CQ1), and the strategic importance of the project to my personal or professional life (Covey Quadrant 2-CQ2).As you saw in my last entry, all my projects are organized into folders by my personal and professional roles. During my weekly review I decide on the CQ1 and CQ2 projects with greatest strategic value, or with the most urgent deadlines. These are the projects that go into my “Weekly Priorities” Folder. My next most important strategic projects go into my “On-Deck” Folder. I try to have no more than three projects in each the weekly priority and the on deck folders. Those projects that are lower priority at the end of the week, but still active, go back into my personal or professional “Role” Folders. I spend about 80% of my time working on items in my Weekly Priority and On Deck folders. I have a custom perspective that filters all my projects down to my priorities grouped by project or context.
 Another perspective shows all my flagged or due items even if they are not in my Weekly Priority or On Deck Folder.
 As I add new projects, or make new projects from items in my Inbox, I am cognizant of any hard EXTERNAL deadline—only items with EXTERNAL deadlines get a due date. I have a custom perspective that shows all due or flagged items regardless of whether they are in my priorities folder. This bubbles up items that are due allows me to stay on top of deadlines regardless of whether the item is strategic or not.The last part of my weekly review strays from GTD methodology—I try to roughly plot out my week, placing actions from my highest priority projects in my calendar. I try to leave free time to allow for interruptions and other inevitable delays.I’ve found time-based perspectives to be helpful in two ways…during my weekly review , when I am trying to sketch out my week, or on-the-fly when I have unexpected time (e.g. a meeting that finished early). When defining the time for actions, I try to keep each to an hour or less. If an action item looks like it will take longer than an hour, I break it down further.My weekly review is complete after I’ve sketched out my week in my calendar. Although having a plan is great, I don’t get stressed when things change. I often need to adjust my plan. This takes place in my Daily Review.Daily ReviewEach day I open OF next to my calendar and review my achievements of the day. I like to record my my major achievements (e.g. completion of a major project) in a journal app (I use Day One). Often, during my daily review, I need to adjust my plans for the upcoming day. I have a perspective actions associated only with my highest priority items. I look at this list first. Next, I look at a complementary perspective that shows me my entire list of actions, grouped by context. Anything that I have not formally placed in my calendar, but want to achieve on a particular day gets flagged in OF. When I get to the office, I use my my “Flagged or Due by Context” Perspective constantly.I hope it's helpful to see how I'm using OF.I'd love to hear what you think...and would love hear the ways you use the software in your life.Addendum:In response to Owen's request....
Warp Speed Sound Generator
I grew up reading science fiction. Maybe that's why I find the Warp Speed Sound Generator irresistible.....
Scrivener iOS: From Alpha to Beta
It looks like our long wait may be over. A post on the Literature and Latte blog this week said the iOS version of Scrivener will move from in-house Alpha testing to wider spread Beta testing. From the article, looks like they will choose a small number of primary Beta testers to kick the tires....once the egregious bugs have been found they will move to more wide-spread testing. Regardless, I can hardly wait. Scrivener iOS is going to simplify my writing workflow quite significantly.
The World's Most Dangerous Writing App
I’ve read plenty on writing. Most resources suggest, when writing a first draft, you simply write whatever comes to mind—writing the whole first draft in one long stream of conciousness. Yesterday, I read a Wired article about The Most Dangerous Writing App, a web tool to help writers get over writer’s block.The app is simple, if you stop writing for more than 5 seconds, The Most Dangerous Writing App erases ALL your work. Not a few sentences, not a paragraph, but everything you’ve written. Now that’s incentive to keep writing (especially if you’ve chosen a longer writing period of 30 minutes to an hour)!I’m not sure if The Most Dangerous Writing App will help me or frustrate me, but am willing to give it a try. If you decide to try it too, please leave your comments below.
Papers Delights Me. Again!
Papers continues to surprise and delight me. I’m glad it’s my publication manager of choice.Many years ago, I switched from Endnote to Papers. Back when using Endnote, if I wanted to make a single change to a paper’s citations, I had to unformat and then reformat the whole document.That behavior was so ingrained in me, I started doing the same thing with Papers. I would save a formatted and unformatted version of each manuscript so I could re-use text. Unfortunately, more often than I would like to admit, edits to the formatted copy did not make make it back to the unformatted copy.In my latest writing project, I discovered something great. It’s not necessary to save multiple copies of each project using Papers. Instead, just insert your new Papers Citation(s) in the body of the existing manuscript. When you’re finished writing the new section, select “Format Manuscript.” Papers integrates the new reference(s) (if necessary changing the numbering within the document) and inserts the new citation in the appropriate place in your Bibliography.Once you’ve inserted something new and formatted the document, you can unformat everything (e.g. if you want to copy a single paragraph from your original project to something new).This feature is awesome and was completely unexpected. I guess I should make it a habit to read manuals more often! Happy Weekend!
Ulysses iOS, Storyist, and Scrivener
I’ve had the pleasure of working with the Ulysses Beta iOS App for iPhone over the last few weeks. As with the Desktop version, everything is very well thought out. The iCloud synchronization works seamlessly. I’m a fan!In a few short weeks, Ulysses iOS app has changed the way I write. For my shorter writing projects (e.g. blog entries, letters, memos, etc.), I no longer need to sync individual text files to a DropBox Folder (as I discussed in this entry). Instead, I dictate my text directly into Ulysses. I can mark up the text on my phone, or wait to return to my desktop. All my text and markdown is synchronized between all my devices.For longer writing projects (e.g. manuscripts and grants), I will continue to use Scrivener with DropBox sync. I impatiently waiting for the iOS version of the app so I can ditch syncing text files. As I was looking to see if there was a projected timeline for release of iOS Scrivener, I found this article by Ricardo Sanchez discussing the integration between Storyist and Scrivener. Storyist sounds like what I’ve been waiting for in a mobile solution for Scrivener. I’ll check Storyist out and report back.
My Omnifocus Set-up (Part 1)
I am a huge fan of OmniFocus (OF). I am so dependent on the software, I’m not sure I could function without it. Although there has been much written about the use of OmniFocus, I have yet to see anyone else that uses the software quite the way I do. In this entry, I’ll introduce you to my OmniFocus set-up. In future entires I’ll demonstrate how I use this set-up to maximize the impact of my work in my personal and professional life.My set-up is an amalgamation of many different things I’ve read online. I’m sure, after seeing what I do, others will continue to build on my ideas.The struggle to keep on top of one’s commitments is not new. Before Getting Things Done and OmniFocus, the go to resource for productivity was Stephen Covey’s First Things First (amazon link). This book suggested breaking down your personal and professional lives into various roles (e.g. Researcher, Clinician, Mentor). Each week, within each role, you were to decide up to three important tasks to accomplish (based on both urgency and importance). Each task could be added to one of 4 quadrants: The fact that not all urgent tasks are important, nor are all important tasks urgent was a complete revelation for me. Once I understood this, it was much easier to prioritize my personal and professional life. Per Covey, in order to maximize productivity, one is to spend the majority of their time in Quadrant 2 (Not Urgent, Important). Rather than working on projects haphazardly, Covey recommended spending the vast majority of time focused on Quadrant 2 projects. I choose to define Importance as the project’s impact on my long-term goals.I have blended Omnifocus and First Things First (and a little bit of Agile Programming—but that’s an entry for another time) to develop a system that’s truly my own. In the image below, you can see how I organize Omnifocus. I have four high-level folders: Weekly Priorities, Single Tasks, Projects, and Meta.My Weekly Priorities Folder contains three folders: Maintenance, Weekly Priority, and On Deck. The Maintenance Folder contains all the projects to keep my system running—reminders for my daily, weekly, and monthly reviews. The Weekly Priority Folder contains my weekly highest priority level projects (both personal and professional) I chose during my weekly review. The On Deck Folder contains other important projects—if I’m ultra productive and blast through my priority projects, I look in the On Deck Folder for next tasks to accomplish.The Single Tasks High Folder is self-explanatory.The Projects Folder contains two subfolders: Professional and Personal. Within each of these subfolders I have folders that define each of my professional and personal roles. For instance, my Professional Folder contains the following role folders: Administrator, Clinician, Communicator, Consultant, Fundraiser, Innovator/Entrepreneur, Mentor/Teacher, Researcher, Society Member. Each new professional project is placed within the folder of one of my roles.The Meta Folder Contains my Someday/Maybe project folders (things I’m interested in, but have not yet committed to doing). I also store my completed and dropped projects here.After defining a new project, I place the project into one of my personal or professional subfolders. In the Notes Field of OmniFocus, I use Text Expander scripts to label each project by Covey Quadrant. I then may use OmniFocus Perspectives to quickly locate ALL my projects of a particular quadrant.
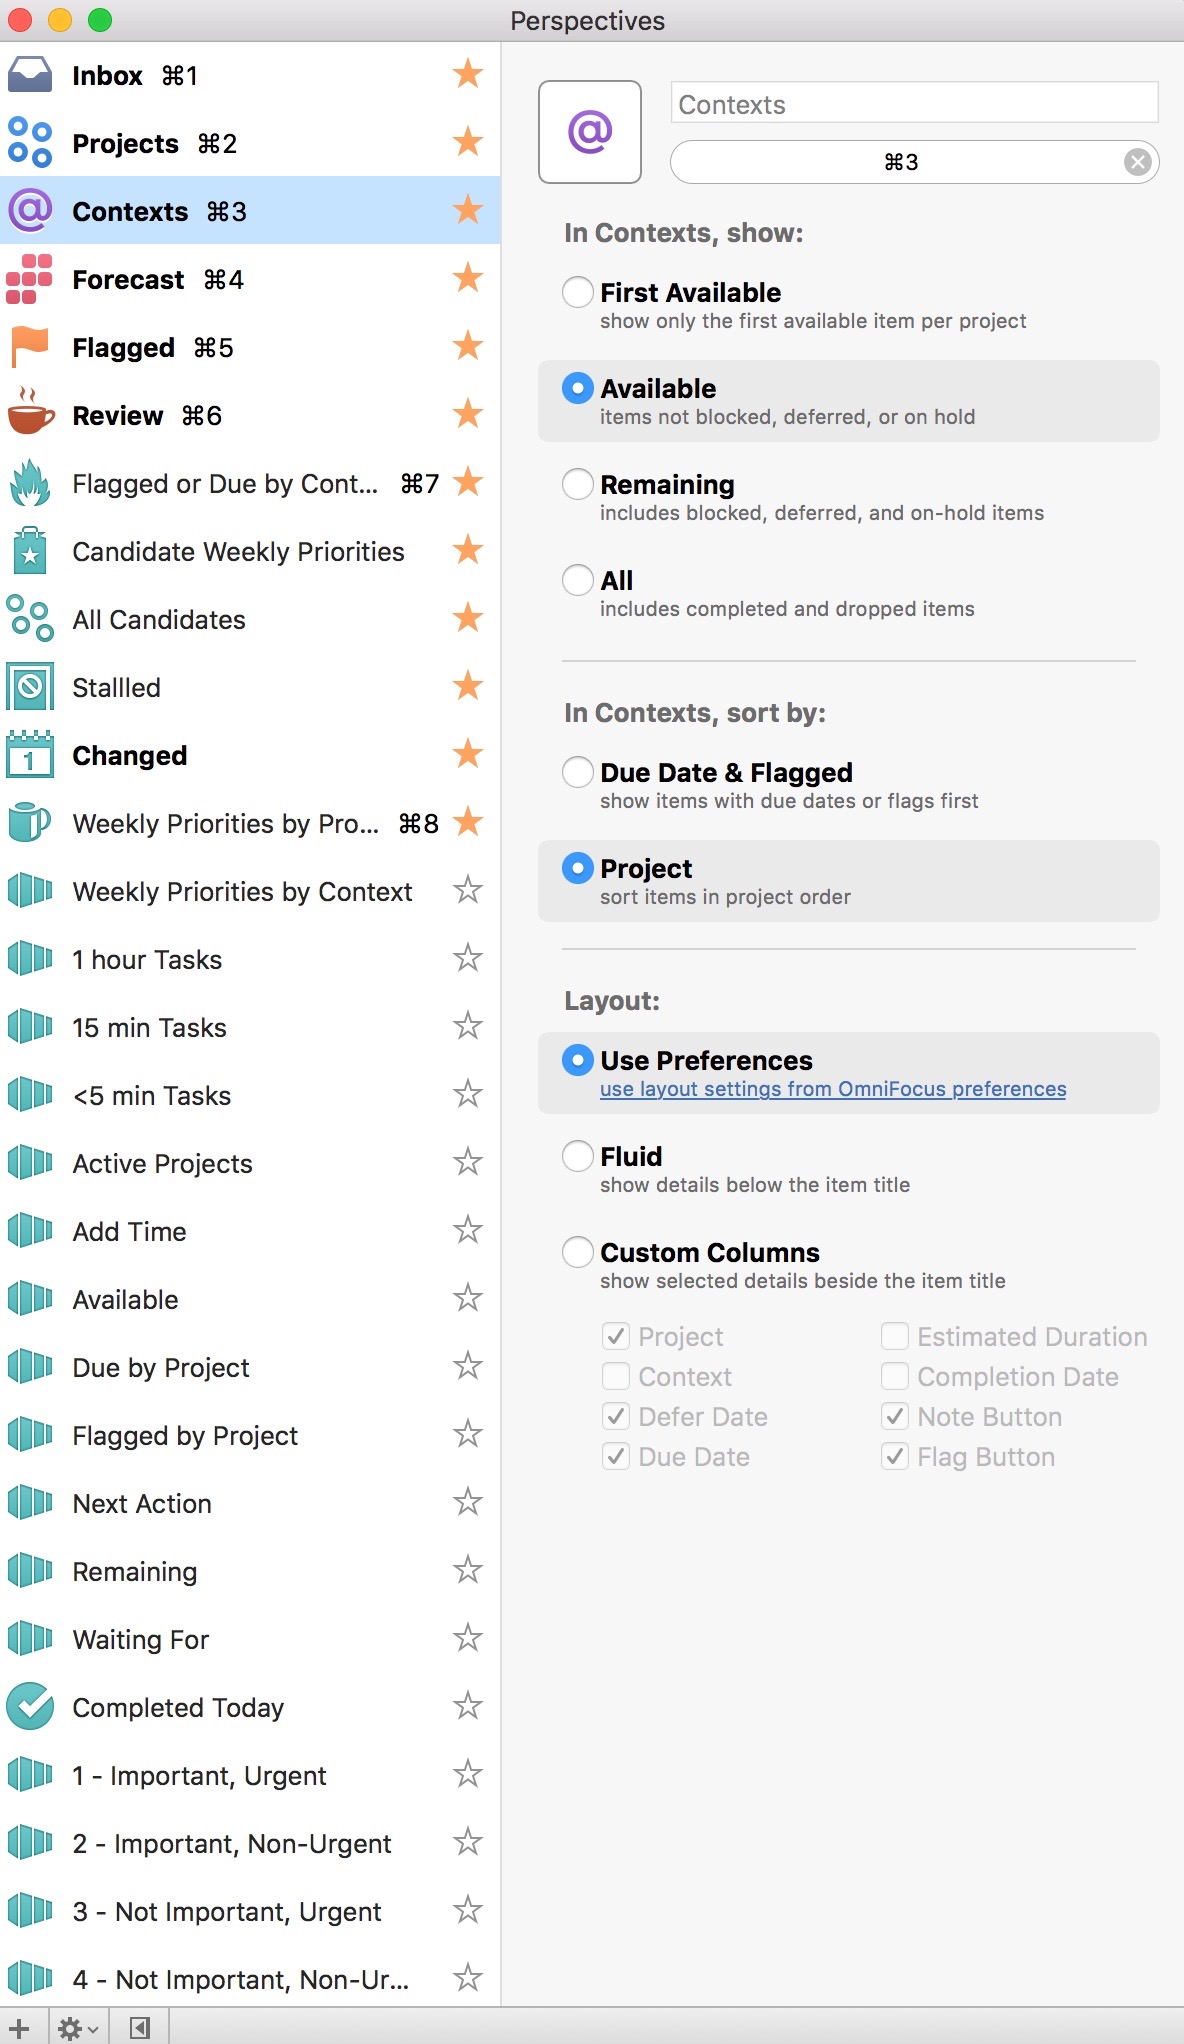 Using these methods, I am able to juggle a huge number of concurrent projects, each week prioritizing those most important to my personal and professional life. In case you’re wondering, I do most of my heavy lifting / organizing on my Mac. I primarily use OF on my iOS device as reference.In a future entry, I’ll explain how I use this set-up in my daily, weekly, monthly, and annual reviews.
Using Hazel to Organize Grant and Manuscript Files
It is almost the beginning of February and thus I am in the throes of writing another grant (2 actually). I thought I'd take a quick break to tell you how I keep my grant information organized using Hazel.I have a folder that has a template for all the subfolders I use during the preparation of the grant. When starting my project I make a copy of this template and name the parent folder including the funding agency, the year, and the type of grant. Hazel can rename files and subfolders. I take advantage of this feature to keep the names of my files consistent.I navigate to the folder I am working on and set up new Hazel rule to rename the file and subfolders. The rule looks like this:
 Anytime I put a file into a subfolder, it is automatically renamed appending the name of the grant to the end of the file. This appended name is hugely helpful when I go back to search using program such Houdah Spot or Foxtrot.
 I use the same method when I'm preparing manuscripts or working on other projects. Using Hazel I never have to think twice-every file I put into the parent folder or subfolder is appended with the name of the project.Try it out.
Retrieval, Annotation, and Capture of Highlights (2016)
I have a unique way of processing scholarly information, I am convinced it gives me an advantage when writing grants and manuscripts--allowing me to find specific notes and related information very quickly and efficiently without having to rely purely on memory. I’ve written a bit about this before, but the process has evolved, so I am dedicating an entry to my updated workflow. The software and utlities integral to this workflow are:
- Papers 3
- Keyboard Maestro
- Launchbar
- Ulysses (or any text editor)
- DropBox
- Devonthink
Highlighting in Papers 3Despite lacking the outstanding features of Skim, I am back to reading/highlighting in Papers. I switched back to Papers primarily for synchronization. I do a fair amount of reading on my iPad. Any highlights I make on my Mac become immediately available on iOS. Anyhing I highlight on my iPad shows up on my Mac. Although I prefer Skim, the simplification afforded by doing everything in Papers was irresistable. Here is the manuscript we’ll be working with, highlighted in Papers. Export NotesOnce I’m finished highlighting, it's time to process. Within Papers I go to File->Export->Notes and am provided with the following menu box. (1) I usually choose to save the file to my Desktop, as it needs to be easily accessible for processing. (2) I choose "Selected Papers Only" or you I export notes from my whole collection. (3) I choose Plain Text.
 First Stage of Processing the Untitled Notes File on DesktopHere is the untitled notes file saved to my desktop.
 Contents of the unprocessed notes File
 Keyboard Maestro Script to Add Citation + Link and Save FileI have written two Keyboard Maestro scripts to help process my exported notes. The first script adds metadata to the text of the notes file we just exported, then renames the file using the unique Papers Citation. In order to use my script, in Papers, I make sure the correct paper is highlighted. Next, in the Finder, I select the exported note file. I invoke the script and it prepends the unique Papers Citation followed by a Papers Link to the top of the file.
 Keyboard Maestro Script to Add Citation + Link and Save File ContinuedThe script continues on to a save dialogue box where it replaces "Untitled" with the unique Papers Citation. I have to manually remove the curly brackets (as they are disallowed in file naming). I save the file to the Desktop.Download the script here…. You'll have to remove the .txt from the end of the file to use.
 Uniquely named Notes File Saved to Desktop.This note I just saved contains ALL of the exported highlights from the manuscript in a single file. As I've talked about in previous entries, I find it more efficient to access a single concept rather than having to dig through an entire papers worth of notes. I developed (along with a few others) a second KM script that copies the Metadata at the top of the note file, parses the single note file into a collection of notes files--one highlight per file, and appends the metadata to each file.Processing highlights in this way has revolutionized my grant and manuscript writing efficiency.Keyboard Maestro Script to Parse Highlights and Append metadata to each note
 Download the script here…. You'll have to remove the .txt from the end of the file to use.Moving the FolderI highlight the folder on my Desktop, then double click my Shift Key--this invokes a Launchbar action.
 Launchbar Moves FolderUsing Launchbar I move the text notes to the folder where I keep all the extracted highlights from all the manuscripts I'v read.
 Ulysses to finish the processAs I've mentioned previously, i use Ulysses extensively in my personal and professional life. I use Ulysses to finish the processing of my highlights, but any text editor will do. (1) Ulysses is pointed to read all the files in my Notes folder--here you see all the individual files extracted from this manuscript. (2) is the text of a single highlight, (3) is the metada added to each file by the KM script. With some notes I will add my own comments, other times, not. (4) are the references that support the statement....these are added manually by reading through the statement and copying each of the corresponding references from the original PDF. I don't go back and forth between the text file and the PDF...instead, I take advantage of Launchbar's Clipboard History.
 Launchbar Clipboard HistoryI merely highlight each reference mentioned, then in bulk I paste each of the references into the note.
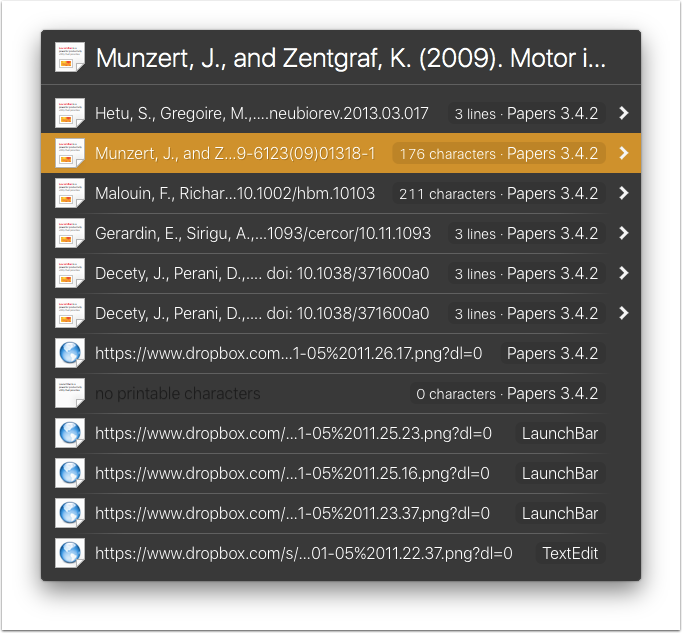 Appearance of NoteI showed you what this file looked like in Ulysses. Here is its appearance as a free standing text file. Depending on my mood (and time) I may or may not append refernces to each note file.
 Copy PDF to Indexed FolderAfter I've processed everything, the last step is to export a copy of my PDF to a location Devonthink can access.
 Using Devonthink to Find Concepts and Related InformationYou may aak yourself why I go to such lengths processing the information I read. The answer is Devonthink. I use the "Artificial Intelligence" of Devonthink quite extensively in my writing. As I mentioned, all the processed highlights, copies of PDFs go into a set of folders on Dropbox. I then Index (not import) the information in these folders (1) so they are "seen" by Devonthink. Why is that important? When I conduct a search (2), I can find the idea I'm looking for (3). By clicking on the "See also" function (4) in Devonthink I can see every piece of related information in my scholarly library (5), including things I have previously written. This ability has revolutionized the way I write.
 ConclusionIn this entry, I have shown you how I read and process scholarly my annotations from manuscripts. Although the process requires an extra ten minutes or so per manuscript, the payoff is immense.Please comment below.
Ulysses for iPhone coming soon
I’ve been patiently awaiting the iPhone version of Ulysses. As the Soulmen blog states, they hoped to have the app released by Christmas, but ran into some delays.I’m a big fan of Ulysses—the Soulmen keep adding features—and they have a sense of humor. The iCloud native version is feature-rich without getting in the way. I lose a bit of app functionality when editing files from DropBox, but it is still pleasant to write in the Ulysses interface.Ulysses is, hands down, the best writing environment for web content. In fact, if it wasn’t for Scrivener, I would say Ulysses is the the best writing environment, period.Until the Ulysses iPhone app is released, as I noted in this blog entry, I’m currently forced to interject Editorial into my workflow. Editorial allows me to dictate and edit files on my iPhone, then share that work with Dropbox. In the future, after Ulysses for iPhone is released, Editorial will remain part of my writing arsenal, since I’ve figured out a way to share files back and forth with Scrivener. I’ll use Editorial at least until Scrivener comes out with their mobile app.In some ways, I’m glad Ulysses did not release their app for Christmas. The anticipation gives those of us that love writing something to look forward to. I just hope it doesn’t take Soulmen too long!
MacID-unlock your Mac with TouchID
When asleep, my Mac is configured to require a password to unlock. I often have to type my password dozens of times each day.This am, while reading My Must-Have iOS Apps, 2015 Edition (by Federico Viticci), I found MacID, an app that uses the TouchID on your phone to unlock/lock your Mac.Setup was incredibly easy. I installed the app on my phone and my Mac. Connecting the two was a snap. I installed the unlock bookmark on the main screen of my iPhone. Now, I merely click the app on my iPhone, use the TouchID, and my Mac unlocks. If I have the lid of my Mac closed, when opened, MacID sends a notification to my phone asking if I’d like to unlock—awesome!Not only is the app incredibly functional, but it is very aesthetically pleasing. Check it out!
Using Instapaper and IFTTT to automate capture of highlights

IMG_0693
IMG_0695
I'm a big fan of the read it later service, Instapaper. Instapaper stores article to be read at your convenience on any device. If you subscribe to the premium service you get a bunch of perks.Two of the great premium features of Instapaper are 1.highlighting and annotation of articles and 2. The ability to save entire articles and annotations directly to [Evernote]. By hitting ‘like’ in Instapaper, the app automatically saves the full text article to Evernote.For my purposes I save liked articles to Evernote , but rely on IFTTT to handle my Instapaper notes. Each time I highlight or annotate within Instapaper, a text file with the annotated text is saved to Dropbox by this script. The saved note looks like this....Once the text note is in Dropbox, using the same Literature Devonthink Database I use for writing (as I wrote about in this entry), I index the folder that contains all the extracted highlight text files. Thus when I search in Devonthink, I find literature from saved web articles, scholarly manuscripts, and extracted highlights all in a single pass. Using the “See Also" magic hat in Devonthink I can find other relevant information very quickly.A few things I need to work on:1. Automating save to Dropbox of Instapaper comments.2. Automating full text transfer to DropBox from Evernote (for notes with highlights)I hope you find this useful.
Papers Links
In previous entries I've written about my love of Papers and how I use it for all my grants and scholarly writing.One of the features I use constantly is called Papers Links. This is a brief code (looks like a URL) that links back to a particular manuscript in your personal library. Here is an example:papers3://publication/doi/10.1097/AIA.0b013e3181eace73Papers Links are available in Papers by highlighting the manuscript, then using "Copy As" under the Edit Menu, right clicking on the paper of interest, or using the keys: Shift- Command-L.
Combining Papers Links with Launchbar is nothing short of awesome. I annotate everything I extract from a manuscript with a Papers Link and a Papers Citation. When writing, I can highlight any Papers Link, hit my Shift Key twice to invoke Launchbar Actions (as I discussed in this entry). The double shift copies the highlighted text to Launchbar--the orange tab shows that Launchbar is awaiting an Action Command.I hit Tab Key to bring up the context sensitive menu. I select Papers and hit return. Papers launches directly to the paper of interest.
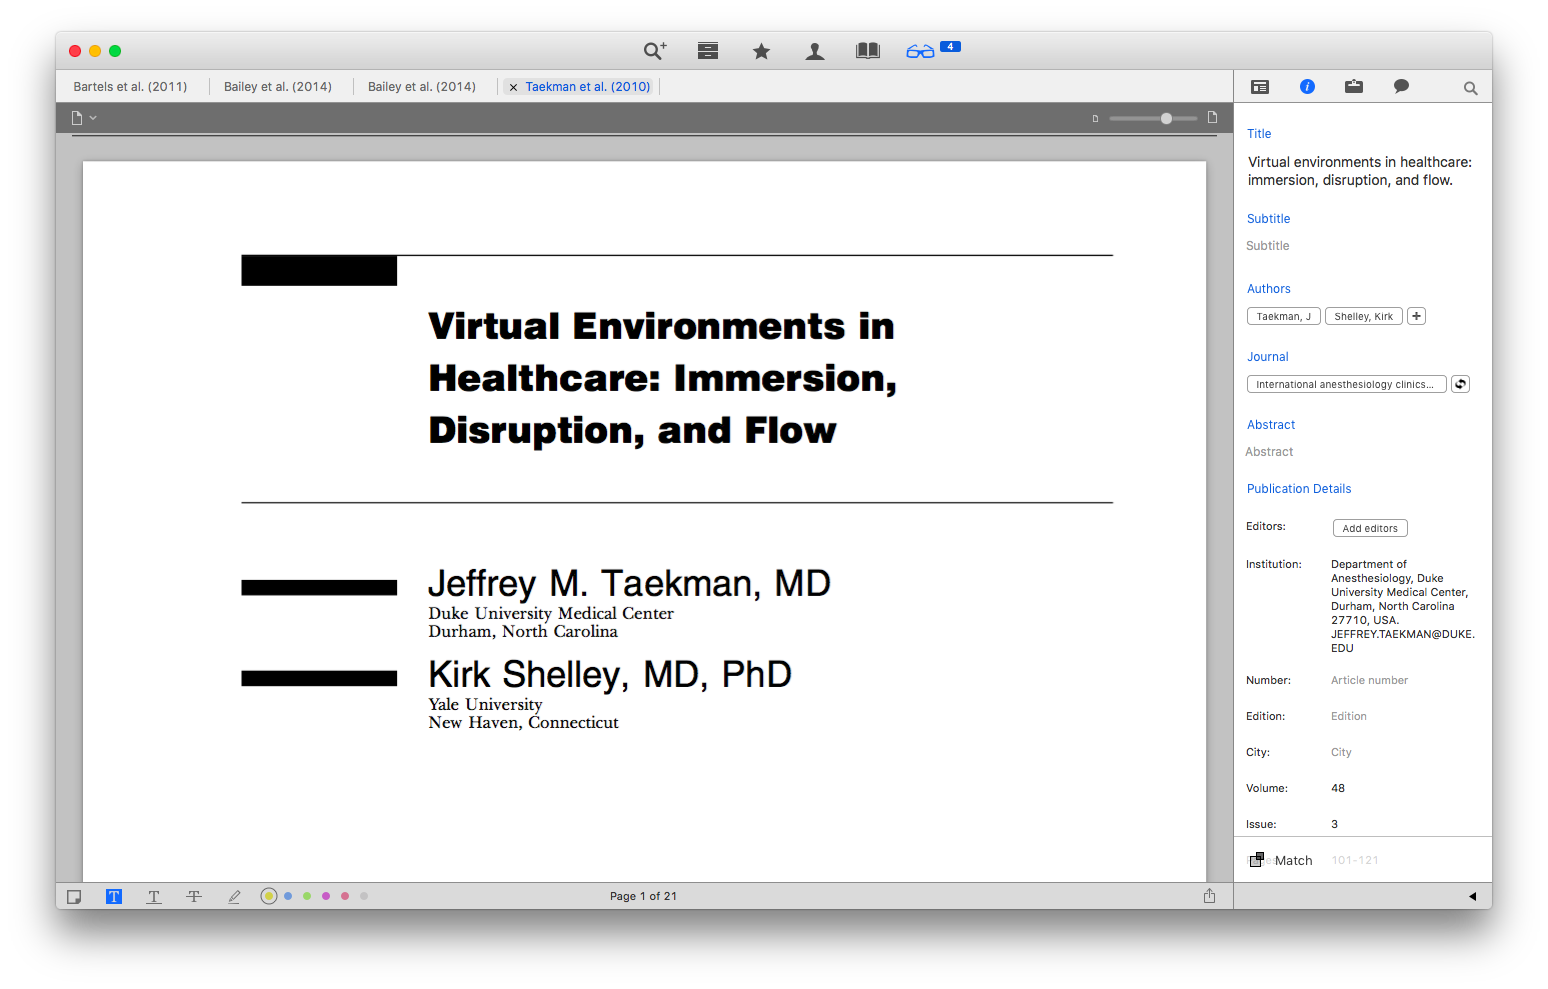 I use Paper Links in all my extracted annotations—it makes it lightning-fast to use a reference when writing, and to be able to dig deeper into the original reference as needed.
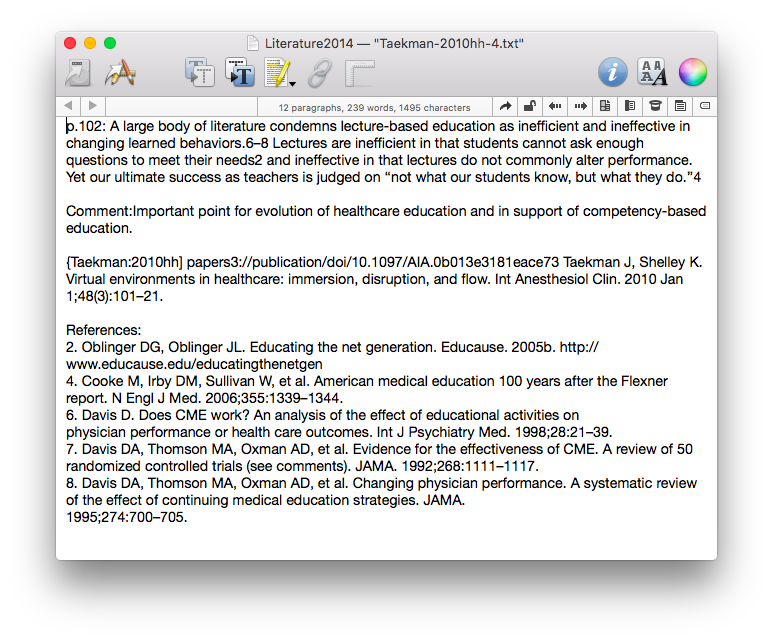 I also use Papers Links when I copy figures or tables from a manuscript using Skitch / Evernote. The Papers Link allows me to quickly find the manuscript with the embedded media element when writing or preparing presentations.I use Papers Links constantly when writing. I hope you find them helpful too.
Tripit and Flightview - Automating Itinerary Building and Flight Tracking
I often travel for business. I previously blogged about my love of TripIt-a website with an app that extracts flight and travel information from my email. I merely send my airline, hotel, and car rental confirmations to plans@tripit.com and the site builds a peronalized itinerary. The Pro version has all sorts of other great features, like finding and booking alternative flights.A while ago, I discovered another site called FlightView. Flightview publishes up-to-the minute, detailed information on flights and airport traffic. It works great in tandem with TripIt. And just like TripIT Flightview is able to extract the salient details from an email itinerary, then activate tracking the day you travel.Now whenever I reserve a flight, I kill two birds with one stone by simply forwarding my flight itinerary to both Tripit and Flightview at the same time. I use this simple trick literally every time I reserve a flight.