Sunrise Meet

The war of the calendar apps continues. I’ve rotated between Tempo, Timeful (now part of Google), as well as the built in Calendar App on my iPhone. Although I like many of the features of Tempo and Timeful, my current app of choice is Sunrise (Sunrise was recently purchased by Microsoft). Today, Sunrise added a new “Meet” feature that helps plan meeting times.

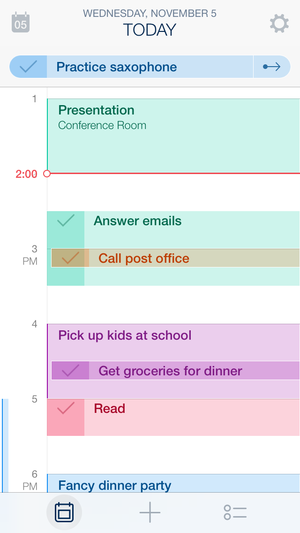
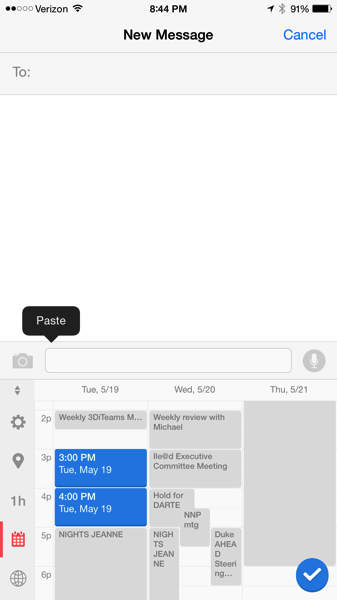
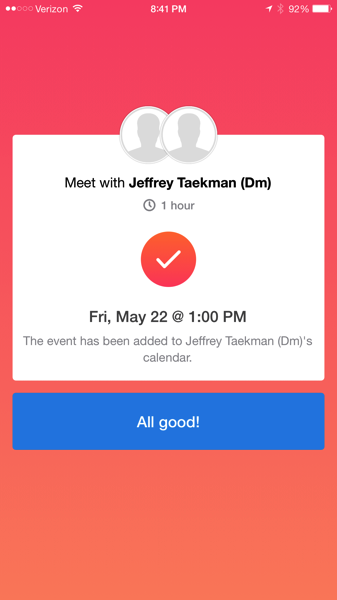
Meet works by installing a custom keyboard on your iPhone or iPad. Launch iMessage or Mail then enable the Meet keyboard and pick available times from your calendar. Your proposed times are sent to your friends or colleagues who see your choices overlayed on their own calendar (if they use Sunrise). Once your friend finalizes the meeting time, the entry is placed in their calendar and confirmed on your calendar. Although I’ve yet to use this new feature for scheduling a meeting, it seems like it will be very useful.


IMG 0056


IMG 0054 2

There are less polished alternatives such as “Share Availability” macro in the iOS Workflow App, but Meet sets a new standard for improving the experience of scheduling meetings.

Read about more of Meet’s features in today’s TechCrunch Article.

Automated Dictation and Task Delegation using Evernote and Workflow App

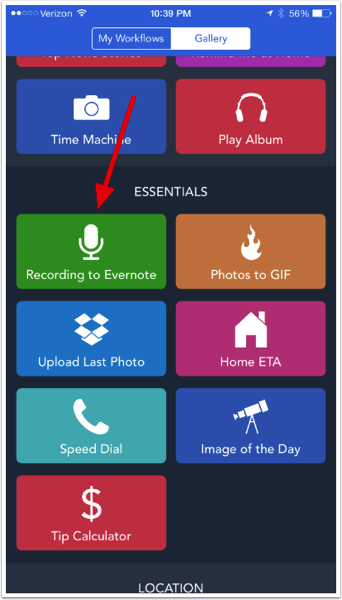
As usual, David Sparks (Macsparky) inspired me. After finishing the MacSparky Workflow Video Field Guide, I decided to try my chops at buidling something new. As I was exploring the Gallery (the pre-baked workflows that come with the app), one of the examples caught my eye; "Recording to Evernote."I have a twenty minute commute between my home and work. When not listening to audio books, I attempt to be productive. While driving, I'm frustrated by my inability to delegate tasks to my administrative assistant. Before Workflow, in order to send a request (or dictation), I'd have to ask Siri to transcribe an email and then hope for the best. As I'm sure you're aware, Siri makes many mistakes. It's both difficult and unsafe to proof while driving. Siri was not a viable option.That's where Workflow comes in. I built a Workflow that records my voice then, at the same time, sends a link to both my admin and to Omnifocus. Here's how I did it.

Add the "Recording to Evernote" from the Gallery

First, download Workflow. Once you've installed the app, click on the "Recording to Evernote" workflow in the Gallery. Select "Get Workflow." Your workflow will be added to your "My Workflows" Area. Now it’s time to edit.add-the-recording-to-evernote-from-the-gallery.png

Programming the workflow

I didn't change any of the programming at the beginning of the script, but you can.programming-the-workflow.png

Programming the workflow - screen 2

Here is where I altering and appended the built in script:

  • (1) I customized the name of the note and included the current date variable
  • (2) After the audio note is recorded, the file is saved to Evernote. "Get Note Link" retrieves the unique URL for this brand new note.
  • (3) "Copy to Clipboard" passes the URL of the audio to the clipboard.
  • (4) "Send email" command takes the clipboard and pastes it into my email
  • (5) I put my admin's email address is in the "To:" field
  • (6) I included my OmniFocus MailDrop email address in the "Bcc" field (so I can track what I've delegated in Omnifocus).
  • (7) I customized the Subject Field (and appended the current date)

programming-the-workflow-screen-2.png

Add to my Home Screen

Finally, when I was finished programming (and after I customized the color and icon of the button), I added the button to my HomeScreen. Now, when I touch the button a screen comes up that reminds me to "tap to record." I tap, record my message, and then tap again. Workflow automatically saves the recording to Evernote then sends two emails: one to my admin (with a link to the audio recording) and one to my Omnifocus Inbox (where I can keep track of the delegated task).As you can see, Workflow makes automation ridiculously easy. I hope you find this simple application useful.

Taekman Writing Workflow 2015

The early release of Papers 3 got a bad rap, and rightly so. My negative experience began as I imported my Papers 2 library into Papers 3. I had about 2500 papers, but only a fraction of these PDFs were imported properly. I am still recovering from these import problems--having to add each missing PDF by hand. Although importing was a issue early on, The makers of Papers, MekentosJ, now part of Springer Science+Business Media, worked hard to fix problems. I assume, with all the work on Papers, that importing has been fixed. My advice? Back-up your data before trying to import to Papers 3!

Although I had early problems, I can tell you that Papers 3 is pretty robust now. I recently used it to write and submit a full grant. I’ll say the app should be strongly considered if you’re looking for a reference manager / bibliography builder. If you’re interested in some of the changes in Papers 3, check out this entry.

With the release of Papers 3, all files and PDFs are bundled into a single container. Bundling makes syncing across computers more reliable, but indexing of individual files much more difficult. Unfortunatly, my Papers 2 workflow was dependent on indexing of single files. And thus, with the release of Papers 3, I had to revamp my writing workflow. That’s what I’m going to cover in this entry.

My current workflow has three parts: 1.organizing, 2. creating, and 3. writing/formatting

The software I use includes:
Papers3
DropBox
Hazel
Skim
Keyboard Maestro
Ulysses
Devonthink
Tinderbox
OmniOutliner
Scrivener
Pages or Word

Part 1: Organizing

Papers 3

Papers is used as my storehouse for all academic literature. I use Keywords and Smart Folders (akin to Smart Playlists in iTunes) to keep my literature sorted. In addition to the topic of each manuscript or book chapter, I use keywords such as "MustRead" that fuel my prioritized reading list. I tend to keep my library sorted by the date in the main window, but can easily search or sort my library in numerous other ways. My library is synchronized using Dropbox.

KeyBoard Maestro

Most people, while reading academic literature, find additional manuscripts they’d like to download. I’ve developed a series of KeyBoard Maestro scripts that simplify the download of these additional articles from Duke’s Library, Pubmed, and Google Scholar. As I’m reading a manuscript, I highlight the article I want to download and invoke my KM script. The macro copies the text string I’ve highlighted, goes to the appropriate web page (e.g. Duke’s Library), pastes the search string into the appropriate box, and hits submit. Thus with two keystrokes, I can find and download new PDFs I’d like to read. The new PDFs are sent to my “Downloads” folder. Then Hazel takes over.

Hazel

Hazel is a program that watches folders on my computer. When a file matches defined criteria, Hazel performs a script. I have a Hazel script watch for PDFs that contain the word “Reference.” When Hazel sees a file that matches, it launches Papers and imports the file into my library.

Skim

Despite the pleasing new main interface, Papers 3 highlighting leaves much to be desired. For reading and annotating scientific literature I use Skim (Skim can designated as the primary PDF reader in the Papers Prefernce menu). Skim has a robust feature set and is customized for academic literature. Oh, and it’s free! When I’m done reading and annotating, I export the Skim annotations to a PlainText file. I then use a KM script to name the the Skim Notes file to my convention.

Using another KM script, I parse the single notes file into separate text files (one for each highlight or annotation). Each file is named to convention and contains the text I highlighted in the manuscript, my own comments, and the full reference. All the individual notes are aggragated into a folder. I move this folder from my Desktop to the cloud so I can access it from anywhere. I call this my Literature Comments Folder. Now I move to Ulysses.

Ulysses

Ulysses is able to read files anywhere on my computer. I’ve configured Ulysses to point to my Literature Comments Folder so all my comments are available in an organized fashion. At this point I can add additional comments to my individual highlight files. The next step is to index the files in Devonthink.

Devonthink

Finally, I open Devonthink. This workflow has matured from what I discussed in this entry. I have a database that is solely used to index my scholarly reading. From the File Menu, I update the index (NOT import) of my Literature Comments Folder. Indexing this folder allows me to take advantage of the “Artificial Intelligence” of Devonthink, finding relevant information throughout my reading.

Part 2: Creating

Tinderbox

At this point I’m ready to start developing my scholarly work. I use Tinderbox (in Outline View) to generate a high-level preliminary outline. Tinderbox is a power-user’s application. I’ve only scratched the surface of its capabilities, but find it extremely useful early on to organize thoughts and find connections between what I’ve read and what I hope to write.

From within Devonthink, I review each of my comments. If I find something I want to include, I drag and drop the file (comment, reference, and highlighted text) into Tinderbox. Then, using Devonthink’s “See Also & Classify” command, I see related notes in my Literature Comments Folder . I drag and drop the additional comments into Tinderbox too. As I think of new ideas, it’s not uncommon for me to conduct a freeform search from within Devonthink to see which comments bubble to the top.

Once I have several dozen comments in Tinderbox, I find myself entertaining new thoughts, and often adjusting (or add to) my outline.

Another way I approach the creative process is to surf through interesting comments and move them one by one into Tinderbox without organizing them (usually in the Map View). Once I have a few dozen of these interesting quotes and highlights, I start to see connections between them, letting me further refine and organize my thoughts (and begin to develop and outline).

Once I’m satisfied with my outline, I’ll sometimes export to OmniOutliner for additional organization. But most times, I’ll export my outline directly from Tinderbox to Scrivener.

Part 3: Writing and Formatting

Scrivener

Scrivener is the place where the early versions of my manuscript are built. Scrivener imports OPML files from Tinderbox or OmniOutliner—each bullet of the outline gets its own content field. I do the majority of my early writing in Scrivener, attacking whatever section I feel like writing at the time. I use the Magic Citations of Papers 3 to insert my references as I write. Once I get words down on the screen, I often find myself tweaking the outline in Scrivener. This early phase, when I’m writing on the go, is when I yearn for the iPad version of Scrivener. Until that’s available, I’ll continue to use Scrivener’s synchronization with SimpleNote when I plan to write on my iPad.

When I’ve completed all the sections in my Scrivener outline, I’ll export everything I’ve written to Ulysses. I use Ulysses to edit and rewrite (in Markdown) until I think the work is ready for submission. As I’m importing and editing my paper in Ulysses, I make sure to have the document type set to Markdown (not MarkdownXL). MarkdownXL uses the curly brackets as an internal mark for annotations. If I use MarkdownXL in Ulysses, all of my Papers citations are formatted as footnotes—very annoying.

Word or Pages

I write and edit for several rounds in Ulysses. Ulysses for iPad makes this process more seamless and enjoyable. Unfortunately, when I’m done writing, I cannot format my bibliography in Ulysses. I have to export my file to Word or Pages. That’s okay though, I still have to format my paper. I use an old version of Pages (the new version of Pages still doesn’t allow bibliography formatting). Microsoft Word also works. To do this, I highlight all my text and from the Ulysses Edit Menu I select Copy as RTF (Word), then paste it in the word processing application. After my bibliography is formatted, I format the rest of the paper.

Finally, as the final check of my writing, I use a KM script to read back the text to me. I often find errors, even in this late phase of writing. Finally, I double check everything conforms to required format of the journal (or funding agency) and hit submit.

And there you have it: my writing workflow. As with most of my workflows it is continuously subject to improvement. For the time being this workflow has streamlined my writing. I hope it works for you too.
Ulysses for iPad: Writing Nirvana

I use a great deal of plaintext and markdown in my writing. I’ve cycled through minimalist applications like Byword, iA Writer (and iA Writer Pro). A few years ago, in search of the perfect writing app, I stumbled upon Ulysses. Ulysses has powerful features for writers, but like many of the best applications, it keeps power features out of the way until you really need them. I like the app’s clean interface, how it handles (and emphasizes) markdown in a file, and especially the ability to organize multiple files across devices and cloud services. The Achilles Heel of Ulyesses has historically been its mobile implementation. There was no Ulysses for mobile devices. That is, until this week.

On Thursday, the long awaited iPad version of Ulysses was released. Ulysses for iPad has all the features that make Ulysses for Mac great. Some of you may balk at the price ($19.99 USD), but I believe it is well worth it. Check out my friend, David Sparks' (Macsparky), overview for more information.

In a future entry, I’ll talk about how my writing process has evolved to use Ulysses (in tandem with Papers and Scrivener) to tackle my large academic writing projects.

My Move to Papers 3 (End of Endnote Redux)

I was a big fan of Papers 2 as my manuscript and citation management software. After reading the early reviews of Papers 3, I was hesitant to upgrade and trepidatious about the future of the software. I went back and took another look at Sente, Mendeley, Endnote, and Zotero. In the end, I decided to stick with Papers.

Fortunately for me, despite the rocky start, the folks at Mekentosj have continued to work on Papers 3. About a month ago, I decided to make the transition from Papers 2 to Papers 3. This was not an easy decision, as changes in Papers 3 have forced me to revise major portions of my writing workflow. Although the transition was painful, I’m convinced what I have now is more robust and flexible than my previous system.

Over the next few weeks, I’ll write about my transition to Papers 3 (both Mac and iOS). I’ll cover the Papers 3 new interface, how I continue to leverage my Papers 2 data (despite the interface and data storage changes), and how I continue to integrate Papers 3 with Devonthink.

I hope you find my experience useful.

(Mynd + Fantastical2) = Calendar Control

IMG 2943

I continue the search for the perfect calendaring app on my iPhone. I wrote a few months ago about Tempo, from the makers of Siri. Although I used Tempo for several months, another contender, Mynd reached my radar screen.

I don’t find the Mynd interface (or colors) aesthetically pleasing, but the app has so many cool features it’s worth a look. Mynd connects to your calendars locally and then mines data for each appointment.

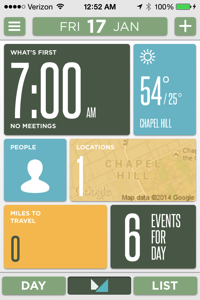
When I first opened the app, I noticed the Mynd View. This view includes the time of my next appointment, the current weather conditions, the people I’ll meet with that day, the locations of my meetings, and the total number of events for the day. I can click on any of these boxes to drill down further. I can connect Mynd to Evernote (appending relevant notes to each meeting) and to LinkedIn (appending further information to each meeting attendee).

Mynd is also location aware. It estimates how long it will take to drive to my next meeting and tells me when to leave my current location. If I’m running late, I can text, email, or call any one (or all) of the meeting attendees from within the app.

In addition, Mynd has a new feature called the Scheduler, that facilitates scheduling of meetings. The Scheduler scans my calendar and suggests free times that might work for a proposed meeting. Mynd aggregates all the potential times I choose and formats an email to my prospective meeting attendees.

Although I’m a big fan of Mynd, I still find making calendar entries clunky. For this, I often turn to Fantastical2. Fantastical is able to make appointments from english sentences (e.g. Meet with Sir Ken Robinson at Weaver Street Market in Durham, NC for lunch tomorrow at noon). I’ll often type (or dictate) my appointment details into Fantastical2. The dictated appointment is instantly translated into a calendar entry that quickly becomes available in Mynd.

Oh…and Mynd is free. Get Mynd in the App Store

Addendum: a reader asked if I was truly meeting with Sir Ken Robinson. Sadly, the answer is no. I admire the hell out of the man and do hope that someday.....

Addendum 2: Although I was very high on Mynd at one point, I’ve gone back to Tempo. Many of the features that were free in the original version of Mynd, are now premium (paid) add-ons. In the end, the change in feature set and the ugly interface scared me off.  Life is too short to live with an ugly interface (especially on a frequently used calendaring app)!

TripIt: Travel Plans Made Easy

Although I don’t consider myself a road warrior, I do a fair amount of travel for my work. For years, my trusted travel partner has been TripIt.

TripIt is a web site (with apps for your iPhone, iPad, or Android) that aggregates all my travel information. Whenever I receive travel related information, I forward the email to the generic address: plans@tripit.com. TripIt processes the information from airlines, hotels, car rentals, etc., and combines them all into a single, easy-to-read itinerary (with confirmation numbers, phone numbers, times, etc.). The base site is free, but the Pro version is well worth the $49 per year. I’ve been a Pro subscriber for years.

Check out this video for more on TripIt.

MyPhoneDesktop: Seamlessly Transfer information Between Mac and iOS Devices

I’ve written about the interplay between my Mac and iOS devices in several entries. The interplay between my iPhone, iPad, and computer are critical to my productivity. Recently, I discovered a program called MyPhoneDesktop that I use so often, it has made its way to the home screen of my iDevices.

Although I love my iPhone, I have trouble with the soft keys—they slow me down when I have to type things like URLs or text strings. If I wanted to transfer files, I would typically use Dropbox (or email) to get files from my Mac to my iPhone or iPad. But no more. After installing and configuring MyPhoneDesktop on both my iPhone and Mac, I can rapidly share information between my devices.

As an example, I can search for a contact on my Mac, then have my computer dial the number on my iPhone. I can send URLs, text snippets, or complete files from my Mac to my iPhone or iPad merely by dragging and dropping onto the app. Similarly, I can transfer pictures to my phone by dragging and dropping onto a pop-up receptacle that emerges from the right side of my screen. Perhaps best of all is the app's bookmarklet that passes a web page from the Mac to my iOS device through the push of a single button. 

What’s the downside? I can’t transfer information from my iPad or your iPhone back to my Mac. 

I use MyPhoneDesktop numerous times every day and you will too. Pick up a copy for $4.99.

Switching from SimpleNote to Notesy

In past entries I’ve written about how I rely on the combination of SimpleNote and nvALT to capture ideas, meeting notes, and more. I’ve been blissfully ignorant of the syncing issues between the two. I’ve had little problem with this combination, but apparently others have. 

When I read that Brett Terpstra (the architect of nvALT) will no longer support SimpleNote, I knew it was time to find an alternative. For me, the choice was between Notesy and Nebulous Notes. Since I need my SimpleNote replacement primarily as a pass-through and for quick mobile searches, I settled on Notesy. I’ll reserve Nebulous for more in-depth tasks.

I also learned that Brett recommends DropBox syncing for nvALT–so I’ve moved my nvALT Folder back to DropBox. I backed up my folder and followed Michael Schechter’s directions to make sure I suffered no data loss.

The total time to make the switch was about 10 minutes.

Meeting Workflows: Processing Meeting Notes and Discovering Linkages

It was a great deal of fun to join my friends, David Sparks - MacSparky, Katie Floyd, and Brett Terpstra (hosted by Dan Miller) on stage at MacWorld Live to discuss my Meeting Workflow. The session was webcast live from the MacWorld site. Following the session, I received many questions as to how I process my notes once they’ve been collected. Here is what I do…..

As I mentioned, I write and capture all my notes in Plaintext (using Drafts on my iPad and iPhone and nvALT on my Mac). I covered the way I capture ideas (IdeaX) using TextExpander. I use a similar method for capturing meeting notes (MeetX), chunks of writing (ScribbleX), quotations (QuoteX), and random thoughts (ThoughtX). Using Simplenote Notesy, I’m able to keep my notes on my iPad and iPhone in sync with my Mac. A single folder indexed by nvALT serves as the repository for everything, regardless of their content. In a pinch, I can search my notes on my iPad or iPhone using SimpleNote Notesy, but the true power of this workflow is realized when I return to my Mac.

I have alluded to my love of Devonthink Pro Office. I’m especially fond of DT's ability to find related notes using its artificial intelligence. For the purpose of this workflow, I have a single database that indexes three things: (1) my collection of manuscripts (from Papers2), (2) my web clippings, and (3) my nvALT notes. My web clippings are added directly to my DT database, but my Papers folder and nvALT folder are INDEXED, not imported into the same database. Indexing in DT is done by choosing File:Index… and navigating to the folder of interest on your computer (this is only during the initial set-up). You will have to manually update the index your folders each time you add new information. This is quick and simple– done by choosing the appropriate folder in DT and choosing File:Update Indexed Items.

When I’m writing (or searching for information), I can select a particular note and find all related information in my library-whether it’s a scholarly article, a newspaper clipping, a web site, or a note I’ve taken. Often times, DT finds linkages for me that weren’t readily apparent. This speeds my writing process immensely and makes me look like a magician to my peers. I hope it works for you too.

Appended March 2, 2013: Read this entry on why I switched from SimpleNote to Notesy.

Soulver for iPad

I've written about Soulver for my Mac–a notepad calculator that allows you to mix words and numbers. And now Soulver is available on the iPad. Soulver is my favorite app for budget and grant planning. I can jot down my ideas line-by-line. If I make a mistake, I erase a single line (rather than starting over). Because I can mix numbers, calculations, and words, I am able to reconstruct my thoughts days, months, or even years later. And since Soulver syncs through Dropbox, I can share my work between my Mac and my iPad. The iPad version is currently selling for $2.99.

Meeting WorkFlows: Efficiently Capturing Meeting Notes

In academics, like every other corporate entity, meetings are a necessary evil.

I’ve tried all sorts of solutions for capturing notes and action items from my meetings. For many years, I would haul my MacBook Pro into the room, relying on a slew of software invoked through Launchbar.

Next, I transitioned to the cool LiveScribe Echo. The Achilles Heel of Smart Pen Technology for me, true to the physician stereotype, is that I have awful handwriting. Most of my handwritten notes were illegible. To make matters worse, sending handwritten notes to OmniFocus was a kludge.

Recently, I’ve been carrying my iPad + Zagg Folio to meetings. Although convenient and portable, I have continued to depend on a slew of software to capture my notes and to-dos. None of my methods were standardized; my notes would constantly get lost.

This inefficient workflow was why I was so interested in the 512 Pixel post, The Capture Form. The author developed a standardized PDF form to capture meetings. But that wasn’t what I found interesting. It was the very last line of the article, with a link to a TextExpander version of the form.

I riffed on his work and developed a new workflow for my iPad + Zagg that I’ve been trying out.

My workflow starts with setting up the following TextExpander snippet:

MeetX - Untitled - %Y-%m-%d at %H:%M


ATTENDEES:

JMT

BACKGROUND / REFERENCE:


NOTES:


ACTION ITEMS FOR ME:


ACTION ITEMS FOR OTHERS:


The first line automatically names the note as a meeting, appending the current date and time. I use the title "MeetX" to help me with search. I know if I search for MeetX I'll only see my meeting workflow notes (instead of every document that had Meet or Meetings). All that's left to do is fill in the title. Since I synchronize TextExpander between my Mac, iPad, and iPhone using DropBox, my snippet is immediately available on my all my devices.

The second part of the set-up involves OmniFocus and their Mail Drop service (note: in order for this to work you have to sync OmniFocus with the Omni Sync Server). If you haven’t done so, log onto the Omni Sync Server, and apply for the Mail Drop Beta (when I applied, I received my invite in a matter of minutes). Once accepted, you set up a unique email address that is your direct link to Sync Server. To learn more, check out the Omni Mail Drop story at MacSparky.

When I want to take meeting notes, on my iPad, with TextExpander running, I launch Drafts. I expand my snippet (in my case by typing “.mtg”), fill in a title, and am ready to go. If I’m preparing for a meeting in advance, I type in my reference material under the appropriate heading, then fill in the remaining fields during the meeting. Most days, I get started with my note taking immediately when I enter the room.

When the meeting is over, within Drafts, I forward my notes to Notesy Simplenote. Since I’ve set up Notesy to synchronize with NValt on my Mac (as I wrote about previously), my meeting notes are immediately available and searchable on all my devices.

If personal to-do items came out of the meeting, I have another step. From within Drafts, I select “forward to email,” type out a subject name, then email the note to my personalized Omni Mail Drop address. When I open OmniFocus, the item is waiting for me as an Action in my Inbox. Even cooler, the complete meeting text is available in the "Notes" field . If there are multiple actions embedded in the original meeting notes, I spend a few minutes processing the set into single unique actions.

An alternative: from within Drafts select "Send to Omnifocus as note" (of course you have OmniFocus installed on your iPad for this to work). Drafts will launch Omnifocus and the notes of your meeting will be placed in the appropriate section of a new action. The only thing left for you to do is type in the name of the action.

This workflow has helped me immensely. I now have an efficient, standardized, searchable, multi-device method for recording and retrieving my meeting notes.

I’m really excited about this workflow–I hope it works for you too. Let me know what you think.

Appended March 2, 2013: Read this entry on why I switched from SimpleNote to Notesy.

Workflow: Capturing Ideas

Ideas are my lifeblood. Whether ideas for writing projects, grants, or to-dos, I need a simple method to get the ideas out of my head and into my system. An idea might come to me during a meeting, in the car, or on a walk. My system has to be fast, ubiquitous, and flexible. The less thought I have to put into capturing my ideas, the better.

Over time, my workflow for capturing ideas has evolved. You won't be surprised my system revolves around plaintext.

Here is the software you'll need for this workflow (you may also want to read my previous entries on why I use plaintext, Launchbar, and Drafts):

TextExpander allows me to type short key combinations (called Snippets) that expand into words, phrases, or even pictures. I use TextExpander constantly to type things like my email address (.hm expands to my home email, .wm expands to my professional email). I use similar combinations for my home address, my city, state, and my email signature. TextExpander is available for iOS devices (called TextExpander Touch) and is integrated into an increasing number of iOS programs. Under preferences, I choose to keep TextExpander Snippets synchronized using DropBox. I highly recommend this--identical snippets are then available on your Mac, iPhone, and iPad only needing to be entered once.

One must also have nvALT - Notational Velocity Fork installed on your Mac. Notational Velocity Fork is a special version of Notational Velocity that was developed by the genius, Bret Terpstra. It allows me to create text notes seamlessly and has a lightning fast search function. nvALT launches and I just start typing. Whatever I type becomes the title of my new note (after I hit return) while simultaneously searching the nvALT database for matching text strings. Hitting return finalizes the title and move the cursor down to a full note area. It's very fast. You need to check three settings in nvALT. First, be sure to set the "Read from Notes" drop-down menu to your desired folder. I synchronize to my nvALT folder in DropBox. Second, under the "Synchronization" Tab, make sure SimpleNote synchronization is OFF. Finally, under the "Storage" Tab, make sure you're saving as plaintext (not as RTF or HTML). If you choose this set-up, you won't be able to encrypt the nvALT database, but the trade-off in accessibility for me is well worth the price.

Next, make sure you have Simplenote Notesy installed on your iPhone and iPad. Notesy is a note taking program that synchronizes between your Mac and iOS devices using DropBox. Make sure Notesy is configured to synchronize with your nvALT folder in Dropbox hierarchy. I use Notesy as a conduit and for searches, but I rarely use it for writing.

The final programs you'll need are Drafts for iPhone and Drafts for iPad. As I discussed in my previous entry, Drafts is my go-to note taking app and has a place on the coveted home-screen of both my iPhone and iPad. I can get information entered quickly. Only after the information is captured, do I need to decide where to route it. Drafts gives me dozens of possibilities that I can personalize to show or hide.

IDEAS WORKFLOW: when sitting at my Mac and and idea hits me I invoke Launchbar (hitting Command-Space), type nv then return--launching nvAlt. Depending on what the idea is, I use TextExpander snippets. For instance ".wix" automatically types the following: WiPPPx - Untitled - 2012-12-10. I have a similar snippet for project ideas ".idx" expands to IdeaX - Untitled - 2012-12-10, and many others as well. All I have to do is change the "Untitled" to something descriptive, hit return and start typing. My idea or writing snippet is captured to nvALT (and is thus searchable via Spotlight, nvALT, or any other search utility I prefer). Because I've set up synchronization these idea files are available on my iPhone or iPad regardless of location.

If i'm on my iPad or iPhone and want to capture an idea, I use Drafts. Once I've completed the thought (using typing or voice entry), I must enter a title. Since Drafts is TextExpander Touch enabled, I can use my same Snippets to name the idea to convention (make sure TextExpander is open on your iPad or iPhone for the text expansion to work). I then route the completed Drafts note to Notesy (via the Drafts interface). It is saved, synchronized, and available on all my devices, all the time.

I can then search and find single or multiple ideas using the nvALT search interface. If I type "IdeaX" in the nvALT search box, ALL my ideas are returned in neat order. If, instead, I'm searching for a specific idea, I can be more explicit with my search terms, finding related items or even a single item.

Although this workflow takes a bit of set-up, the payoff is immense. Over time, I have accumulated hundreds of potential projects, text snippets, and more using this method. Many of them would have been lost, had I not had a quick and convenient way to capture them.

I hope you find the workflow useful.

Appended March 2, 2013: Read this entry on why I switched from SimpleNote to Notesy.


Writing Workflows: Processing Annotations (All Roads Lead to Skim)

One of the great things about the internet is its ability to enable collaboration--workflows are never static, each of us builds on the work of others to enhance our own productivity. After my last post, Writing Workflows: Capturing Annotations to Enhance Scientific Writing and Knowledge Retrieval, I received a boat-load of comments, suggestions, and links. Thanks!I suggest you take a look at an entry in Aleh Cherp's excellent Macademic blog. In a recent entry,  a guest author discussed  limitations with the built-in annotation tools of Papers, Sente, and Mendelay. His preference for annotating manuscripts is the open-source Skim. I've been playing with Skim recently (especially some of the post-annotation processing tools). I used Skim in the past, but curtailed my use in order to simplify my workflow (doing everything within Papers2). Despite the rich annotation tools in Skim, I set it aside because of the extra steps needed to make Skim highlights visible in Papers (and visa versa).As pointed out in the comments section of my last entry, the Achilles Heel of my annotation workflow is the need to separate my highlights / notes file by hand (Papers puts out a single aggregate file with all highlights and notes batched together). Although there are scripts available to send Papers2 notes to DevonThink Pro, I could never get them to work properly. I'm experimenting with a modification to my previous workflow--one that will significantly speed up the process:

  • I highlight and make notes in Papers2 on my Mac or iPad as I discussed in my last entry
  • When I've finished annotating, I make sure the most current version of the paper is synchronized back to my Mac. I then "Export PDF File and Media" from the File Menu in Papers2 and save to a convenient location (I use my Desktop). 
  • I then open the document saved to the Desktop in Skim and choose "Convert Notes" from the File Menu in Skim (this results in all the embedded notes being converted to Skim Notes).
  • I open and select the "Inbox" of my Literature Database in Devonthink (this is the location the script will save my comments).
  • With Skim still open, I run the following SKIM PDF Notes to DEVONthink script I downloaded here.
  • I return to my Inbox in Devonthink where I now have individual RTFs for each highlight or note. 
  • I insert my own comments (if I have any) in each RTF file and save each file. I ignore the link the script generates.
  • If I have a comment I plan to cut and paste directly into a future project, I append my comment with the Papers Citation Index.
  • In DevonThink, I highlight then drag and drop all the RTFs (but not the duplicate PDF of the paper) to the "Supplemental" Tab of the manuscript in Papers (this copies each RTF into the Paper folder hierarchy).
  • Finally, in Devonthink, I Index (the first time) or Update the Index (all subsequent times) - NOT IMPORT - the folder. 

The SKIM PDF Notes to DEVONthink script saves me quite a bit of time--I no longer have to parse my comments by hand. Happy writing!

Writing Workflows: Capturing Annotations to Enhance Scientific Writing and Knowledge Retrieval

As I mentioned in a previous post, reading and writing are central to my academic career. I am a voracious reader. I not only have to keep current in my clinical specialty, Anesthesiology, but also in my research areas, Simulation and Games Based Learning. Because of this, I’ve developed multiple workflows that make reading and annotating more enjoyable, efficient, and useful.I’ve mentioned my preference for Papers2 app to keep track of scientific publications. What I didn’t mention is that I’m a prodigious highlighter-it is not uncommon for me to mark up a single manuscript with dozens of highlights and notes. Keeping track of the information in manuscripts AND my thoughts about what I read used to be a real chore. Before Papers included highlighting, I had a complex workflow to accomplish this feat. Now it’s relatively simple.As I mentioned, when working with scientific literature, I like to batch operations. I go on paper collecting binges where I do little (if any) reading. Only after I’ve completed my collecting, is it time to read. I actually schedule time on my calendar to read, annotate, and synthesize ideas.This entry is about my annotation workflow–and how I use technology to speed up the process of retrieving concepts when writing and citing.I do most of my reading (and annotating) on one of two devices: my Mac or my iPad. I read so much, it’s hard to keep track of all the ideas. There are few things more frustrating than knowing I’ve read something, but being unable to find the source. This workflow alleviates the stress of finding relevant information in my library. But even more than that, using artificial intelligence in a tool called Devonthink, I can find links between concepts that were not initially apparent to me.This workflow has been a personal success. Before implementing this workflow, I could spend hours trying to track down an appropriate reference. Since implementing this workflow the same task takes seconds.I also wanted to thank Derek Van Ittersum (Kent State | blog) for inspiring me to polish this workflow–I had a chance to collaborate with Derek on the Mac Power Users 100 show.Programs needed:  

Setting Things Up

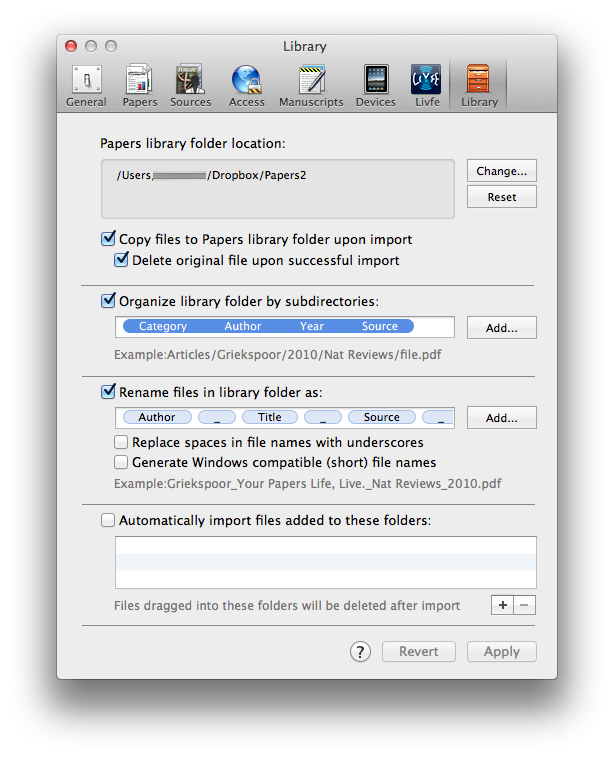
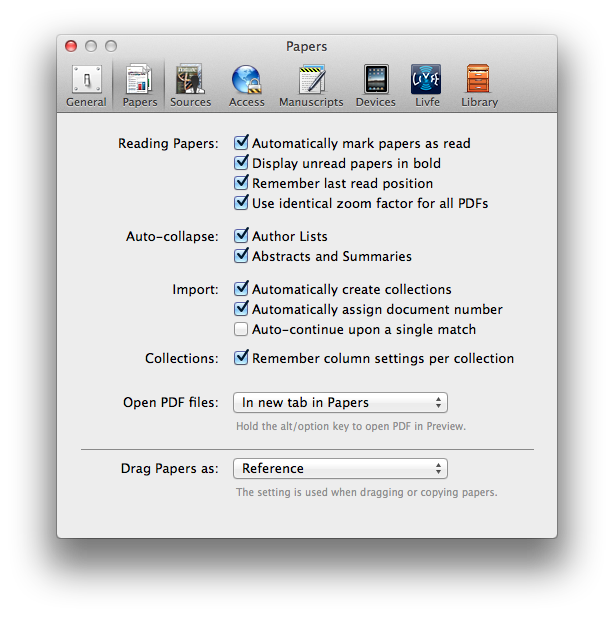
I’m assuming you’ve already installed DropBox on both your Mac and you iPad. As I discussed in a previous entry, I configure Papers save PDFs to a designated folder Dropbox. I set this up by navigating to the preference menu in Papers and designated my preferred folder you in Dropbox. I do this to have the PDFs in my Papers collection accessible from anywhere and by any tool.How Papers handles PDFsWithin the Papers preferences, I’ve configured Papers to launch a PDF in a new tab (using Papers itself, NOT an external PDF reader).Launch PDF within Papers
Annotating

Papers on the Mac and iPad have built in highlighting tools (on the Mac, invoked by hitting the control key over highlighted text, or on the iPad by holding a finger down and dragging). As I highlight or make notes in Papers , a separate layer is created in the PDF that keeps track of annotation information. As I annotate, each highlight and note appears under the “Notes” tab in Papers.Notes Tab in PapersIf I find a paper I’d like to read that’s not in my library I copy and paste the title and author to my OmniFocus Inbox-to be gathered during a future collecting binge. This way I don’t interrupt what I’m doing.After I’m done highlighting and note taking, I write a single summary note that captures the essence of the paper. At this point I also tag the paper Papers Keywords. Once I’ve completed my summary, if I’ve been reading on my iPad, I synchronize the PDF back to Papers on my Mac. After syncing, the annotations I made on the iPad are available on the Mac (and visa versa). If I’ve been reading on my Mac, I don’t need to synchronize to perform the next step.Once the annotated PDF is in the Papers collection on my Mac, I go to File:Export:Notes within Papers (make sure the “export selected paper” is highlighted and RTF is selected) to export a Notes file to a folder on my Desktop. RTF format is important–Devonthink relies on it.Export Notes from PapersA limitation of Papers is that it can’t export each note or highlight separately–it dumps all my annotations into a single file. I open the file and cut and paste each individual note (that represents a single highlight) into its own file. I then comment on the highlighted passage. Finally, I use the “Magic Manuscript” feature of Papers (invoked by hitting my Option Key twice) to append the citation reference to each statement.Extracted Note with Magic Manuscript CitationFinally, I drag each RTF into to the “Supplemental Files” tab of the Papers. This saves each comment in a supplemental folder residing side-by-side with the manuscript in the Papers Dropbox hierarchy.Adding RTF to Supplemental Files in PapersThe next step of the workflow uses the “Indexing” feature of Devonthink Pro Office. Using Devonthink, it is possible to index (or reference) any folder on your hard drive. This makes the contents of PDFs and RTFs available to Devonthinks Artificial Intelligence without directly importing the information into a Devonthink Database.I created a Devonthink Literature Database that indexes (does not import) my Papers2 Folder. I did this the first time by opening the File:Index… Menu item in Devonthink and navigating to the Papers Folder in Dropbox. All subsequent updates are done by opening my Literature Database, highlighting the indexed “Papers2” Folder, and navigating to File:Update Indexed Items. Indexing can takes quite some time–be patient.Devonthink IndexingThis all sounds complicated, but trust me, it’s worth it. What this allows me to do is open Devonthink and find any statement, concept, or related item quickly. I can then cherry pick comments related to my search and paste them into a draft document with little modification.When I’m writing, I take all related concepts and paste all of them into a single card in Scrivener. This allows me to arrange, and rearrange information to help support my argument. Because I took the time up front to include the Magic Manuscript Index from Papers, no further searching or citation work is needed, until I’m ready to format my bibliography.Scrivener for iOS is under development–it is likely my workflow will change when it is released. Instead of using Scrivener, one might consider using Tinderbox –Derek’s tool of choice or the newly announced Scapple (by the makers of Scrivener). I will cover the next step of the writing process using these tools in an upcoming entry.

Closing

In this entry I’ve covered my annotation workflow and how I make use of my annotations when writing. Using Dropbox, I can access my highlighted manuscripts from anywhere. Using a combination of Papers and Devonthink I can make use of my annotations saving me countless hours of time when writing.

Drafts for iPad

I was talking to a colleague today about how I quickly capture notes on my iPhone and iPad. My goto app on the iPhone is Drafts (by Agile Tortoise). Drafts lets you get stuff out of your head and on to your device quickly. Once you've captured the information, you can decide what to do with it (e.g. send to Facebook, Twitter, save as a text file, Omnifocus, or a whole host of other possibilities). 

While Drafts was great on my iPhone, it wasn't available on the iPad--until now ($2.99 on the App Store). 
Drafts is now on the first screen of both of my iOS devices. Thanks Agile Tortoise!